Tag: distress inks
-
The Greetery – Merry Christmas Gifts!
Hi creative and crafty friends! It's my turn on The Greetery Blog today, and I'm sharing my project here too! Hope you're doing great and enjoying this beautiful Fall season. My birthday is over, and voting day is over. It will be Thanksgiving before we know it…and then Christmas! The rest of the year is going to fly by!! For my project today I created a classically red and green Christmas Card using the gorgeous Gifts Galore Stencils and Dies… This card is nice and flat for mailing too! I added a bit of sparkle to it, and I used the new Warm and Cozy stamp set for the perfect sentiment. Time to make Christmas cards for sure!My finished card is an A2 white card base. I layered green patterned paper on top of the white card base. To begin the card I used the Gifts Galore Stencils and kept my colors to only red and green. This idea has been in my head for a long time and I really like how it turned out. I used two shades of red and two shades of green for a clean monochromatic look. I die cut the bows and ribbons using the Gifts Galore dies – and used bright gold cardstock.I trimmed my presents panel down to 4" x 5.25". I glued all the gold pieces onto the gifts and then added a few pearls as embellishments. I heat embossed the pretty sentiment onto vellum using white embossing powder for an elegant look. I wrapped my vellum strip around the presents and affixed that whole panel to the card base. I couldn't resist adding a few snowy white paint splatters too!My 60th birthday was this past Sunday and I had a wonderful day! My husband spoiled me rotten and I am so super grateful!! On to a new decade as a sassy old lady! -
The Greetery Summer Watercolor Butterfly Card!
Hi there my creative and crafty friends! I'm up on The Greetery Blog today to share a project with you! I am always so excited and happy to share with you over there! And of course, sharing my card here too. Hope you had a great 4th of July! Sacramento has been HOT. Gosh, so hot. We are set to break an all time record for most days over 100 degrees. I think my brain is cooked! I'm laying low and moving slow…. For my project for today I created a watercolor card with a nature theme and an all purpose sentiment. I haven't made a watercolor card in a while and I was inspired by the pretty butterflies of Summertime…. Simple and airy for the season….My finished card is an A2 size Kraft card base, layered with watercolor paper die cut with the beautiful A2 Scallops Dies. All the die cut pieces on this card were made using watercolor paper. I kept the design clean and simple and let that pretty purple butterfly shine! All the coloring was done with my set of Mini Distress Inks and a water brush… I do love this technique.I started by die cutting the Fern Dies, the Butterfly Dies, the background panel and the sentiment panel from watercolor paper. I used Distress Inks and water brushes to color all the pieces and set them aside to dry. For the background I used a wet on wet watercolor technique: Put down a good amount of clear water onto the paper, then add the blue ink into the water and let it spread out into a free form shape! I use a large brush for the plain water and lots of water…. You never know what you'll get with this and I love that!!After all my pieces were dry, I glued together the Fern and the Butterfly using liquid glue. I added a purple enamel dot to the butterfly. I stamped the sentiment in brown Distress Ink and then went over the writing with a detail water brush to make it 'messy.' I assembled all the elements together and I used foam tape to attach the sentiment. I do love the greens against the bright purple butterfly….That's it for my project for today! I hope you have a fantastic and creative day! I look forward to sharing with you again soon. In the meantime, happy crafting! XO Wanda -
Happy (Good) Friday! Mr. Rabbit is ready for Easter!
Hello and Happy Friday! Happy GOOD Friday! Easter weekend is upon us! I have time to squeeze in one more Easter card today! Hope you had an awesome week and I'm wishing you a lovely Easter with your family and friends. Easter came so fast this year! I don't prefer it when Easter is in March – it seems like it just happens too fast! Well, ready or not it's here! And then on Monday it's already April!! Spring crafting continues!
My card for today features a wonderful new stamp set from Tim Holtz and Stampers Anonymous release just in time for Spring this year. I have seen soooo many great cards and projects people have made with the new set!! The new stamp set is called Mr. Rabbit and it's the sweetest vintage bunny wearing a suit (of course), and the stamp set comes with different accent elements. I got out all my Tim Holtz supplies and created a vintage style Easter card in pretty blues…. My finished card is an A2 kraft card base, layered with plaid, and blue, and then cream. I added tons of stuff to this card, as I love to do!!
I started my card by stamping the bunny image in brown ink three times! I stamped him once on the cream rectangle panel, then twice more on scrap paper. I fussy cut out one bunny, and then fussy cut out his suit lapels and his bow tie. I colored the bunny image with Copic Markers and added glitter to his ears. The reason I stamped him on the cream rectangle first is so that the whiskers would show. I was worried I wouldn't be able to fussy cut them perfectly!
I die cut out an oval using the Tim Holtz Vintage Labels Dies and stamped Happy Easter in brown ink.
I stamped two Easter eggs in brown ink and colored them with Copic Markers. I also used a generous amount of glitter to make them look like sugared eggs! SOOO fun!
The flowers are from a Tim Holtz ephemera pack and I loved the blue tones for this card!! All the pieces are inked around the edges with Distress Ink!! I also added glitter to the flowers (you know me!)
I hand dyed some crinkle ribbon using different colors of Distress Inks. I wrapped the ribbon around the bottom of my card when assembling, and tied a pretty bow!!
The most fun part I think is that I made him a REAL flower boutonniere! Ha! I have Baby's Breath flowers all around my house right now as part of my Easter decorations. I snipped off a few tiny flowers and made him a flower spray for his suit jacket!! Hee hee. I wrapped a tiny strip of blue paper around the stems to hold them in place. They will dry out and look vintage!!
Okay, I think that's all the elements! Now, for my assembly process…. I stamped the polka dots in the background on my cream panel (the polka dot stamp is part of the new stamp set). I used foam tape to adhere the rabbit onto the card. Then I glued on his coat lapels and bow tie. I tucked the flowers under the rabbit and I placed the eggs near the bow. The sentiment is also attached with foam tape at the top of the card. I glued on his boutonniere and added a few sparkly blue gems.
Here's a close up of my layers. The plaid paper is from a (many) years old paper pack in my stash….
Happy Good Friday. The most important day. I took this photo the other day in front of our church because the clouds were spectacular! I feel like this photo conveys the mood and importance of this somber day.
Thanks for stopping by today! Thanks for your support and kindness. Again, wishing you and your family a lovely Easter!! XOXO
-
Graceful Watercolor Leaves with The Greetery!
Hi there my creative and crafty friends! Happy weekend! This past week I had the honor of having a project featured over on The Greetery Blog! I wanted to make sure to post my card here for you as well. I know we're switching between a lot of things lately…Fall, Christmas, Halloween! Tis the season for sure! My Greetery project is an ode to fall….because my heart is still happily in Autumn mode and I am excited about falling leaves and crisp mornings… This is what inspired my card for today! I tried to capture the serene mood of a Fall morning with a bright blue sky and pretty trees…. I kept it clean and simple and graphic….My finished card is an A2 white card base that I covered with Woodgrain cardstock. The rest of the card pieces are all watercolor paper for a nice creamy look. I am featuring one of my favorite Greetery stamp sets – Autumn Sketches! I used the matching Autumn Sketches dies along with the beautiful A2 Arches dies and the Blessed Blooms Stamp Set.I used one of my favorite techniques – which is stamping with Distress Inks and then water blending the inks to mimic watercolor painting. This is such an easy and fun technique that gives great results! I started the project by using Distress Ink pads to do my layered stamping – one layer brown for the branches, and then yellow and orange layers for the leaves. After I was done stamping, I die cut out the branches/leaves clusters. I then took my water brush and "painted" over my stamping! I also went back in and added a bit more color to some of the leaves….I die cut out an arch, using the A2 Arches dies. I again used Distress Ink Pads in blues (smushed onto a stamping block) with a wet on wet watercolor technique to make my blue sky background. The sentiment is very simple to match the mood…. I used my MISTI and brown ink for perfect placement. For my finishing touch I added some clear enamel dots.That's it for my card for today! I hope you are enjoying a happy Autumn season…. I'm wishing you a wonderful and creative day and I look forward to sharing with you again soon. In the meantime, happy crafting! XO WandaCLICK HERE or on the graphic below to see the supply list and links for today's card! (Affiliate Links Used) -
Pretty Pink Posh – September 2023 New Release Blog Hop! Cozy Days and Autumn Greetings!
Warm Fall Greetings my friends! I am VERY happy today to share some warm and cozy Fall cards with you!! Happy Fall Y'all! I've been getting in the mood for sure, and these cards today will hopefully get you in the mood too!! Today is day two of a big blog hop celebrating the new September/Fall release from our friends at Pretty Pink Posh. Paulina has crushed the fall mood for us and I know you're going to love it all just as much as I do! I had the best time making cards with the new release, and I was smiling the entire time! I hope my cards today get you in the mood to switch seasons! I have two cards today, and then I'll share another card next week when we do the Instagram Hop. The new release is already available for shopping!!
CLICK HERE TO SHOP THE NEW PPP FALL 2023 RELEASE!!
My first card today features the newest addition to the 'mug' collection! The Fall Mug Additions dies go along with all the other mug series dies, and I created a warm and cozy scene with a Pumpkin Spice Latte theme (of course!)…. I used a new stencil, and new sentiments too!! Everything is orange and brown and warm….. I love how this card came out! My finished card is an A2 cream cardstock card base, layered with pretty brown plaid. Then my top layer and design elements….
Here's a close up of my paper layers and a close up of that pretty new Deco Leaves stencil! I used Antique Linen Distress Ink and a blender brush to make the soft background. It's perfect!! The brown plaid screams FALL!
Here's a side view to show all the layers and elements… The mug was made with three stacks of woodgrain paper and the lightly shaded with Distress Ink. The pumpkins and leaves are from different sets (Supplies are listed at the bottom of my post)…. I kept my color palette to orange, cream and brown mostly, with a touch of gold…. Also, yes, that mug is wearing a scarf!!!! I am obsessed!!!! Doesn't this make you want a PSL right now??!!
Cozy days indeed! This die cut sentiment comes with the Fall mug additions set…. I made an orange and cream straw using the birthday candle from the birthday mug additions set!
All the pieces were die cut from colored cardstock and then shaded with Copic Markers… Then some white paint splatters and some Diamond Stickles glitter glue on certain pieces.
My second card for today features the brand new Acorn Shaker Die set, and the new Autumn Pumpkins Stamp set…And another gorgeous new stencil, Layered Woodland… My finished card for this one is a square 5.5" x 5.5 " because I really wanted to showcase all of the stencil!! I again kept with a warm Fall color palette with gold accents and also some vellum.
I die cut the acorn from dark woodgrain paper and a rust colored paper. I splashed gold paint on everything to look nice and shimmery…. The sentiment was gold embossed onto cream cardstock.
I used cream cardstock for my stencil portion. I think it's just warmer with the rich fall tones. I used lots of Distress Inks to make the elements…and white ink to make the spots on the mushrooms. LOVE!!!!
To finish off the stem of the acorn, I wrapped it with thin twine and added a button and a heart… I always love the little touches…
The leaf on the acorn is from one of my favorite PPP sets – Small Stitched Foliage! I wanted a pop of Olive on there….
Thanks for stopping by my blog today for this fun introduction of the new release and for the exciting blog hop! It was nice to share with you! Have a great day today and keep on crafting! I hope you feel all warm and cozy inside!! XOXO
BLOG HOP PRIZE INFO! There are THREE $30 gift certificates up for grabs (one winner each day of the hop). Winners will be picked randomly along the blog hop from all the comments. Comments must be left by 11:59 PM PST on 9/19!! Winners will be announced on the PPP blog. Good Luck!!
-
The Greetery – New Beginnings Collection – New Release Day 1!
Hello friends! How's your week going? Well, I think it's going to get a whole lot better! Because I'm here to share the product and project reveals for the March 2023 new release from The Greetery! Yay! This release is called "New Beginnings" and it's all about Spring and Easter! We will have two reveal days this release – today and tomorrow. The design team will be sharing projects on our blogs and revealing all the new products for you. SO exciting! The new release is pretty and happy, like a breath of fresh air. Flowers and bunnies, and everything that signifies "new beginnings!" RELEASE DAY will be Friday, March 10th at 10am EST. I have so many cards to show you, and I can't wait. It made me smile creating everything with a spring color palette and gorgeous new stamps, dies and stencils. Are you excited?? You know how I am, so grab a cuppa, because there are lots of pictures today!
THE NEW RELEASE DAY IS FRIDAY MARCH 10TH AT 10AM EST!
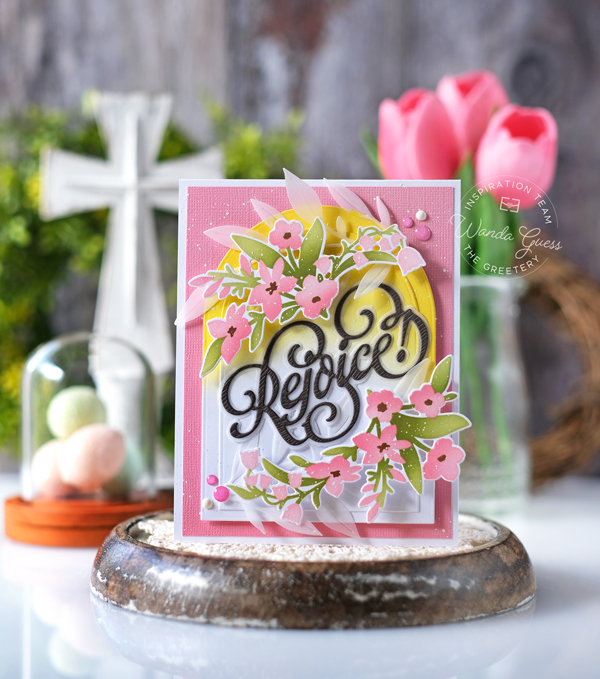
My first card for today features the brand new Spring Sprays stencils and Dies, and the brand new Rejoice Dies… I used the previously released Arches Dies and the Ruscus Dies too. I intend this one as an Easter card so I used pink and yellow and green for my color palette – a nice coral pink!! My finished card is an A2 white card base, layered in pink, then two arches, then my design elements.
Here's a side view to show my layers. I die cut the rejoice die from dark brown woodgrain cardstock (see the supplies) and layered it with vellum. I like the dark color in contrast with the bright pastels.
I layered some vellum sprigs under the stenciled Spring Sprays elements!!
The flowers and leaves are from a stencil set and then die cut out with the matching dies. I used Distress inks and blender brushes to get a nice layer of color. I splashed on some white paint for an artsy effect. When I put the Sprays onto the card I used foam squares to raise them up.
I used yellow Distress ink and my blender brushes to ink just the top parts of the arches. I first had the card with just white, but I felt like I wanted a pop of color behind the florals.
A few enamel dots to finish off my card!
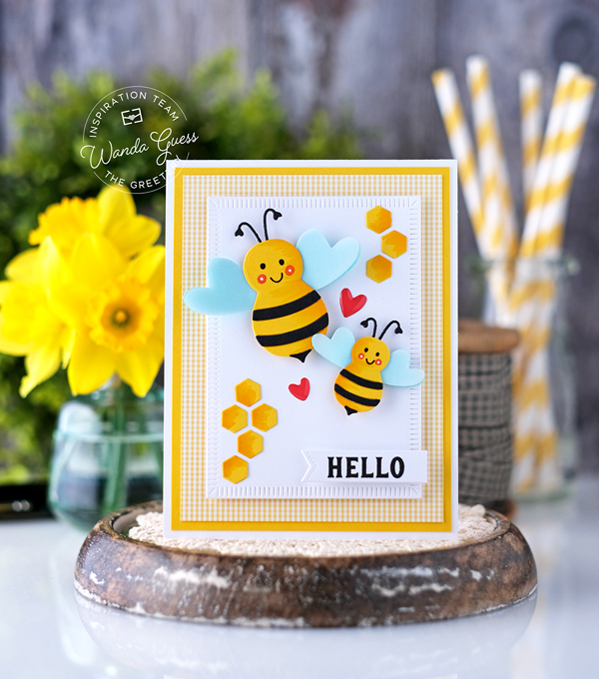
My next card will make you smile!! This card features the brand new Baby Face Bee dies and Baby Face Stamp Set! I also used the Honeycomb Corners to add a few little bits! I kept this card clean and simple and bright! The new Baby Face Collection is ADORABLE!!!! OH my gosh! Bees, Elephants, Sheep, Sweet Peas, and more!! For baby cards and new beginnings! I chose to use the bees and make a hello card! My finished card is an A2 white card base layered with yellow and some gingham from my stash…
I die cut the beeeeees from yellow and black cardstock. I added some subtle shading with a Copic Marker. I used the Baby Face stamp set to add the eyes, mouths, and cheeks. For the wings I doubled up with aqua cardstock and vellum cardstock.
I also shaded the little yellow honeycomb bits – by using a Copic Marker. Here is a photo of my layers…
The bees are attached to the card with foam squares. I added a few hearts, well just because.
My last card for today features the brand new Bunny Kisses Dies, the brand new Tear Strips Spring stamp set, and the brand new Ribbon Maker -Egg dies!! I chose three of the pastel colors of the ribbon paper to make my background on kraft! My finished card is a white A2 card base layered with aqua and then kraft.
I die cut the egg strips from pink, blue and lavender and glued them onto a kraft panel on a diagonal… This made my pretty background. I die cut a white circle for my focal point.
I die cut out the sweet bun bun and the eggs and attached them inside the white circle. Isn't he so cute!!? this just really says Easter!!
For the sentiment I used the previously released Tear Strip Tags Dies along with the brand new Tear Strips Spring stamp set!! LOVE.
Yiipppppeeeee for a new release!! That's it for day one of the new release reveals! Be sure to come back tomorrow and I will be sharing three more cards featuring the new items! Yippeeeeeee! What's your favorite thing so far? And how cute are those bees? I can't take it! The new release will be for sale on Friday, March 10th at 10am EST. See you tomorrow! XOXO
PRIZE INFORMATION! The Greetery will be giving away two $50 gift cards each day of the hop, To be entered to win, leave a comment on each blog for today! Random comments will be chosen and announced on The Greetery Blog!
CLICK HERE TO SHOP THE GREETERY STORE!
CLICK HERE or on the graphic below to see the supply list for these cards! (Affiliate Links Used)
DESIGN TEAM INSPIRATION LINKS FOR TODAY!
-
Friday Fun with The Greetery and Beautiful Birthday Balloons!
Hey hey hey everyone, my crafty friends! I've missed you a lot and I think I'm back to sharing! I really really miss blogging, sharing, and interacting with all of you. I have to be honest, I haven't been myself here lately and so I've been cocooning and taking care of myself. I am exhausted and mentally and physically just not feeling well. When I don't feel good it is very hard for me to create. 2023 has already been a super hard year at our house – lots of stress and anxiety for both myself and my dear husband. If it can break, or go wrong, it has….and I am burned out. We always turn to the Lord for comfort and He always provides for us. We will be fine as we always are. Just seems like a lot of tests lately. My soul hurts and I want to be my old loud, crazy, silly self. But not yet – sometimes there is just the need for a season of rest and quiet. I have been creating the past few days and I have SO many projects coming up. SO much good stuff from our favorite companies. I look forward to sharing with you and hearing from you. I hope you are doing well, and getting crafty. I hope to inspire you and be inspired by you! XOXO
Today, I'm up on The Greetery blog with a fun, pretty in pink, birthday card! My card features all supplies from The Greetery, including the gorgeous Balloon Bouquet stamps and dies along with the awesome Square Dance Stencils. My finished card is an A2 card base in white, layred with pink and some stenciled gingham….and more of course….
Here's a side view of my layers…. I die cut out an Arch with the A2 Arches Dies to serve as a frame for the stenciled gingham. I made my focal balloon with the floral spray, and then die cut more balloons from vellum and pink cardstock. Love this soft look!
The Balloon Bouquet stamps are SO pretty and unique!! I used soft pink and green distress inks to stamp the flowers. I really like this color combination. I used the same green distress ink to gently ink blend the bottom of that one large balloon. I stamped and heat embossed the happy birthday sentiment in my favorite silver glitter embossing powder.
I used the Cake Pops Banner and stamps to make a smaller sentiment of hip hip hooray! The 'strings' were die cut from silver glitter cardstock.
The Square Dance Stencils make a gingham/buffalo plaid and you can use up to three different colors to make your plaid. I wanted it to be super soft, so I used all three of the stencils with the SAME color of pink ink! Fresh and pretty!
I am completely obsessed with these glitter drops and added lots of pretty pink sprinkles to finish off my card! (supplies are listed below)
That's it for today! Happy Friday! I hope you have a fun weekend planned! It has been very very cold here!! The snow line is LOW – like only about 20 miles from us. We are staying in this weekend except for church. I hope you're ready to see a lot of me next week – cards are coming! XOXO
-
Pretty Pink Posh September New Release – Fall Blessings Wreath!
Hi sweet friends! Hope you're having a great week! What's new?? We finally have gorgeous fall weather here, and I am like a new woman! Spending lots of time outside finally and decorating the house for Fall….Opening the windows and generally doing good! And we had some glorious rain too! It's my favorite season. And, once again, I have so many ideas, and I'm already thinking I'm going to run out of time to make everything!! What have you been crafting?? Last week – thank you for all the super nice comments on my post for the new release blog hop for Pretty Pink Posh!! As with every new PPP release, there is also an Instagram Hop – and that's today (today is day three of the IG hop)!! Celebrating the new release from Pretty Pink Posh for September 2022!! So if you have Instagram, be sure to head over there and leave a comment for a chance to win some prizes, and to see all the other card makers' inspiration! Click here for my Instagram!
My card for today features the brand new Autumn Leaf Wreath stamps and dies. I LOVE the Pretty Pink Posh wreath series, and this new one is a beautiful addition to the collection! My finished card is a white A2 card base. I did some pretty distress ink blending and then featured that pretty wreath. I also added a few elements from some of the Fall items released last year. Supplies are listed at the bottom of my post!
Here's a side view of my layers. No colored cardstock or patterned paper on this one! Just clean and simple layers. Both the ink blended layer and the wreath are attached to the card with foam tape.
I started this card by ink blending the background! I used orange and teal because those are my favorite Fall colors! I inked the color on with blender brushes and gently faded to white in the center. After I ink blended, I die cut out the panel with a stitched rectangle die. I used silvery watercolor paint to splash on some shimmery bits!! I added white and clear enamel dots also.
I set my inked panel aside to dry, and started working on all the other fun things. I stamped everything with black ink, and used Copic Markers for coloring. I added white gel pen accents as I love to do! I used the Falling Leaves Stamp Set and the Fall Corners Stamp Set to make my grouping of leaves and pumpkins on the left side of the wreath.
I lined up my sentiment to go into the center of the wreath… Tip – use washi tape to tape the wreath down and then stamp inside for perfect placement!
I tied on a little twine bow….
Here's a close up of my cluster of fall goodness!!
That's it for today!! Be sure to check out the Instagram Hop – prizes too! I'll be back soon with more projects!! Until then I'm sending Fall Blessings! Happy crafting! XOXO
CLICK HERE TO shop the new PPP release!
CLICK HERE or on the graphic below for the supply list for today's card! (affiliate links used)
-
The Greetery – Calico Fields New Release – Day 2!
Hey there!! Welcome back to Day Two of release week for The Greetery's new Calico Fields Release for Fall 2022! Yesterday and today, the design team is sharing all of our projects and revealing the products from the new release! And, release day is tomorrow, September 8th at 10am EST! Be sure to look at all the design team's cards from both days! Prize information, supplies and design team links are at the bottom of my post! I have three more cards to show you today showcasing all the new goodies! Are you as excited as I am?? Can't wait to show you more today!!
First up is this FALL card featuring the brand new Stencilscapes – Autumn, and the new Thankful Heart stamps and dies!! My finished card is a woodgrain A2 card base. Then the one layer of stenciling! You guys!! OH MY GOSH – these stencils are so cool!!! It's eight stencils to create this amazing countryside scene. I loved making this!! I've never seen anything like this!! You're going to love it too.
The stencils have an opening near the bottom for your sentiment. Genius. I used the Thankful Heart stamps with matching dies to place my sentiment perfectly in that open space. Betsy really does think of everything.
I mixed and matched all kinds of ink pads and used my small and large blender brushes. I love that small touch of blue in there along with all the warm tones. This card makes me happy.
Even when stenciling, I like to add some shading by going over the pieces with more ink, or a darker color ink. Gives it a bit more life I think.
My next card features the brand new Time For Gratitude stamps, stencils and dies. This new suite works perfectly with the previously released Hourglass dies. My finished card is an A2 white card base, layered with some pretty gingham. Then those dies and stamps are the star of the show. I used a vellum background in the hourglass also.
I decided to go with a pretty lilac and yellow color palette and I like how it came out!! So soft and pretty. In this photo you can see the amazing detail that you get with the matching die. I mean really…could it be more perfect??
I added pearls to my hourglass frame. The frame was die cut from woodgrain paper and the inside of the frame from purple paper.
There's always time for gratitude – indeed!!
And my final card for release week – features the brand new Rolling Hills stencils and dies, the brand new Countryside Dies, and the brand new Warm and Wonderful stamps and dies. Lots of new new new!! Again, another set of super innovative stencils and dies that work together. Here, you can create a rolling countryside of your own!! Use the dies and stencils, or just one or the other… Mix and match in houses and barns and trees… There is no limit!! My finished card is 5" x 5" square card made with cream cardstock and woodgrain cardstock…oh and lots of ink pads!!
I started by die cutting the entire die from cream cardstock. I used Distress inks to color in all the hills using yellows and different shades of greens. I splattered on some gold paint and set it aside to dry. I die cut out all the houses, barn, fences and trees from cream cardstock. I also used distress inks to color these elements.
For the sentiment I used the stamps from the Warm and Wonderful (coffee) set. I stamped onto an oval and inked the edges of the oval to antique it a bit. I added some enamel dots too….
Okay friends! That's it for all my projects for the new release! What do you think? What is your favorite item?? I have thoroughly enjoyed showing you all the new goodies! Remember the new release is live for sale tomorrow – Thursday, September 8th at 10am EST! I am so excited for you to create with these pretty supplies! I know they will bring you joy as they did me. Happy Autumn indeed!! Happy Calico Fields!!
PRIZE INFORMATION! The Greetery will be giving away two $50 gift cards, To be entered to win, leave a comment on each blog for today and yesterday! Random comments will be chosen and announced on The Greetery Blog!
CLICK HERE TO SHOP THE GREETERY STORE!
DESIGN TEAM INSPIRATION FOR TODAY!
-
Fun Fall Apples Cards with Taylored Expressions!!
Hello friends! Or should I say "Happy Fall Y'All!" Today is September first, can you even believe it?! I am super excited that the 'ber' months are starting and Fall is coming! Yeah!! Happy September everyone. I hope you're having a great week so far. It's funny to me how crafting goes in cycles and trends, kind of like fashion… A few months ago it seemed like all the companies were making bee themed items. Before that it was hexagons, or lemons… Well, right now the trend seems to be Apples! Which is totally okay with me. I love a good apple stamp/die/stencil. A week or so ago I was cleaning out some things and came across some of my older dies from Taylored Expressions – the Apple Stacklets and Postage Stamp dies (sadly both are discontinued)…. And an idea popped in my head for some cards. I'm sharing my apple cards today in honor of turning the calendar over to September today!
I have two cards to show you! Both cards were created with the same focal element – pretty watercolored apples! The first card is a kraft A2 card base. I layered watercolor cardstock with a beautiful die cut pattern, some twine and a few hearts. Then the apples steal the show!
To watercolor everything I used Arteza watercolor paper and my favorite Mijello watercolor palette!
I splashed on lots of water and splatters to get this cool mottled effect on the apples. I love to pop in a bit of teal when I watercolor leaves…
Here is a close up of that gorgeous Swirls background die. This is a favorite!!
I used a few clear droplet enamel dots to look like morning dew on the leaves!
My second card is a cream A2 card base. I layered kraft and some gingham on this one! The sentiment stamp says Happy Fall Y'all like on this card. For my first card I taped off the Y'all part and just stamped the Happy Fall. This is a great way to get more use from your stamps!
For the background on this one I used the pretty cable knit embossing folder in kraft! LOVE the texture on this!
The apples are attached to the card using foam tape to make them pop!
That's it for today! Happy September! Enjoy your day and happy crafting! XOXO
-
The Greetery – Breath of Spring New Release – Day 1!
Hey, hey, HEY!! It's an exciting day! Today, the team is kicking off a brand new, beautiful release from The Greetery! The new release is called "Breath of Spring" and it surely is a breath of fresh air! Florals and bunnies and Spring icons, and more florals! It's all so very very pretty! I can't wait to share my projects with you! Today and tomorrow are project and product reveals, and then the release will go live for shopping on Thursday March 17th at 10am EST. I am quite sure you're gonna like it! Are you excited for Spring? I am!
Today I have two cards to show you and they are very different! One is a bold and bright floral and the other is a sweet pastel scene. Something for everyone I think!
My first card features the brand new Print Shop Spring Mix Stamp/Stencil/Die combo! The florals fill the front of an A2 card perfectly and you can make your florals any color combination. My inspiration for my card was Rifle Paper Co – so I went with bold colors (Distress Inks) and a dark black background. Oh, and pops of gold too. My finished card is an A2 white card base, layered in black, and then the floral. I used vellum and gold embossing for the sentiment.
Here's a close up of the new floral. It's a set of stencils – super easy to use!! I added Copic Marker accents over the stamping and I also splattered the entire thing with gold paint. I used black enamel dots for some of the flower centers.
I heat embossed the pretty sentiment onto a vellum strip and wrapped it around the layers.
I love these colors all together. Truly like a big burst of SPRING time!
Next up is a sweet sweet little bun bun holding an umbrella from the Spring showers! This card features the new Springtime Stamp Set and Dies. This stamp set pairs perfectly with the previously release hourglass dies!!! I chose to use the elements without the hourglass. My finished card is an A2 white card base, then a bit of gingham, then some blue and more white.
The sentiments in the new stamp set fit onto the Christmas Time Banners – so you can use them to stamp and die cut them out as I did here. The umbrella is two step stamping – so easy.
That little bunny is just too cute. This stamp set would be perfect for baby shower invites, Easter, or Springtime!!
I used a cloud stencil, Distress Ink, and blender brushes to ink a few clouds over the umbrella. The raindrops are stamps that are part of the new set.
Okay, friends, that's it for day one! We will be back tomorrow with more inspiration and more new items!! Can't wait to share more with you. And remember the new release is live for sale on Thursday March 17th at 10am EST.
As usual, Betsy will generously be giving away two $50 gift certificates for the blog hop. The winners will be selected from comments left on all the blog posts! Good Luck!!
CLICK HERE TO SHOP THE GREETERY STORE!
CLICK HERE or on the graphic below to see the supply list for these cards! (Affiliate Links Used)
DESIGN TEAM INSPIRATION FOR TODAY!
-
Pumpkin Treats for Halloween Week!
Hi there! Where is this week going? It sure is flying by so fast! Halloween Week! I have one more project and then I'm going to have to save all the other projects for next year…. Should I start now perhaps? Lol! I hope you're having a good week! Today I'm sharing some adorable ADORABLE treat wraps made with a die from Taylored Expressions. It came in the mail last week (just in time) and I sat down right away to make these! Candy treats are so much fun to make and these are super easy too!
CLICK HERE FOR THE SUPPLY LIST!
I used the Pumpkin Treat Wrap Die to make lollipop treats! Bright orange, happy jack-o-lanterns with a sweet surprise in the middle! I used pretty orange cardstock, distress ink blending, and cute twine. I was thinking – how could I use this shape for other things…. I think you could make them into Thanksgiving treats too – without to face! And maybe somehow make an easter treat? Maybe some bunny ears? I'll get the wheels turning on that. I used Dum Dum pops for the treats, but the Hershey Nuggets would work great too! The space inside is pretty large… Anyhoo…. On with the photos!
The die is all one solid piece to make wrap. Then there is an overlay piece and a stem piece. It comes together so easy. I was able to make four on one sheet of cardstock. You just cut and fold the wrap, add the over lay and the stem! I stamped the face using my MISTI for a nice dark impression. The die has holes already cut out in it for the twine to come through. No gluing it together!
I splattered on some white ink to make it look festive. On the stem I used a Copic marker to add shading and then white gel pen and some TE Tiny Diamonds! You could jazz it up as much or as little as you want!
I also added a button when I tied the twine together. I glued on a little halloween banner too!
I used two shades of Distress Ink and TE Blender Brushes to add depth of color to the tops of the pumpkins! I think it makes it look so good when you die cut – to add just a pop of ink for more pizazz. These oranges blended together beautifully. So warm and rich.
Here is a treat in my hand so you can see the size!
I used a piece of foam tape on the bottom to keep the lollipop from sliding around. Here's the side view so you can see how it goes together. The twine keeps it all tight.
Here's my little pumpkin patch! Aren't they adorable? SUCH a fun project!
Thanks for stopping by today!! Nice to have you here for a spell…. I'll be back on Friday with a Greetery project – and I'm up on The Greetery Blog on Friday too! (with a Christmas card!) Have an awesome day! XOXO
-
The Greetery – Spring Fever Collection – Day 2!
Hellloooooo! Welcome to Day Two of the new product/project reveals for The Greetery New Release! The new release for Spring 2021 is called Spring Fever! What do you think of everything from yesterday? Isn't it all so fun and pretty? I am excited for you to create too! SOOOON! Today is the final day of reveals, and all the new products will be available on Wednesday, March 10th at 10am EST on The Greetery Website!! Yesterday I shared three cards, and today I have two more cards for you! Thanks for joining me today!
My first card for today showcases the brand new Empty Grave stamp set and matching dies, and also the new Nordic Circles dies! (Yes, your favorite Nordic dies now come in circles!)…. I used the previously released Lily and Palm dies to feature that gorgeous sentiment. My finished card is a deep aqua card base in a 5" x 5" square shape. I used Bristol cardstock for all my elements because it's a bit thicker and really holds up to ink blending.
I heat embossed the sentiment with gold embossing powder and die cut it out with the matching die. I heat embossed the smaller "He is Risen" sentiment with gold onto a strip of olive green cardstock. I set those aside to build my florals…
These Lily and Palm Dies were released last spring and I LOVE them. Gosh, they are so beautiful!! Here's a close up of the flowers. I used a small sponge dauber and distress inks to color everything, and then went back with Copics and some splattered ink over them to look like Stargazer Lillies.
I die cut the largest size of the new Nordic Circles and ink blended pretty blue distress inks to serve as my 'ground' layer for the other vivid colors and the put some color behind the sentiment.
I really love the concept of having dies that match sentiments – it looks so professional like this!! A perfect cut every time, too. This is my go to, gorgeous color palette for Easter!
My final card for this release extravaganza features the brand new addition to the Print Shop Collection! The Print Shop Floral Frame stamp, die, stencil combo! SO beautiful! My finished card is an A2 kraft card base. I went with a soft vintage color palette for this card. The cardstock I used is cream instead of bright white and I used muted vintagey colors…. The sentiment is from another one of my favorite previously released sets – Comforting Commands.
I stenciled and stamped the frame and then splattered some gold ink onto it and die cut it out. I inked the edges using Antique Linen Distress Ink – to make it look a bit aged. The sentiment is stamped in dark brown ink instead of black – again for a vintage feel.
In this photo you can see the splatters and the inked edges. I glued on a tiny bow – I love some texture!! To make the top cream layer with the pretty edge, I used my Deckle Edge Paper Trimmer! It lends a bit of nostalgia too – like an old photo border. (Supplies are all linked at the bottom of my post)
I think this frame would be so pretty with invitation wording inside too – or maybe a Mother's Day sentiment? Just lovely!!
Today completes the release week reveals. All of the new goodies will be for sale TOMORROW! At 10am EST! CLICK HERE to shop The Greetery Storefront! Do you have your wish list ready?! Tomorrow on my Instagram stories I'll be showing my cards in more detail and also going through all the products. Stop by if you have time! XO
There will be one $50 store gift certificate given away each day of the reveal. For a chance to win, leave a comment daily at each blog stop. Winners will be announced this week on The Greetery Blog.
-
The Greetery – Spring Fever Collection – Day 1!
Hi everyone! It's been a minute since I've seen you – but I'm here with a big crafty treat today!! How are you? I hope you are doing great, staying healthy, and getting crafty! It's Spring and the birds are chirping and the flowers are blooming. It's been busy here in my crafty cave, and today I can finally start sharing some wonderful things with you! Today is Day one of the two day product/projects reveal for the new release from The Greetery! It's called, appropriately, the Spring Fever Collection! Flowers, bunnies, carrots, more flowers!! It's all wonderful, and I'm going to go out on a limb and say it's maybe my favorite Greetery release ever! I love Easter and spring colors, so it was a joy to create cards with the new stamps, dies and stencils. I'll share three projects today, two tomorrow… And then the release will be available for shopping on March 10th at 10am EST! Yeah! Let's get started!
This first card is a fresh spring breeze! Soft and watercolor-y and pretty! I used the brand new Wildflower Mix Dies along with the watering can from the Sprinkled with Kindness stamp set…And a few carrot tops in there too! The finished card is an A2 soft gray card base. The other layers and the images are all stamped and colored on watercolor paper with Distress Inks. I used all my favorite colors.
I started by die cutting the entire sheet of Wildflower Mix Dies. I left them attached with the paper and water colored them loosely with Distress Inks and a water brush. I set the flowers aside to dry before I could glue them together. This die set is a mix of stems and little flowers. You can mix and match them however you like! I love that you can use your own creativity here and I can't wait to see what everyone else made with these dies!!
The sentiment was stamped onto a small part of the new Put A Bow On It stamp/die set! Wait until you see that set!!!!
To color my watering can, I used Pumice Stone Distress Ink and stamped JUST the third layer of the watering can three step stamp. I used a water brush to move the ink around over the parts that were inked onto the paper. It makes it much lighter but you still get the pretty words on the can. I am really happy with how this came out – just like I imagined (that doesn't happen all that often!!)
I tucked all the flowers, stems, and carrot tops behind the watering can and affixed the can with foam tape. I painted on a 'ledge' of grey for it to sit on and added two little blooms to the ledge, like they just gently fell off….
My next card is as fresh as a Farmers Market morning stroll! I used the brand new Carrot Die and the new Spring Word Die along with some old favorites (Shiplap and bow!) to create this country card. The finished size is A2 with a kraft card base. I layered gingham and then a Crimped Rectangle in cream cardstock.
I die cut the carrots and leaves from colored cardstock and used distress inks to ink the edges in orange and green for added dimension. I also did some splatters over the pieces – and set them aside to dry. I die cut the big bow from kraft cardstock…. (Blue and Orange are complementary colors on the color wheel, so they always pop together!)
My inspiration for the card was a Spring Market, so I knew I wanted to somehow create a crate! I used three pieces of the Shiplap Die cut set and lined them up to mimic a box!! I used the sentiment from the Mason Around Set to add the words "Fresh Picked" onto one of the panels. Can you smell fresh product yet? How fun are these carrots?? Perfect for Easter!!
My final card for today features the brand new Bunny Hop Stamp/Die and Stencil combo set! Another winner using the stencils and stamps together. I really love this concept! I used the Square Dance die and stencils as my background to showcase that cute bunny wreath! This finished card is a white A2 card base. I used inks and a small sponge dauber to ink the stencils and stamp the greenery!! I went back with Copic Markers and added darker shades to the centers of the flowers and some other elements, and then splashed on some white paint.
I die cut the bunny circular wreath out with the matching die. PERFECT!! I stamped the sentiment onto a circle die cut and placed it behind the wreath and affixed the wreath onto the card with foam tape.
I used hot pink paper to match the tulips in the wreath…. I die cut the Square Dance Die out of the pink paper and then used white pigment ink and small sponge dauber to make my gingham background.
My finishing touch was to add a few white pearls to the card.
Today completes the release week reveals. All of the new goodies will be for sale March 10th at 10am EST! CLICK HERE to shop The Greetery Storefront! What is your favorite thing from the release reveals so far?
There will be one $50 store gift certificate given away each day of the reveal. For a chance to win, leave a comment daily at each blog stop. Winners will be announced this week on The Greetery Blog.
-
Thanksgiving Blessings and pretty leaves!
Hi everyone! Happy Monday! I'm back! Did you miss me at all? I sure missed you, and missed blogging here with you! I haven't posted since Halloween. I'm pretty sure this is the longest I've gone in 11 years without blogging. I didn't know I needed a break, but evidently I did. It naturally happened, a little break from stamping like a crazy woman. I've been generally feeling a creative block and that's okay. It happens from time to time and I've learned over the years to just go with it. Focus on something else and let my brain rest. So instead of stamping, I've been cross stitching and decorating my house and watching a lot of tv with my husband…and cooking…. Other creative pursuits! I finished my Halloween stitching and started a cute snowman stitch. Usually I am a holdout for decorating for Christmas until the day after Thanksgiving, but this year it's already full on Winter Wonderland here. I dunno. Just made me happy and cozy this year to put up the lights and sparkly Christmas things. A lot of my friends have said they're decorating early this year too. We must all be ready for the joy of Christmas time. 2020 has been a ride!
It finally rained here last Friday and it was awesome! We went out in it and drove around and enjoyed the wet weather. My birthday happened on the 3rd. I think this is my first birthday ever that we've spent it at home. We ordered a pizza and hung out here. Just was weird with it being election day and everything. Normally we like to take a little Fall trip around my birthday. But, like everything else this year, um no. It's cancelled too. I'm praying that all of you reading this are doing well and staying healthy and happy. As we move into the holidays I just want to again thank you for following along with me and for all of your kindness throughout this year. XOXO
Now, onto some crafting! I woke up this morning and went in the craft room and got out my bin of 'not used yet' things. Well, this beautiful stamp/stencil combo from Taylored Expressions jumped right on out at me. And I thought – YES! A Thanksgiving card is just the thing for today! So I stamped this, photographed it and posted it all in the same day! That hardly ever happens! But it feels nice to be in the moment with you today. I am resisting the urge to make all the Christmas things but I may just give in on that too! LOL. But first, one more card with leaves….
One of the big trends for the past year in stamping/crafting is the invention of Stamp/Die/Stencil Combo products. I LOOOOOVE this trend! And no one is doing it better than Taylored Expressions!! As soon as I saw this stamp/stencil combo (Fall Foliage) I knew I had to have it! I used it to make the background for today's card. It's a stamp of the stems/veins and then three stencils to layer on top to do the colored leaves. It's freakin genius!!! And SO super easy to get perfect results!! The finished card is an A2 card base. The large stamp is bigger than A2 size so you can trim it to whatever size you like. Step out photos are later in the post. I gold embossed the leaf stems and the beautiful sentiment for that warm glow of Thanksgiving….
EEKS. Like seriously, how pretty is this???
I cut the leaf panel with my new Deckle Edge Trimmer (LOOOOVE) and layered it twice onto woodgrain paper from my stash. The sentiment was embossed onto vellum and wrapped across the front of the card. I added an orange heart to add another pop of color under the vellum. A little bit of twine and some clear dots finished it off. The leaves are the star of the show on this card.
Here's a close up of that pretty Deckled Edge. It looks like an old photograph. I'm obsessed with it already! The trimmer has been on my wish list since January when I got to try it out at Creativation. It's finally available! So I bought it asap!!! CLICK HERE to see what I'm talking about!!
These are the two pretty products that are the focus of my card today!
Here are the three stencils you use to make three different leaf shapes. If you look closely you can see some embossed veins in the plastic stencil. These are what you use to perfectly line up the stencils. Genius.
I used my MISTI to stamp the big background stamp in Versamark and gold heat emboss onto cream cardstock.
Stencil one is taped down with washi tape onto scratch paper….
First up – oranges!
I used my TE Blender Brushes and two shades of orange to do the first stencil….Already looks pretty!!
Next up – reds!
Here's what it looked like after oranges and reds…
And finally – yellows!!
The colors of Fall and Thanksgiving!
OMG I think I squealed when I took the last stencil off! SO BEAUTIFUL!
And here's a dream close up…
And again, that Deckled Edge….swoon….
Okee dokee – looks like I remembered how to do a blog post! Nice to see you all again after a break! Next week I have amazing news – a new release from The Greetery! That's what I'll be working on next. You're gonna love it. Super creative and interesting and of course beautiful new designs from The Greetery. Can't wait to share all of that with you. I hope you have an excellent week. Thanks for stopping by! XOXO
If you are online shopping I would be super grateful if you would check out my list of stores that I am an affiliate for! (Keeping the lights on and all that jazz)
CLICK HERE or on the graphic below to see the supplies used for today's card! (Affiliate Links Used).
-
More Boos!! Sweet little ghosties card!!
Hey Boos! More boos today! Another Halloween card to share with you!! This time it's little adorable ghosties colored with Copics… Lots of fun stamps and dies from Hello Bluebird! Hope you're having a great weekend. We're doing good here. Friday morning we got up to the apple orchards early in the morning and got some cider and yummy warm apple donuts. Then we went for a long drive. It was a wonderful day. Since then, I've been in the crafty cave working away! We'll start sneak peeks for The Greetery new release on Friday – woot! Thanks for stopping by today. BOO!
This finished card is a 5" x 5" square card. I used purple this time to make it spooky but pretty at the same time. Some purple distress ink blending too! It's not a color I use often but whenever I do I like it! Oh, and don't laugh – more clouds! Supply links are at the bottom of my post.
The card base is white, then a layer of purple, then the stenciled cloud layer, then the trees die cut layer…. And I tucked a harvest moon in there too… I used stamps from a couple of different sets to create the Halloween scene.
Here's a close up of my ink blending… Two shades of purple, then splatters, then some gorgeous Nuvo drops on top. Love how it came out!!
I stamped and die cut the cat, pumpkins and ghosties and colored them all with my Copic Markers. I added some stickles as an accent and shimmer element.
Here's a side view so you can see the layers.
That's it for today's share! I'll be back on Tuesday to share the brand new kit from Taylored Expressions! Yipppeeeee! See you then! XOXO
CLICK HERE or on the graphic below to see the supply list for today's card! (Affiliate Links Used). Thank you for supporting me and shopping my links. I truly appreciate it so much!
-
BOO! Have a faboolous day!
BOO! Did I scare you?! Lolz. Today I'm sharing a fabooooolous Halloween Card! It's a little shabby haunted house at 31 Spooky Lane! I'm so excited to share this one! I realize as I'm typing this post that it's very similar to my last post with the beach house… Similar, but very different! This time it's dark and moody, and instead of crabbies, we have some ghosties hanging out in their house. I do really love making this kind of card! You can totally customize the little houses to be whatever you want them to be! Some of you might recognize those green puffy clouds in the background – I posted those on Instagram a while back. I used them as the background for my haunted house.
This card uses stamps and dies from Lawn Fawn! I used the Build A House die to make the haunted house. CLICK HERE to see another card I made with this die – a farmhouse! It's super versatile! Supplies are listed HERE or at the bottom of this post!
The finished card is an A2 card base. I used dark orange as my card base, then layered white and then my top layer with all the images. I created a little scenefull of bats, spiders and ghosts. I love making Halloween Cards!!
My haunted house is made out of cardstock and woodgrain cardstock. I backed the window and door with yellow paper sponged with pumpkin distress ink. The ghosties are die cut out of vellum so they are see through! The hill and scary trees are one die which makes it easy to use! I stamped some flying bats on top of the green cloud background…. SO MUCH FUN!
I did a two step sentiment – something I love to do! Die cut letters and then the stamped words below. And a little ghost flying out of the top!
Here's a good look at my cloud background!! Three shades of green… Clouds can be any color! Especially at Halloweeeeeen.
Here's a side view so you can see how everything is layered. I used liquid glue to attach the ghosts – and tucked them behind things so you don't see the glue. Vellum can sometimes be a bit tricky like that.
I used an alphabet stamp set to stamp 31 on the house for the address… I stamped some bats on the inside of the card too.
Even though it's still hot here, I've been decorating the house for Autumn! Here is my tiered tray for Fall! It's on display in our entry way and each time I pass by it I smile!! I'm ready indeed!!
Thanks for coming by today! Hope I didn't scare ya! Fall is my very favorite crafting time. I'm hoping to make tons of things this year to share! Hope you have a great day! I'll be back soon with more fall cards, and some Christmas cards! (Yes this time of year is weird like that!) XOXO
CLICK HERE or on the graphic below to see the supply list for today's card. (Affiliate Links Used)
-
Sending some Mer-mail your way today! Fun new stamps from Waffle Flower!
Helloooooo from under the sea! Hum a sweet tune from The Little Mermaid, grab a pina colada, and take a look at my fun mermaid card for today! Over the years I have befriended sweet Nina, the owner of Waffle Flower Crafts and last week she sent me a package of the cutest stamps from their Summer release! Thank you Nina!! They always have new artists and super unique stamps and dies. LOVE Waffle Flower! I smiled and was so excited to stamp with all of these ocean themed goodies!!
One thing that is on trend in paper crafting right now is Slim Line Cards. These are cards that are 4" x 8" big….giving lots of room for more fun images!! I decided that I wanted to use a lot of stamps, so I made my first Slim Line Card. I made the card base using my Scor-Pal and paper trimmer. It's thick white Neenah cardstock. My card has one more layer of white as a frame, and then the panel with the images. This card will fit into a business size envelope. I will probably make my own envelope out of some oceany paper though!
Here's the finished card! One note about my props… I am trying to gather enough items to make an ocean themed tiered tray… I got the cool netting and the baby starfish (and some coral) at my friend's antique store last week!
Isn't that mermaid so sweet! She has seaweed and a little tiny shell in her hair. I gave her red hair and a green and aqua mermaid tail. I stamped and die cut all the images and colored them all with Copic Markers. The images have touches of white gel ink pen accents and Diamond Stickles. The clear bubbles are brand new clear enamel dots from Waffle Flower. I'm gonna need more of those! They perfectly mimic water!!
The stamp set with the mermaid is called Mermaid Mail!! OMG do you love that little letter with the shell?? I colored lots of fish and greenery…Baby seahorses and a happy crab!
The sentiments set is AMAZING! The best sayings and the best combination of fonts! LOVE!!! For all my ocean cards from now on!!!
The sea floor is a die cut called Stitched Slopes from SSS. I colored it with Distress inks and splatters!
Here is my ink blended background before I did anything else to it… All the gorgeous shades of blue distress inks!!!! Here are my tips for good results from ink blending: 1) Use Bristol cardstock. It's smooth and slippery so the ink doesn't 'stick' to it right away, allowing blending 2) Apply the ink in swirly circles and keep going! 3) Use Domed blenders to avoid the blotchy circles!! This background took a while!! I kept adding ink because I wanted it very saturated!! I added waves and sun rays with dark ink and white ink!!
I made this little graphic with my finished card base… The ink blending was done first and allowed to sit a bit and dry. The I die cut one of the waves out of cardstock to use as a stencil. I inked some subtle waves using both dark ink and white ink… My first time trying this and I kinda like it. The white sun rays were made using a small sponge dauber, white ink, and the MFT Rays stencil. I splattered white ink all over it also. Later…I ended up stamping bubbles onto the background and a few plants.
All the elements were affixed to the card using foam circles!
I wanna give this guy a hug! LOLZ. So happy and fun!
Here is the sentiment stamp set!! I love it so much!! (all the supply links are at the bottom of my post)…
I used another sentiment on the inside of the card and also stamped some bubbles…It's wonderful!! Thanks for stopping by today to see me!! I hope you have a wonderful weekend!! My LSS finally reopened so I'm gonna take a trip down there tomorrow hopefully. Not too much else planned. Hope you are doing great!! Next week we'll be launching the new Taylored Expressions Card Kit. OMG you're going to LOVE it. And it's going to sell out! I'll give you a head's up on my Facebook Page when it goes live!! My cards are already done and I can't wait to share them.
CLICK HERE or on the graphic below to see the supplies used for today's card. (Affiliate Links Used)


