Hi everyone! Happy Friday! Woohooo! It was a super fun crafty week, don’t you think? Here comes the weekend, a gorgeous spring weekend, just in time! I have a fun card to share with you today! It’s my day up on The Greetery Blog so pop over there too if you would like! I hope you have some fun plans for the weekend. We have tons of yard work to do and some general relaxing too!
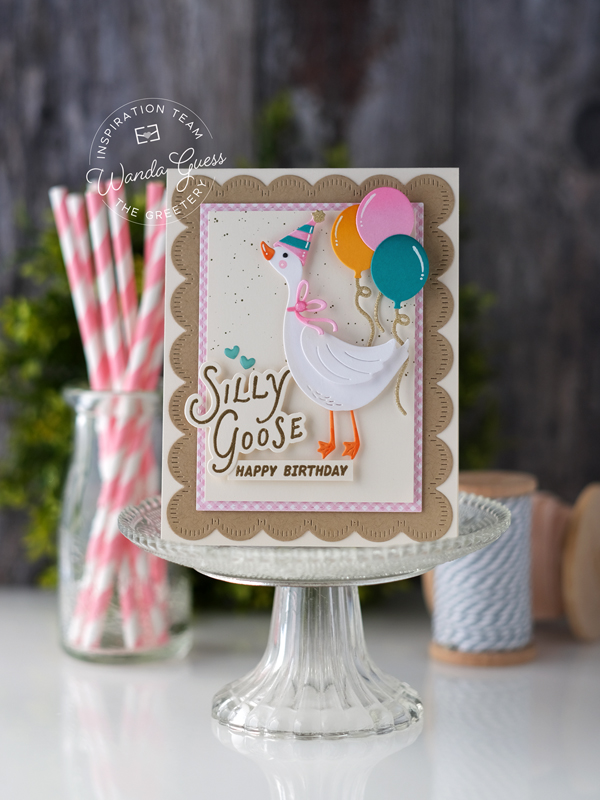
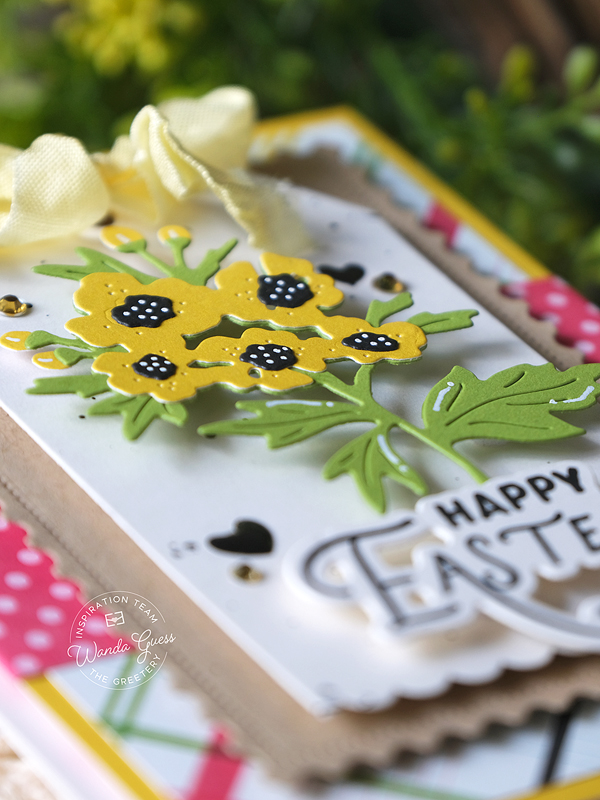
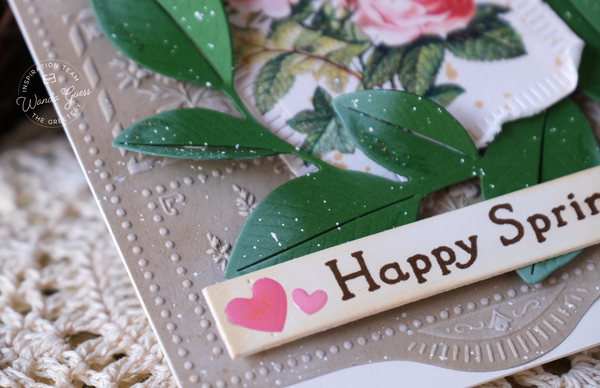
Hope you had a wonderful Easter and that everything is good in your crafty place! I am still loving a pretty Spring color palette and brighter, more cheery cards for the season. How amazing was last month’s new release? I loved it all! I knew I wanted to make some more Silly Goose cards, and I have one to share with you today. I made this one for a girlfriend who loves geese and I used a pretty color scheme grounded with cream and kraft… Let’s look!
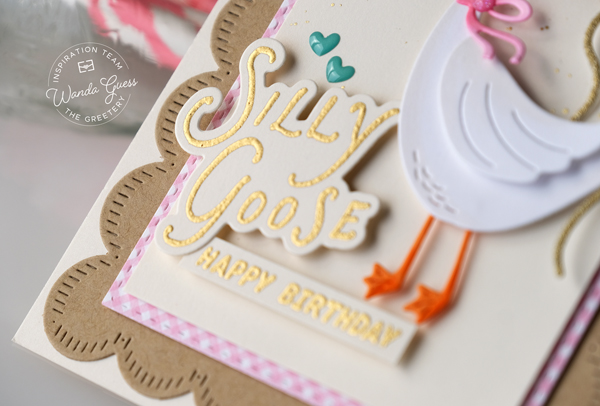
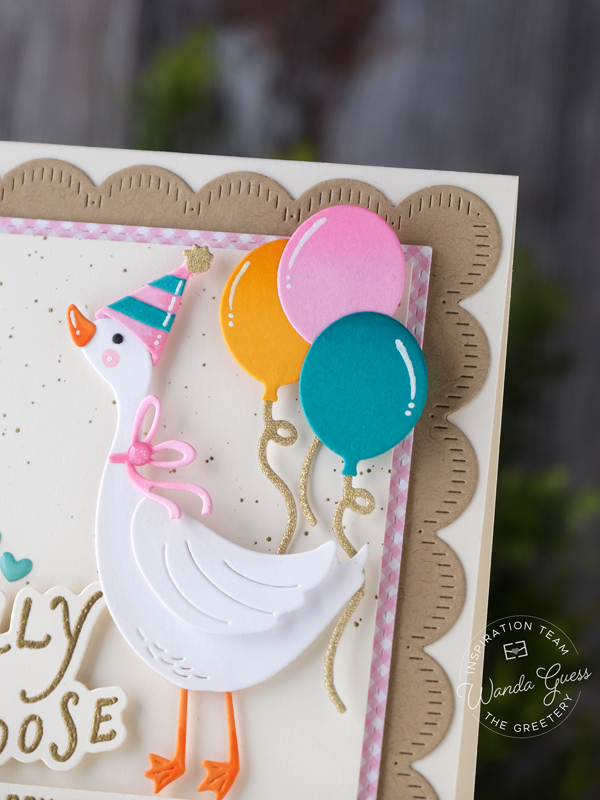
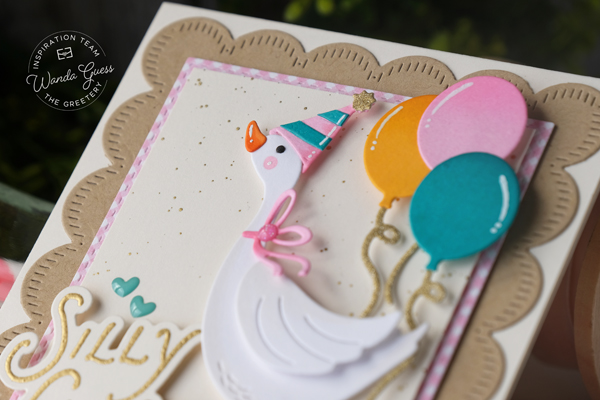
My finished card is an A2 Cream card base. I used the A2 Stitched Scallops Dies in Kraft to make a pretty background. I layered on some gingham paper and then another cream panel. I die cut out all the pieces for my cute goose, her hat, and the balloons using the awesome Silly Goose Dies. (I am obsessed)… I put the goose together and added shading with Copic Markers.
I die cut two hats and hand cut out the stripes to make it a bit more festive! White gel pen accents on there too! For the balloon, I gently inked the tops of the balloons with matching Distress Inks. The balloon strings are gold cardstock.
I stamped and gold heat embossed the sentiments from the Silly Goose Sentiments stamp set and I used the matching die for the larger sentiment. I cut the smaller sentiment out with my paper trimmer. I layered all the pieces onto my card using foam squares for added dimension.
That’s it for my project for today! I hope you have a fantastic and creative day! Wishing you all the best. It’s my pleasure to share with you every month. Happy Spring! Honk Honk! Blessings to you and your families. I will see you soon… In the meantime, happy crafting! XO Wanda
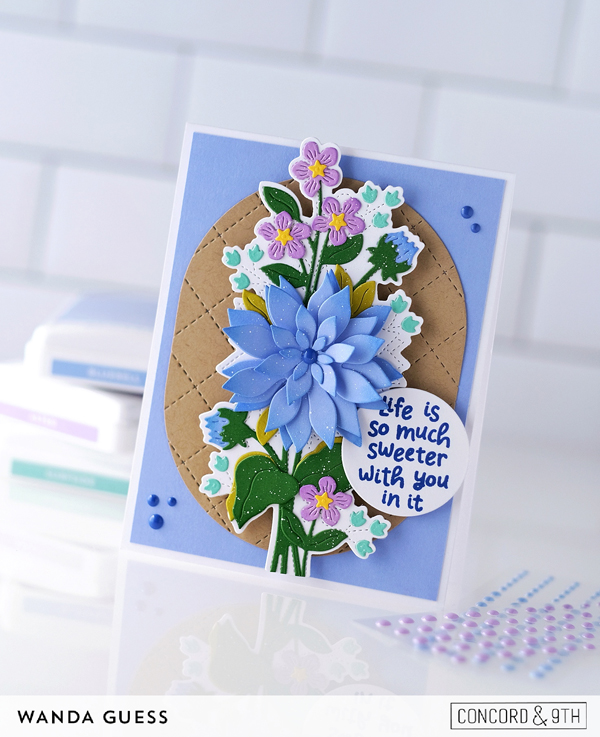
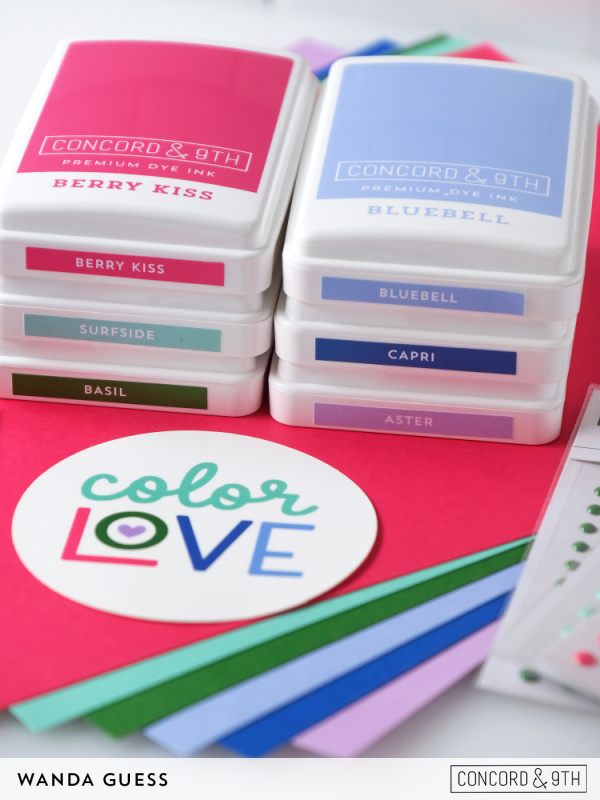
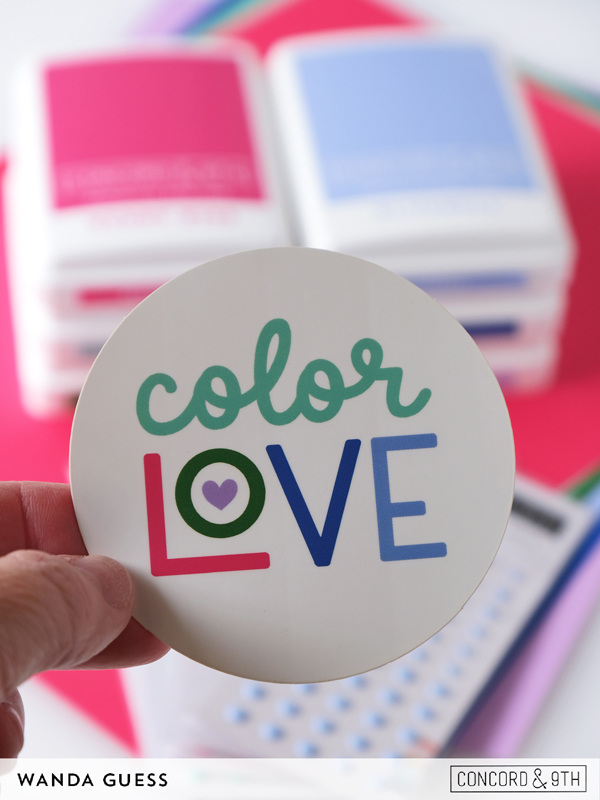
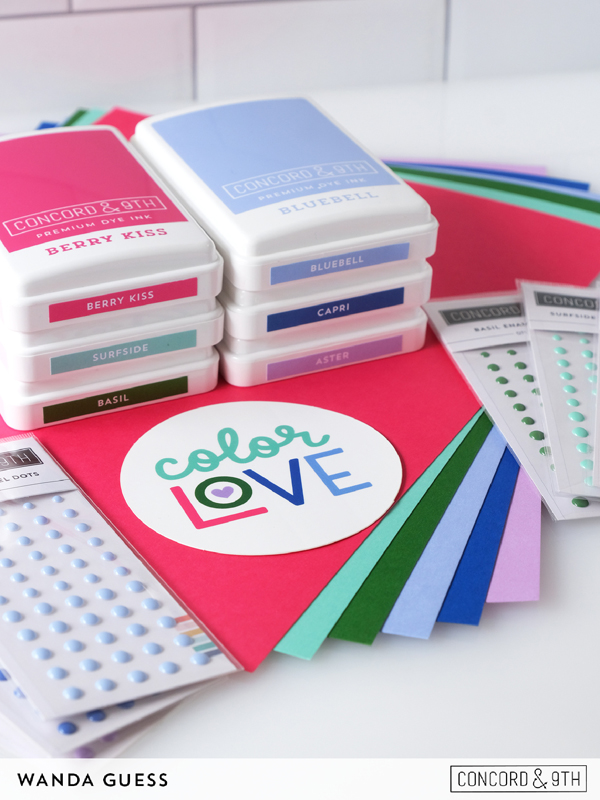
Hi friends! WOOHOOOO! It’s time for a new product release from Concord and 9th! ANNNDDDD….new colors too! Yes, you heard that right, a new color drop just in time for Spring! Today is launch day, and everything is already available in the Concord and 9th storefront! So you can shop to your heart’s delight. The new colors are fresh and beautiful. The new colors are: Aster, Bluebell (my personal favorite), Surfside, Basil, Berry Kiss and Capri! My card for today features the new colors (most of them) along with the new stamps and dies. Let’s get to it!
FYI – all the new colors have cardstocks, ink pads, and enamel dots!
My finished card is an A2 white card base. I layered that delicious Bluebell color and then a Kraft Layer embossed and die cut into that pretty oval shape. The star of the show is the brand new Handpicked Dies! A huge gorgeous floral bouquet that makes me smile. I used all of the new colors except for Berry Kiss. I love that big flower in the center. Pow!
I started by die cutting out all the pieces of the floral grouping and then glueing them to the background die (so simple!). Then I splattered on some white ink. If you look closely, the die cut pieces have gentle ink blending using the matching ink pads. The sentiment is so sweet! I attached the floral portion to the card using foam dots. My finishing touch is some matching blue enamel dots. This card could be pretty in a million different color palettes!
Hi everyone! Happy Monday! It’s going to be a very busy and crafty week this week! I have lots of things to share with you and I am so excited! I hope you had a wonderful Easter yesterday! Our Easter was perfect. Eighty degrees out, blue skies, an amazing sermon and awesome worship music. Followed by a huge delicious brunch and then a LONG nap with kitty. Really a perfect day! Now it’s back to work today and also back in the crafting groove. Wishing you a good week ahead, my friends.
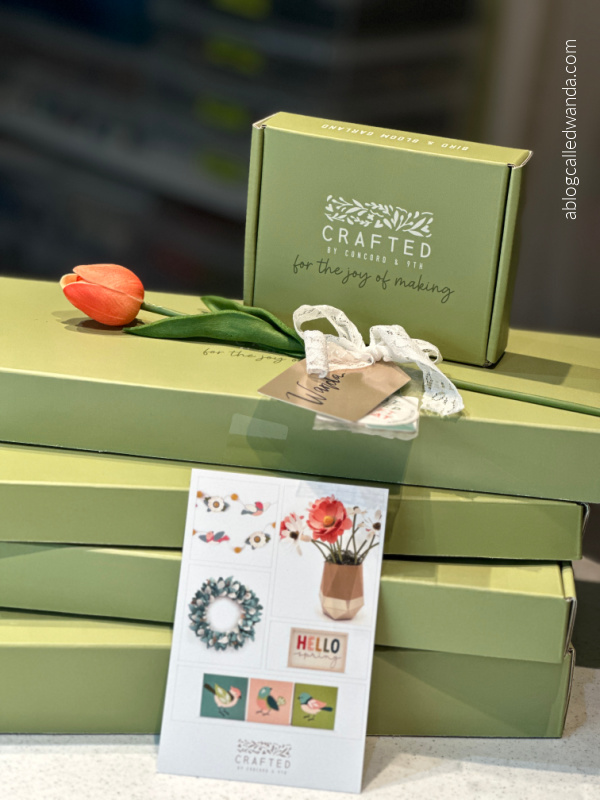
Today is the launch for the brand new, gorgeous, colorful, happy, amazing Spring Kits from our friends at Crafted by C9! You know that I am such a fan of their crafting kits, and the spring kits are no exception. I had a lot of fun making all of them, so I could show you each one. The pretty Spring colors are delightful and the kits are imaginative and inspiring.
There are five kits this time: Gathered Blooms (paper flowers in a vase), In Bloom Wreath, Hello Spring Wall Decor, Birds Of A Feather Home Decor, and the Bird & Bloom Garland. As always, the instructions, and instruction videos are easy to follow. Everything is included!! The only things I used from my stash were scissors, a pencil and a ruler. The boxes contain everything else you need.
All the kits come beautifully packaged in these green hard boxes. It really is such a treat to receive and open them up. You can feel the quality. These make great gifts for that creative person in your life (or someone who wants to start being creative!)
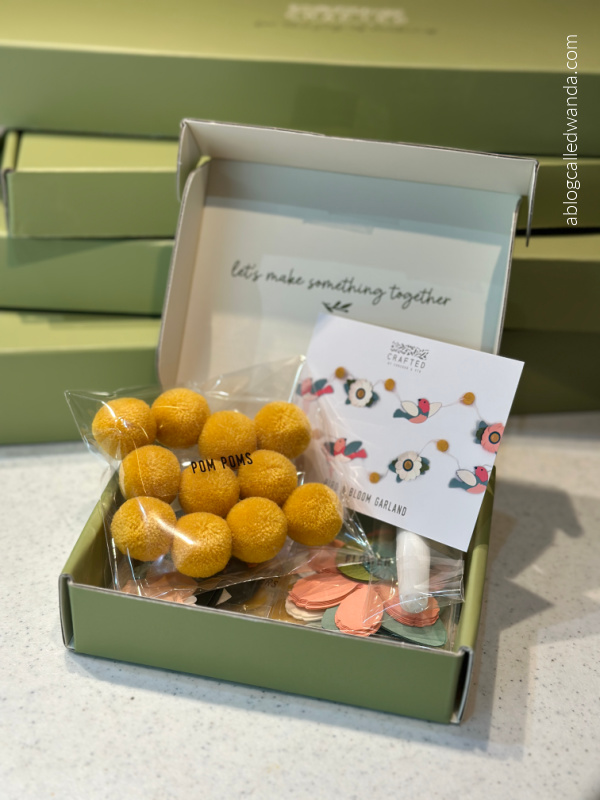
Here is the Bird and Bloom opened box. You can see all the elements are packaged inside and labeled. Also, there is a project card inside and you can use the QR code reader on your phone to click on the code, which takes you straight to both written and video instructions.
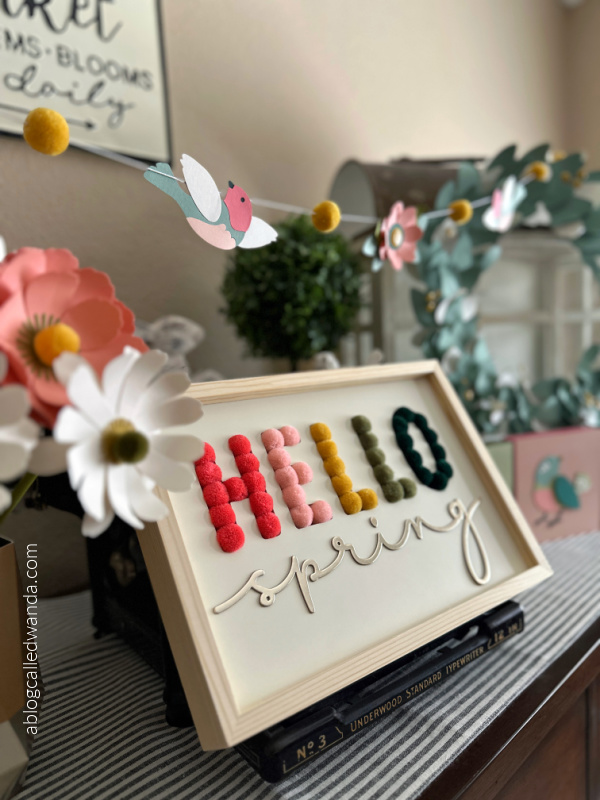
Here are some photos of my completed projects…. You can see the garland, the wreath and some of the flowers. In the center portion is the Hello Spring wall decor piece made with pom poms! This is SO dang cute. Came together so quickly and easily!
In this photo you can see the fabulous Gathered Blooms Kit assembled! Out of the five kits, this one was the most time consuming. You make it all! The vase, the flowers, everything! I absolutely adore the pom pom flower centers – they make the entire project so whimsical and fun. The instructions are so clear and anyone can make this! Leave yourself lots of glue drying time is my only tip!
In this photo you can see the big In Bloom Wreath! The perfect colors! All the pieces are die cut for you! (hallelujah!) and it’s simple to assemble. I am going to add some paper flowers to my wreath! In the photo you can also see the garland and the Birds of a Feather little home decor pieces.
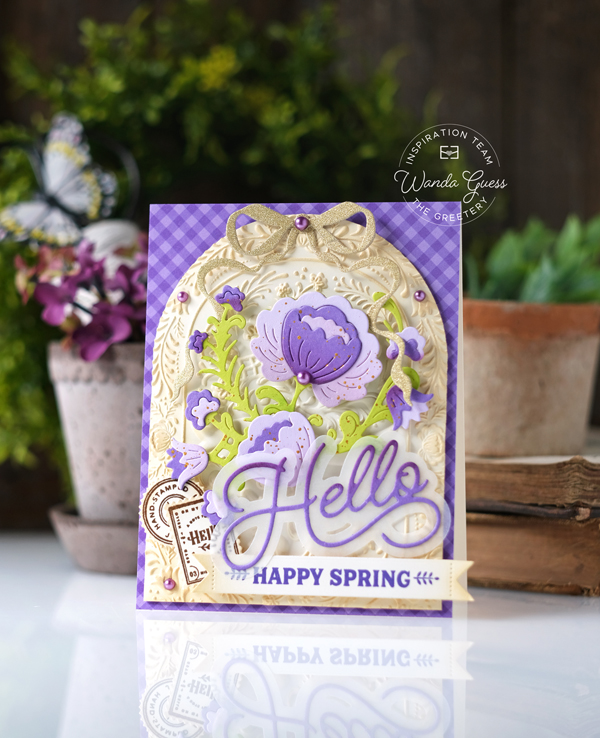
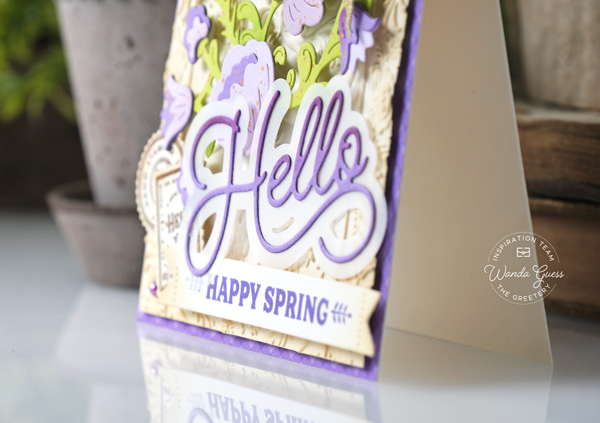
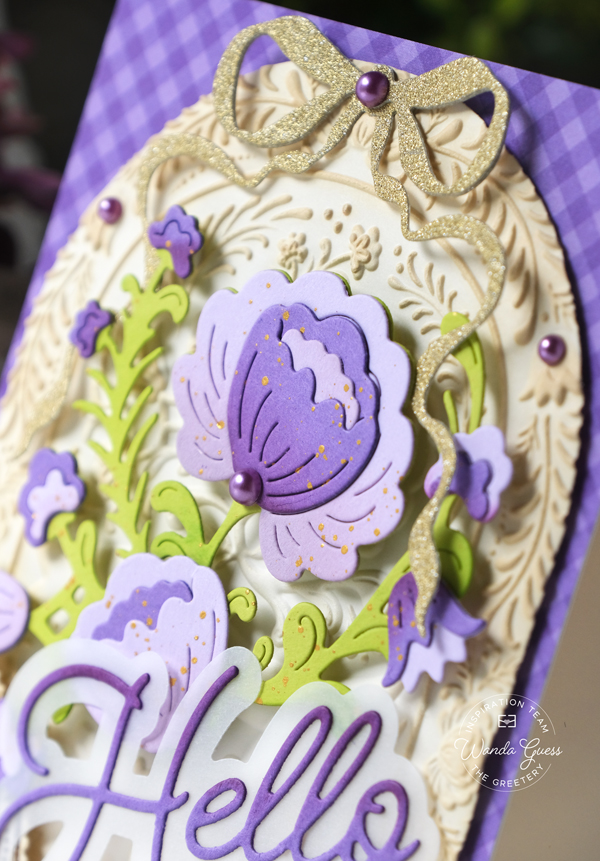
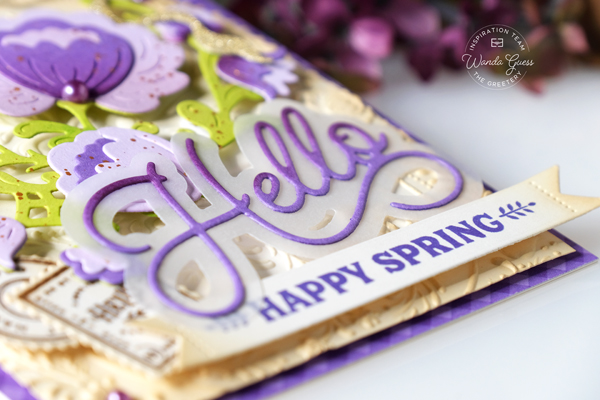
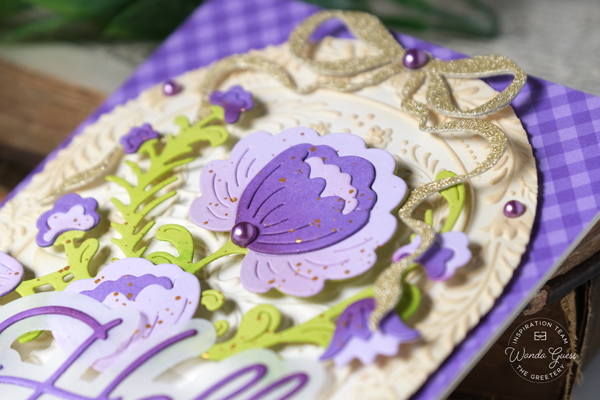
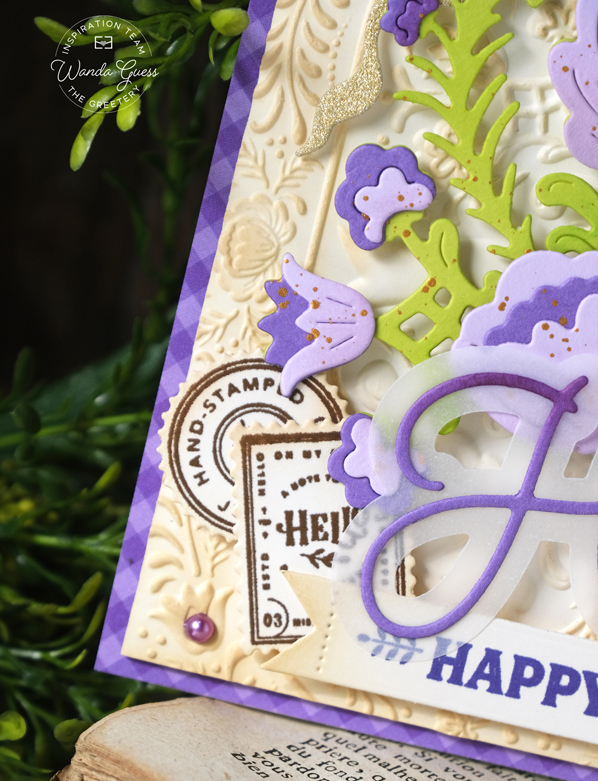
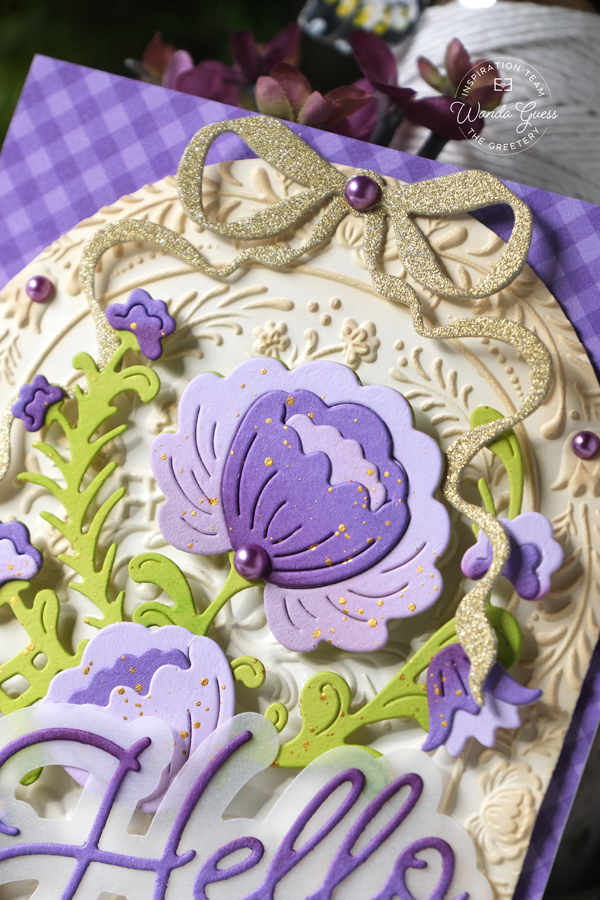
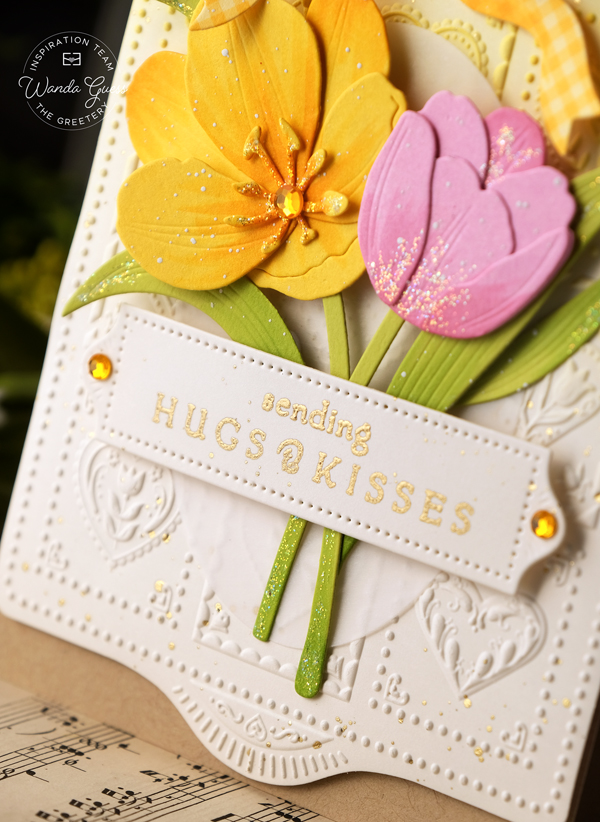
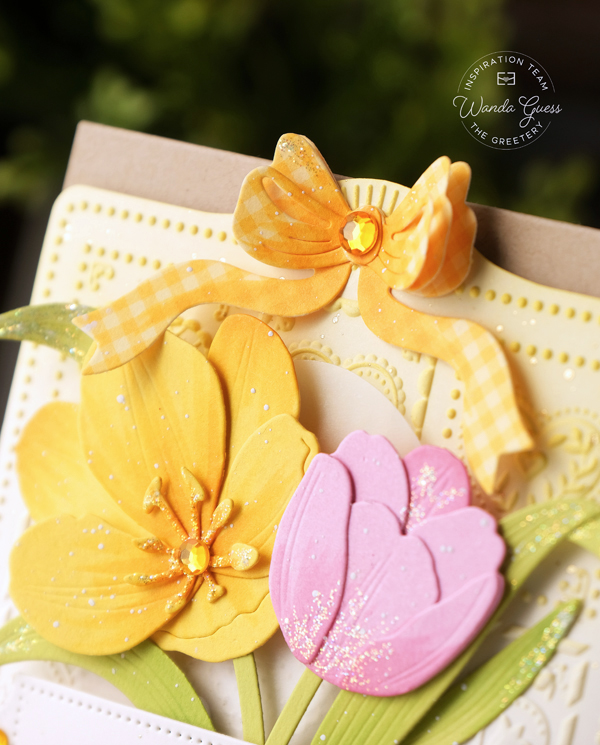
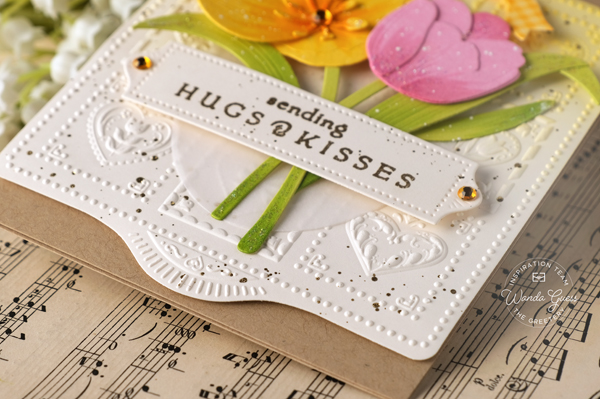
Hi creative and crafty friends! It’s my turn today on The Greetery Blog! I hope you enjoyed the new release and got some fun things to craft with!! Especially after that new release, I feel that Spring is in the air! At my house in Northern California, we have tons of daffodils and tulips blooming, and the trees are so full of beautiful blossoms. Renewal is coming…. Easter is coming…. Today is Lucky’s birthday (my sweet kitty turns 8 today!) And it’s St. Patrick’s Day! I am excited to make some Spring cards full of pretty colors and floral themes. For my project for today I made a purple, flowery, vintage-y, texture filled card with lots of Greetery supplies. More is more!
My finished card is an A2 cream card base, layered with purple gingham. For my cream background layer, I thought it would be fun to see if that gorgeous Rosemal Reflections Embossing Folder would work with the A2 Arches. Well, guess what? They go together perfectly! I die cut the A2 arch and then embossed it. I gently inked over the embossed portions to give more detail. Next I die cut out all the pieces of the Rosemal Reflections Jumbo dies – floral spray. I inked all the pieces with matching Distress Inks and then splattered on gold paint.
I die cut the Scripty Hellow dies form both purple cardstock and vellum and layered them together. For the secondary smaller sentiment, I stamped the sentiment in purple ink onto cream paper. I also stamped and die cut out some postage stamps from the Postal Modern Set.
For my finishing touches I added a pretty gold glitter bow, and some purple pearl embellishments. I attached everything to the card using foam squares. It all came together in a vintage way!
That’s it for my project for today! I hope you have a fantastic and creative day! Wishing you all the best. It’s my pleasure to share with you every month. It was so great to just share another beautiful release with you! Blessings to you and your families. I will see you soon… In the meantime, happy crafting! XOXO
It was my pleasure to introduce the brand new and gorgeous Spring Jardin Collection to you last week! And, I hope you love it as much as I do!! Happy Crafting!! If you scroll back to my last two blog posts, you can see all my projects from the new release! If you have any questions – reach out!! Thanks for all the love and kind comments! Happy Creating! Can’t wait to see what YOU make! I’m so excited for Easter crafting! Have a beautiful day!
Hi friends! Welcome back to Day Two of our showcase days for the new Spring Jardin Collection from The Greetery! Do you have Spring on your mind now?! What was your favorite thing from yesterday? You are in for more projects today too! More Easter creations full of pretty colors, and more chocolate bunnies! Remember that release day is Monday 3/16 at 10am EST. This is such an inspired release. I can feel Betsy’s vision particularly in these pretty new Spring items! I have three more cards to show you today. Thanks for joining me!
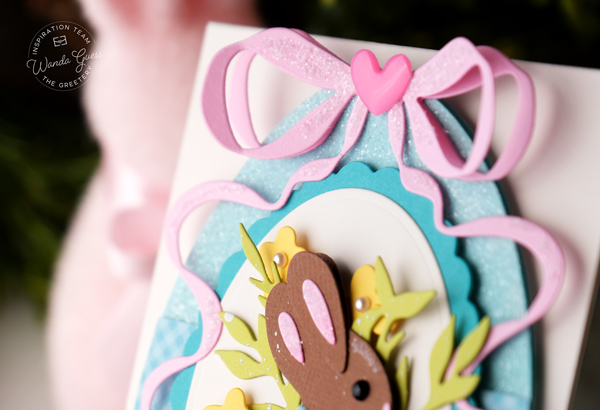
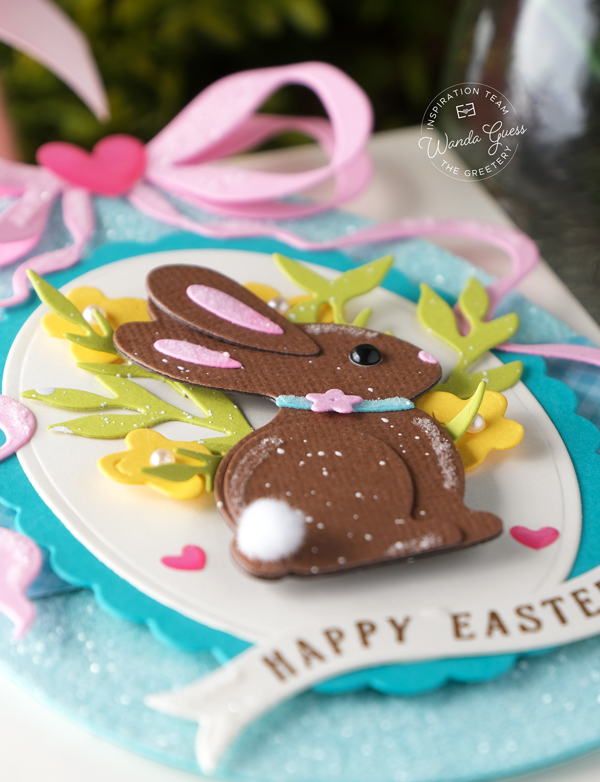
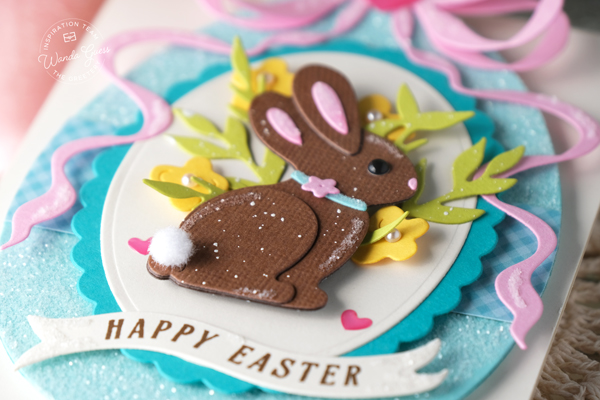
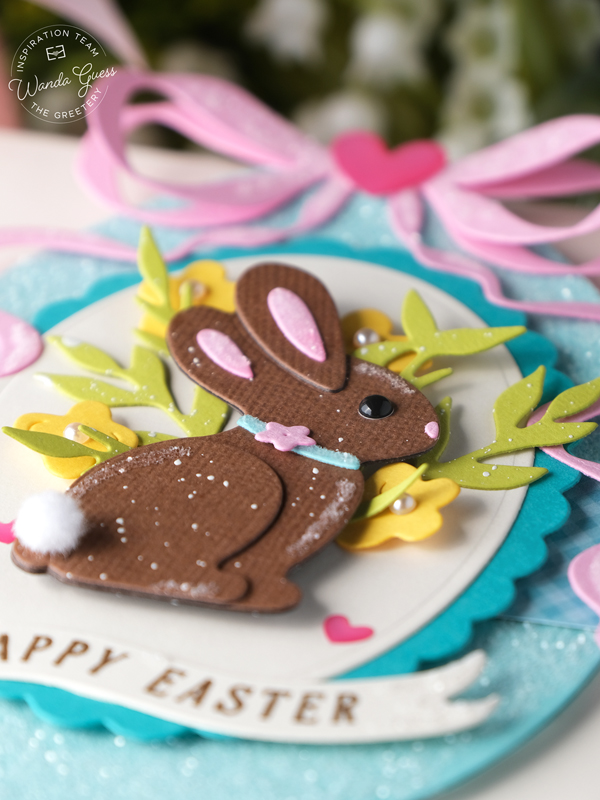
First up today is I think my favorite card I made with the new release! It has everything…sparkle, pastels, a giant egg, a bow, and a bunny! Hee hee. This card features the brand new Golden Egg Dies, the brand new Chocolate Bunnies dies, some items from Tangled Tulips, and more of the gorgeous new Bigger Botanicals! My finished card is an A2 cream card base. I layered and layered with shades of teal and turquoise!
I started by die cutting the largest egg first and coating it with chunky glitter – I set that aside to dry and made the rest of the elements. I die cut out the bow (more glitter) and the flowers and the bunny. This is such a traditional Easter color palette. I definitely had fun making this card, smiling the whole time!
Here’s a side view of all the layers and parts. I added pearls and hearts for good measure…
So you might notice that today’s chocolate bunny is facing the opposite direction of yesterday’s chocolate bunny! The die set comes with two – one facing each direction! That way you can put them together like they are rubbing noses! EEP.
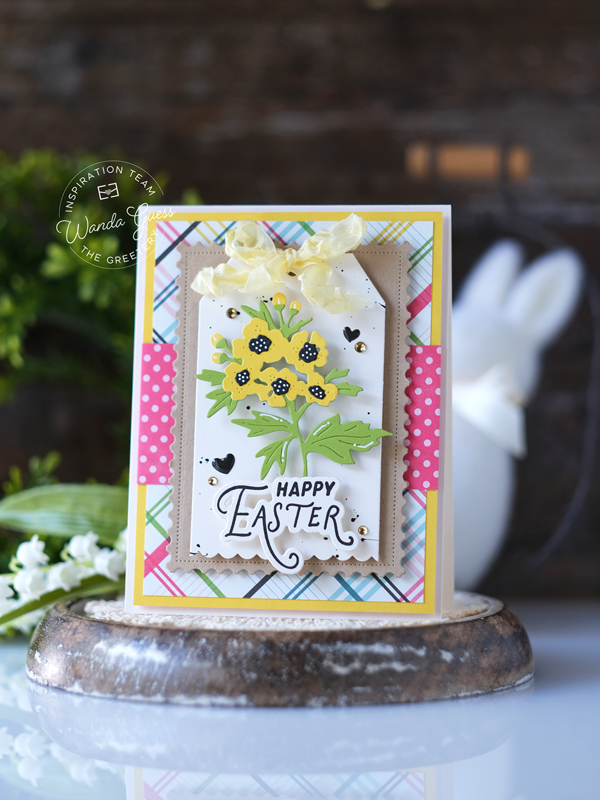
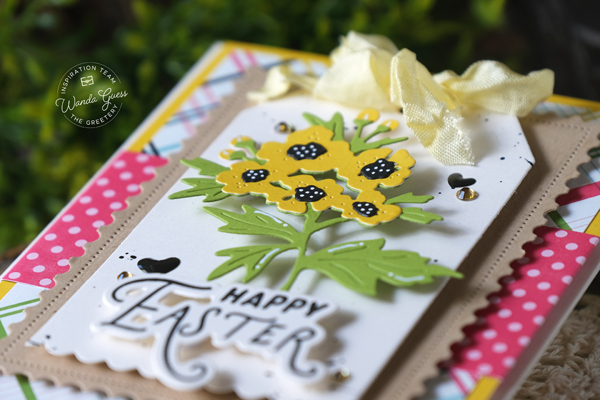
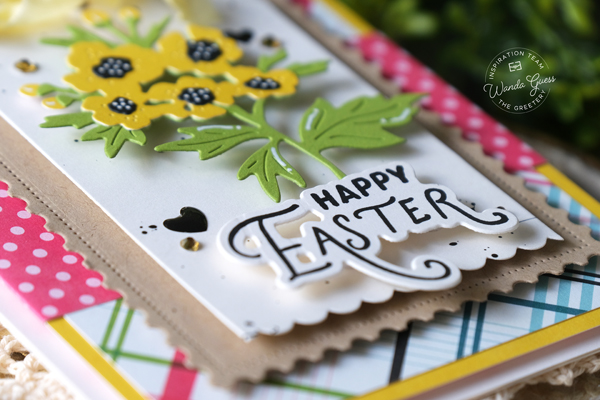
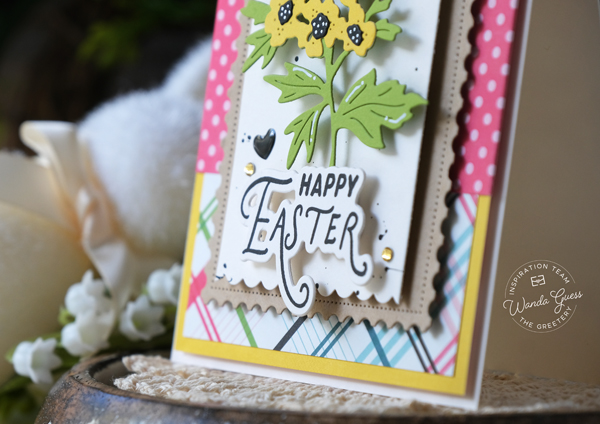
My next card is also an Easter card, but goes in a completely different direction! This card is more bright and vivid and modern! This next card features more of the Bigger Botanicals (Hawthorne) and also the Silly Goose Sentiments (we’ll get to that more in a moment!)… I used an old paper pad and die cut all the pieces from the solids in the pack. Lord, I have SO much patterned paper – need to start using it more! My finished card is an A2 white card base. I layered a postage panel and one of the tags from Tag Team Duo (I used scalloped scissors to trim the bottom of the tag).
This card came together pretty simply. To me it feels fresh! I splattered on some black ink and used black heart accents to ground all that color. I used lots of foam tape to pop up all the layers. In the centers of the flowers I used a white gel pen to add dots.
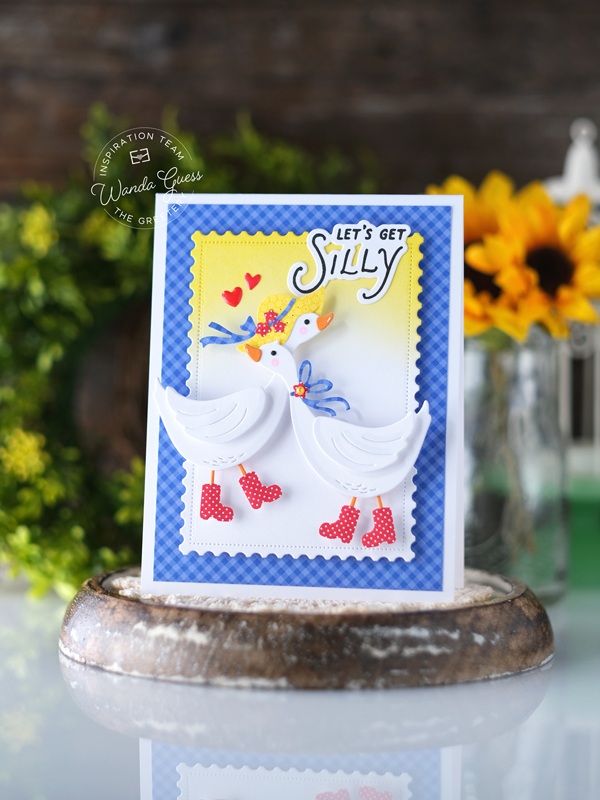
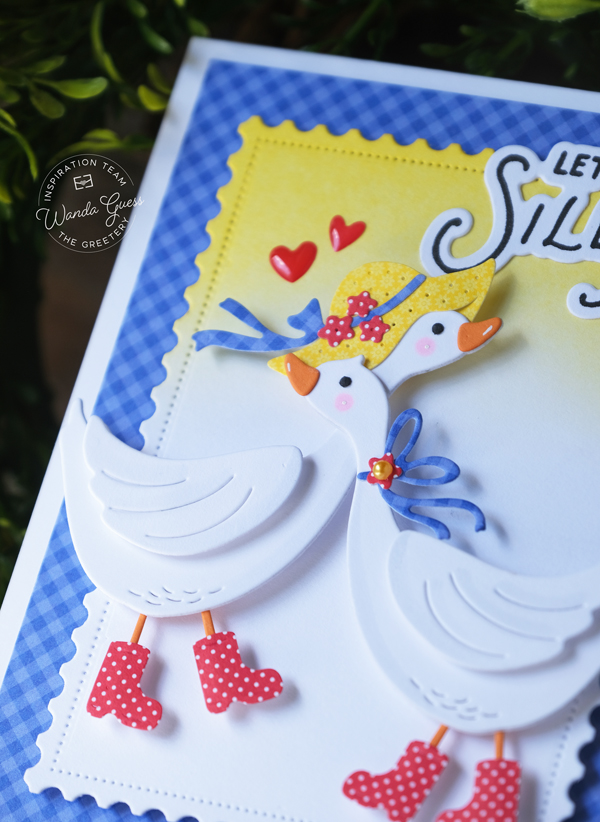
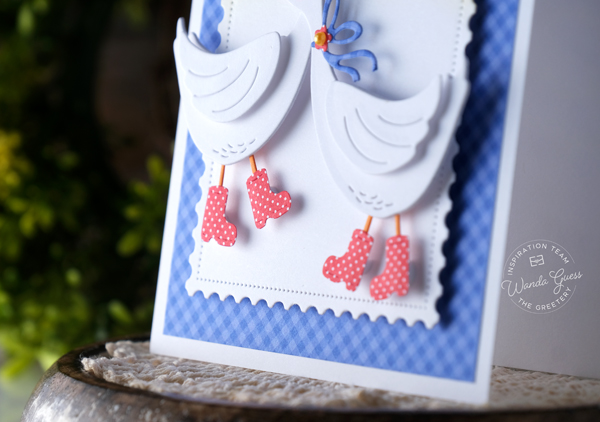
Okay….now Let’s Get Silly!! Final card of the new release! It’s sooooo dang fun and cute!! This card features the brand new Silly Goose Dies and Stamps and lots of vivid colors! Gosh, if this isn’t the cutest thing ever! My finished card is a bright white A2 card base layered with some blue gingham. I die cut a postage layer and inked the top with soft yellow at the top only. I die cut out all the pieces of the geese and put them together so easily! Then I stamped and die cut the sentiment. I LOVE their cute boots! I’m imagining me and my bff out for a shopping trip in our cute outfits (with a stop for coffee of course)!
I feel like you can never go wrong with red, yellow and blue. It’s always going to look fresh and pretty! I added a few hearts too. In this photo you can see the detail on the hat, the flowers and everything else!!
That’s it for today – and day two of our showcase of projects for the Spring Jardin Collection! Thanks for stopping by to share with me yesterday and today! It’s my pleasure to introduce the new release. MONDAY is release day! I know you have to wait all weekend! Wahhh! Get your shopping list ready! Enjoy this new release and happy crafting! XOXO
Giveaway Information: The Greetery is giving away two $50 gift certificates! The comment deadline is 3/16 at 6:00am EST (comments from team blogs entered into giveaway). Winners announced on The Greetery blog on 3/16 at 9:30am EST (right before the new products go live) GOOD LUCK!!
COMMENTING NOTE: On my new blog – to leave a comment, you must open the post first. Then the comment box will appear at the bottom. You can click here to make it easy!
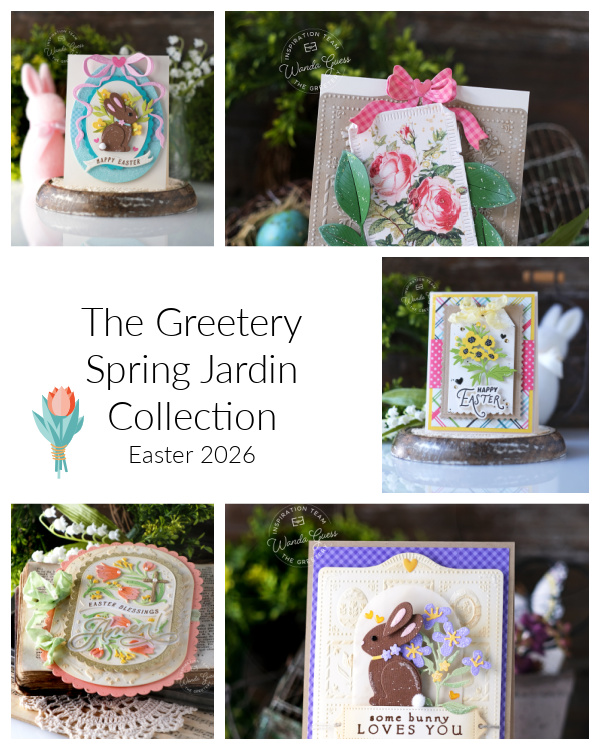
Hello hello hello my sweet friends! Something beautiful starts today! It is getting very close to Easter – which is my favorite holiday! And with that comes Easter and Spring crafting! Awesome. The Greetery has a brand new release this week, and it’s called the Spring Jardin Collection! As you would expect, it’s lovely, soft, spring-y and so pretty! Think eggs, and bunnies, and tulips and….geese! It’s so good. The design team will be showcasing our projects today and tomorrow, and then release day will be on Monday March 16th at 10am EST. I am so excited to show you everything! Three cards today, and three more tomorrow. I’m hoping to inspire you and get you looking forward to Spring! Let’s get started!
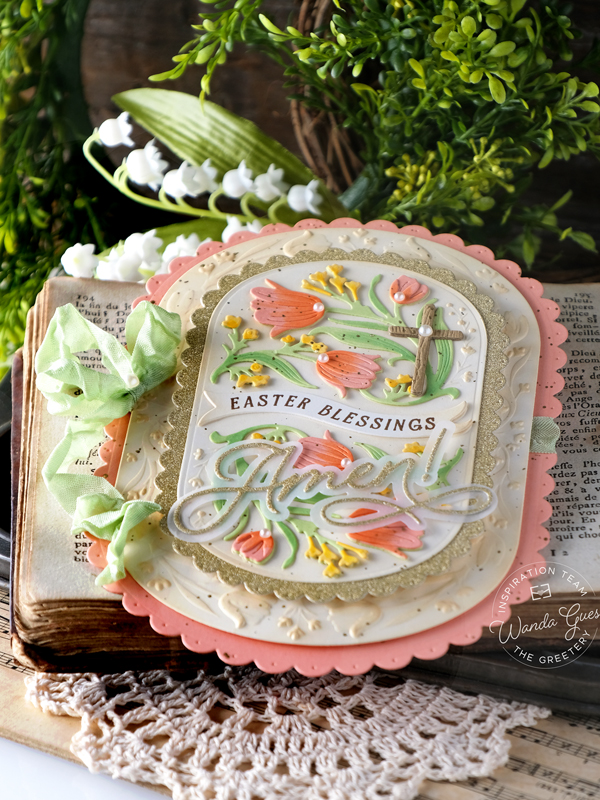
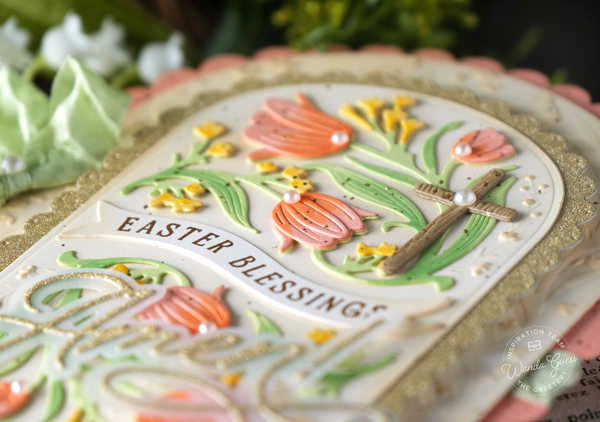
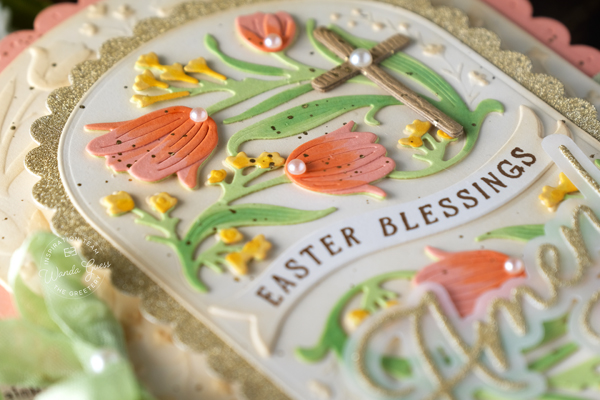
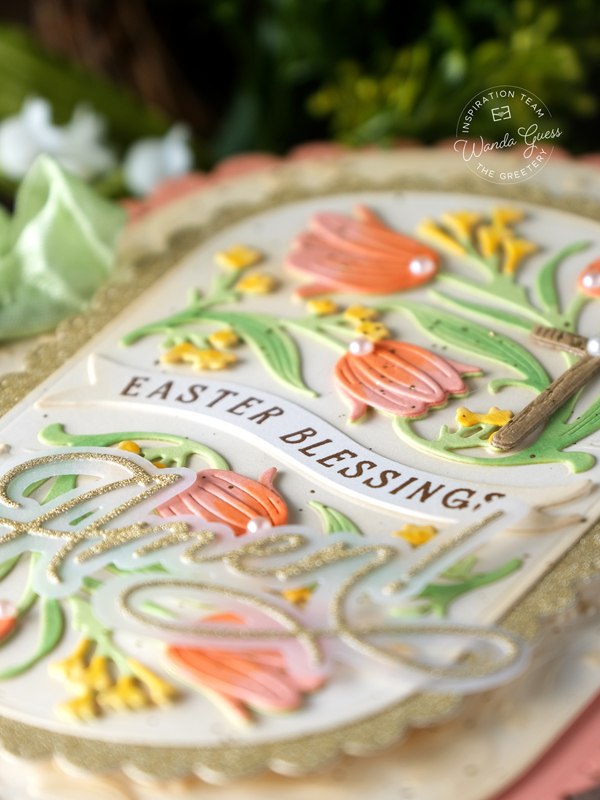
For those of you (and me) that love the Rosemal Reflections stamps/dies/embossing folders, have I got a treat for you! This new suite is the same concept, but for Spring! It’s called Tangled Tulips! There is a gorgeous embossing folder, stamps and dies. It pairs perfectly with the Capsule Collection dies and makes larger, 5×7 cards. I went all out with my project – and chose a peach/apricot, soft green and gold color palette to make an Easter card. This card features the new Tangled Tulips stamps, dies and embossing folder. My card also features the Amen die and the cross from the Easter Morning Sentiments.
I love all the color and texture in this card… The smaller dies match the embossing folder perfectly. I gently shaded the flower/leaf pieces using matching Copic markers. I added pearls because they fit the vintage vibe I was going for.
You can never have enough little details! I used some green crinkly ribbon as an accent. Here you can see up close the embossed tulips… Also my gold splatters and gentle ink blending…
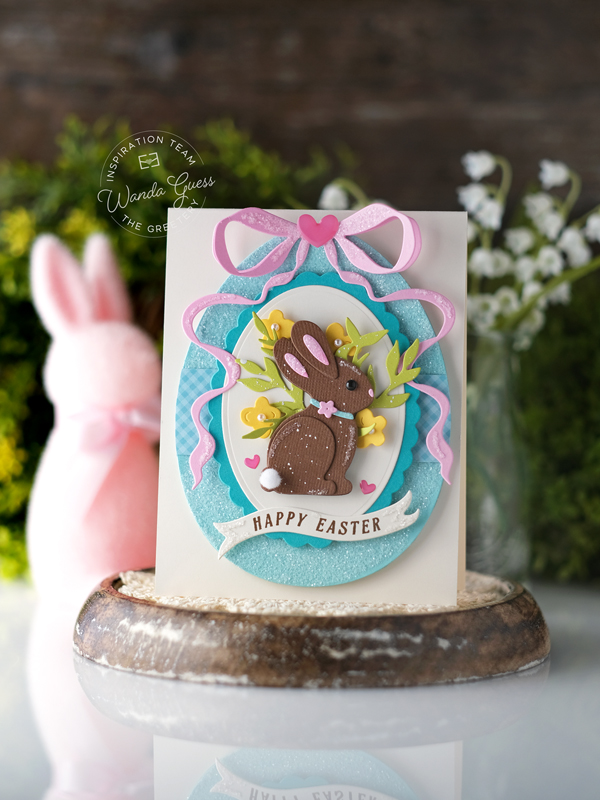
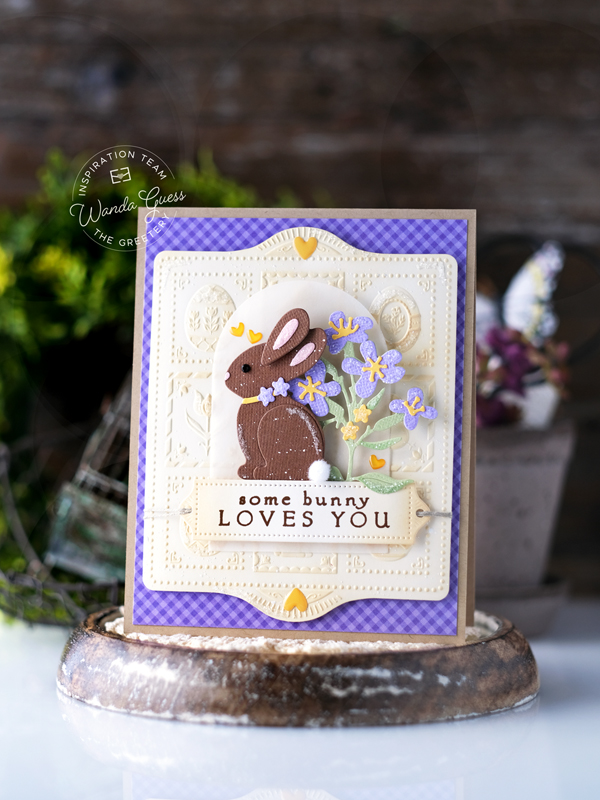
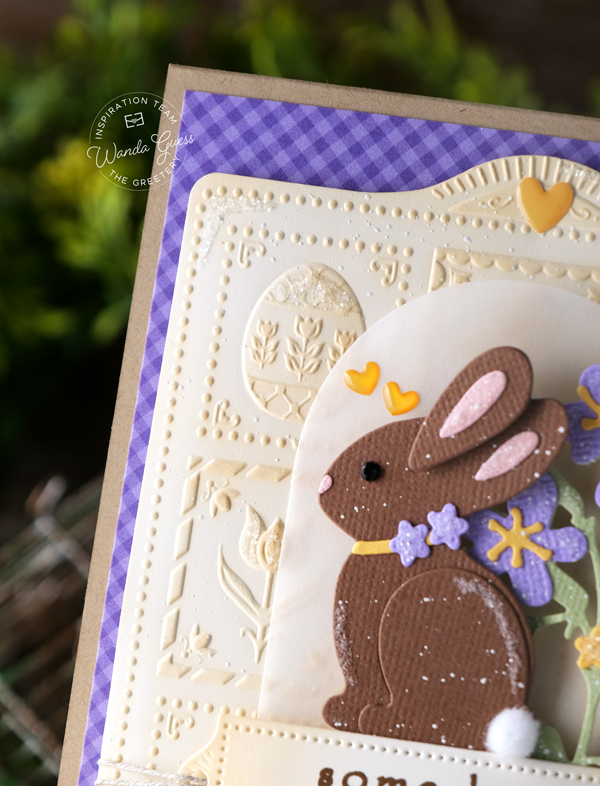
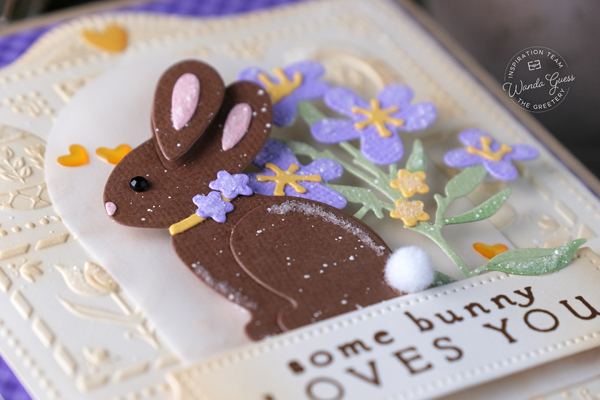
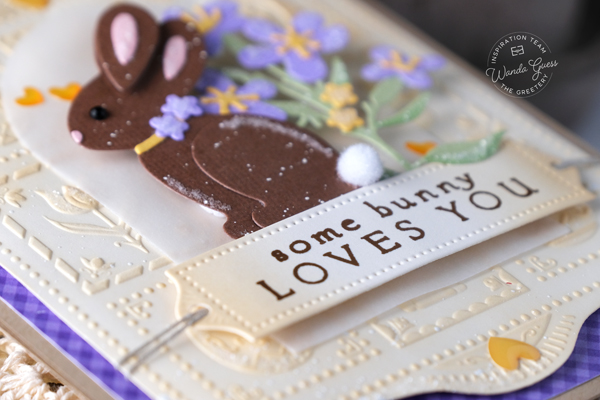
Next up is this cuuuuuuuute Easter card with lovely purple accents! (I have always loved purple and yellow together) This card features lots of new products! First up – Chocolate Bunnies! Are you serious!? ADORABLE! And the new Shortbread Shapes Easter! And also new Bigger Botanicals – Soapwart. (There are several new botanicals this release!) So much good stuff. My finished card is slightly larger than an A2 – I cut it from kraft cardstock to allow a layer of gingham. I embossed and die cut the pretty new Shortbread Shapes background first.
Then I die cut the flowers and the chocolate bunny! I gave everything a good coating of chunky glitter to look sparkly and pretty. I am already super smitten with that rabbit.
I used a little white pom pom for his tail and sat him upon the sentiment. I wrapped a bit of natural twine through the ends of the sentiment by using a small hole punch. You can see there is an arch of vellum underneath too! All the tiny details!
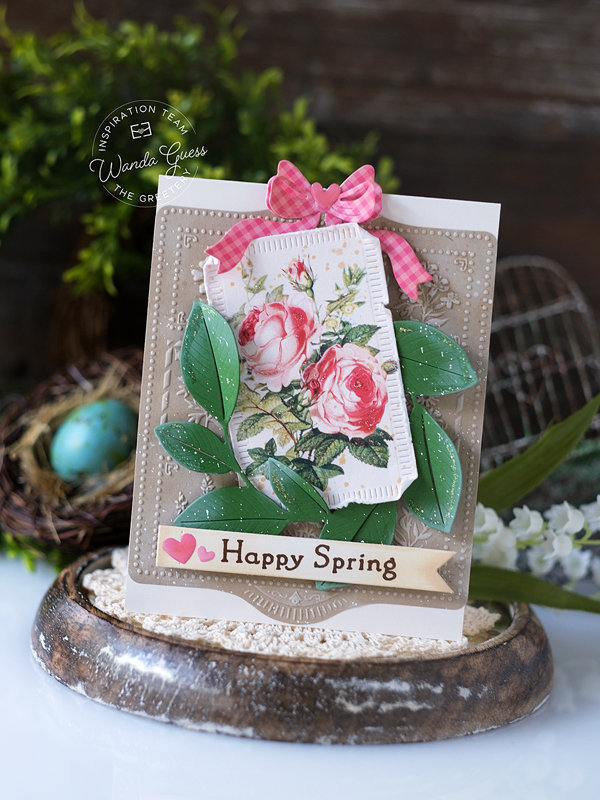
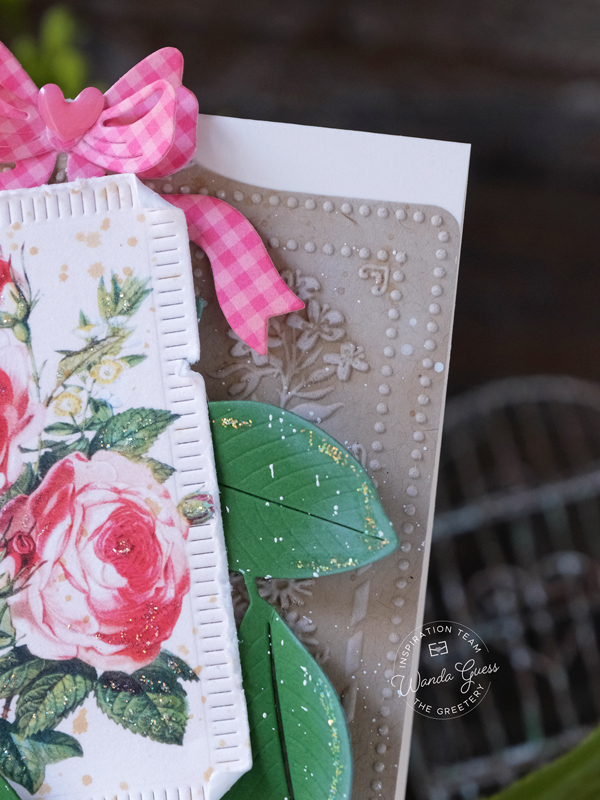
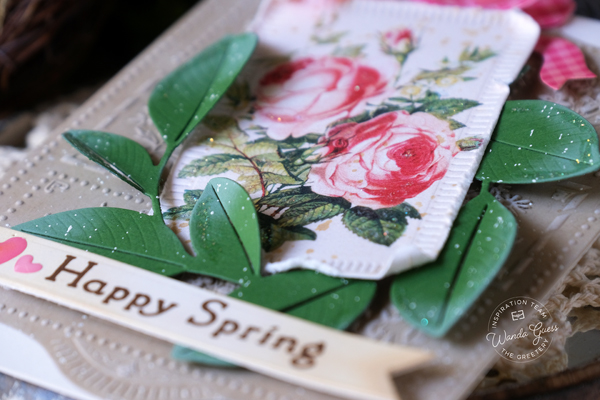
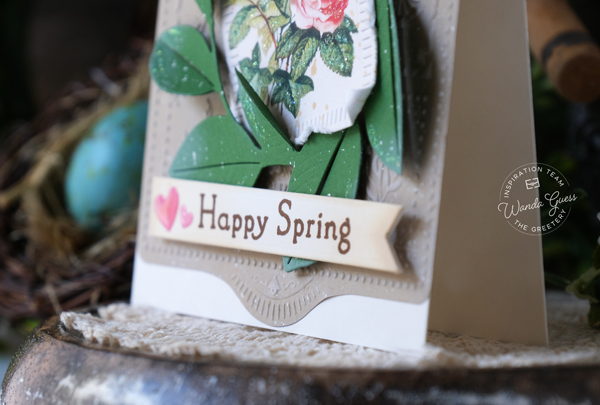
My last card for today features the other brand new Shortbread Shape – Spring! This one is full of beautiful florals on the Embossing Folder! I embossed and die cut the Shortbread Shape from kraft cardstock and gently inked with white pigment ink. My finished card is an A2 cream card base. I used the new Simple Spring Sentiments on this one – such a pretty font! I used the beautiful image sheets from the last release and die cut it out with the crimped rectangle die. I also used the gorgeous Magnolia Wreath Die….. Creating a vintage Spring card! And of course a pretty bow to finish it off. Be sure to use all your old and new supplies together!
That’s it for today – day one of the showcase of projects for the Spring Jardin Collection! Thanks for stopping by to share with me today! It’s my pleasure to introduce the new release. I will be back tomorrow with three more cards!! YEAH!! Don’t miss it!! Seriously. Don’t miss it!
Giveaway Information: The Greetery is giving away two $50 gift certificates! The comment deadline is 3/16 at 6:00am EST (comments from team blogs entered into giveaway). Winners announced on The Greetery blog on 3/16 at 9:30am EST (right before the new products go live) GOOD LUCK!!
COMMENTING NOTE: On my new blog – to leave a comment, you must open the post first. Then the comment box will appear at the bottom. You can click here to make it easy!
Hi friends! Happy Monday! Just a quick little post today with a super cute card I made yesterday! I used supplies from last month’s release from Concord & 9th! They have the best supplies, don’t they? Easy stamps and dies that go together like a dream…. I used the brand new Scalloped Petals suite. And of course I had to add a little gingham! I hope you have a wonderful week!
A bit of news: There’s a new Greetery release coming later this week!! YAHOO!! Everything beautiful for Easter!
My finished card today is a white A2 card base….then a gorgeous blue die cut background and then those gorgeous floral dies.
Hi friends! Wooooo I am really getting this project made and posted in the nick of time before Valentine’s Day! Yeah! Happy Friday! I am wishing you a weekend full of love and laughter with the ones you love! And, it’s a work holiday weekend too. Lots to be excited about. We don’t really have plans for Valentine’s day so maybe we’ll go to our favorite pizza spot and just enjoy being together. I hardly ever see my lovely husband anymore! I am looking forward to hanging out with him – my best friend. This past week was crazy busy. I’m taking a class at night and we got our taxes done one evening after work…this old girl is tired. But never too tired for crafting!
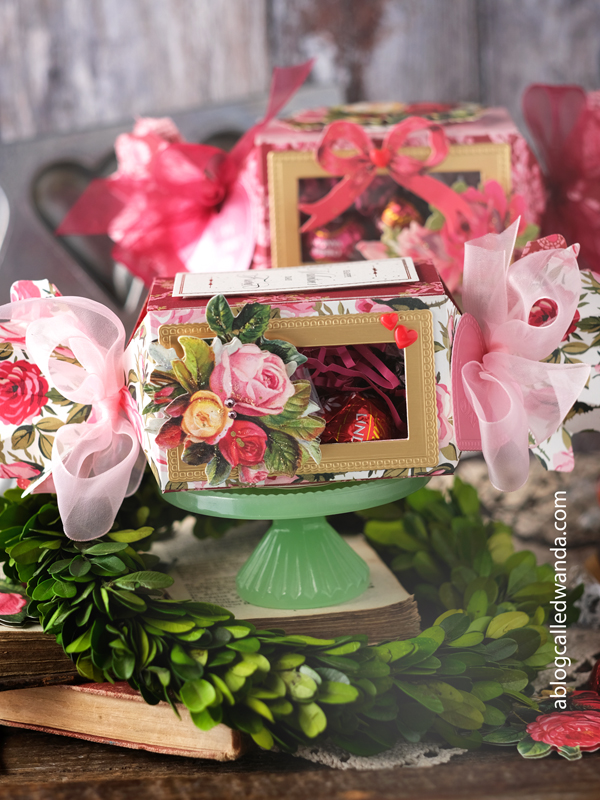
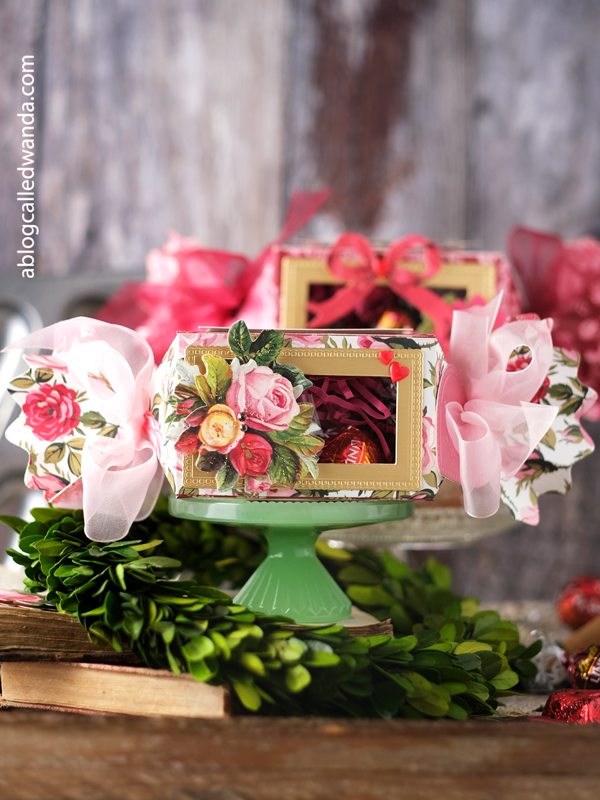
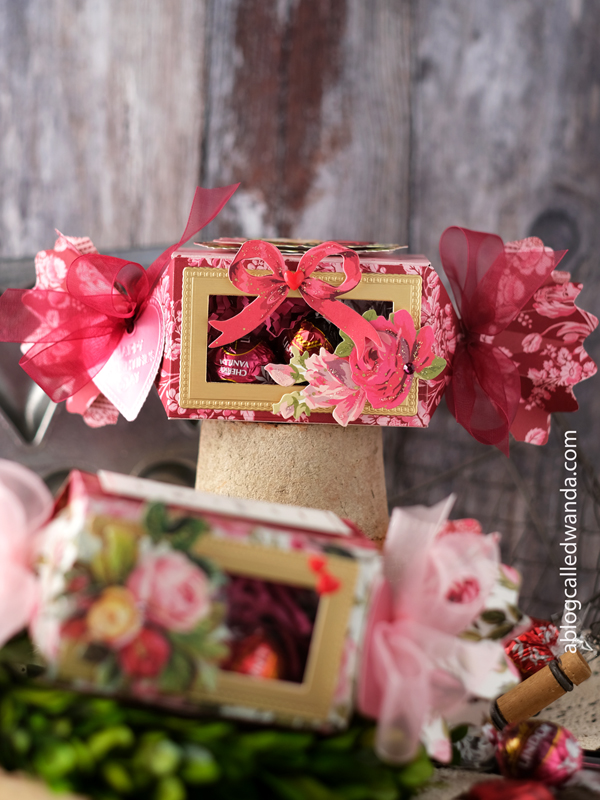
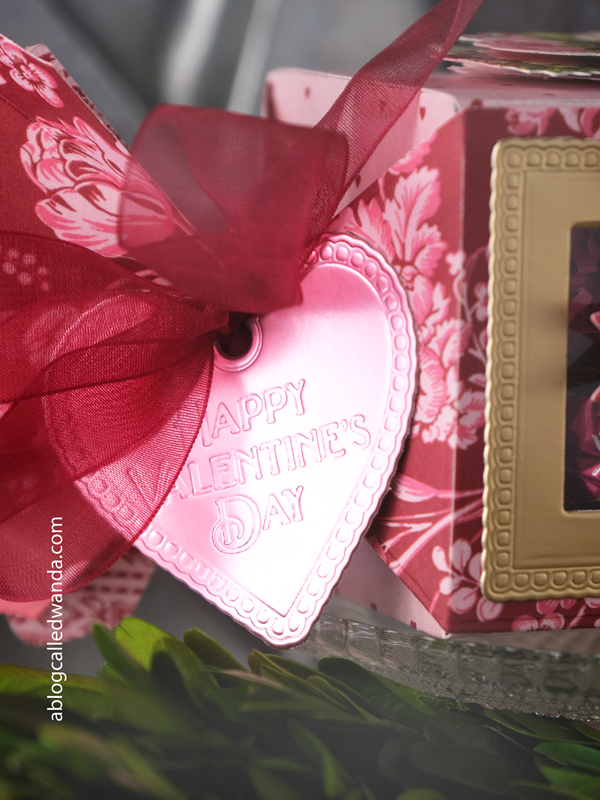
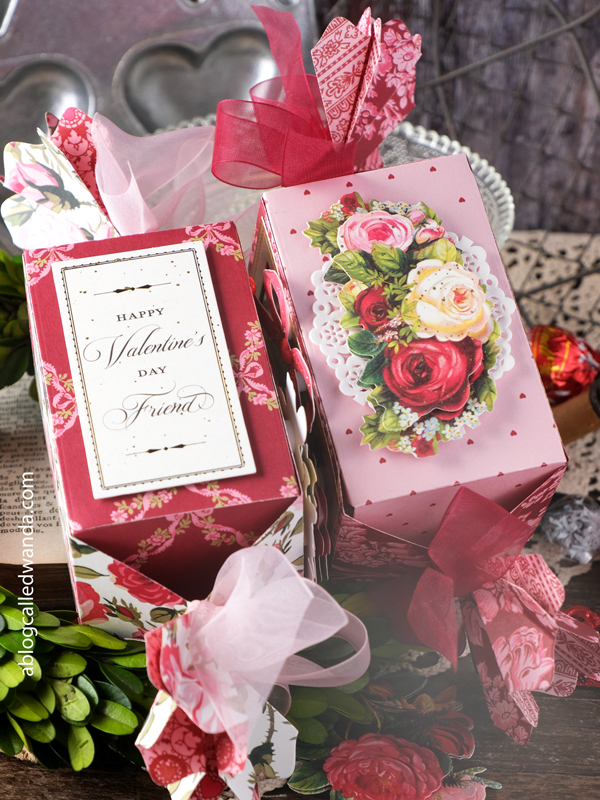
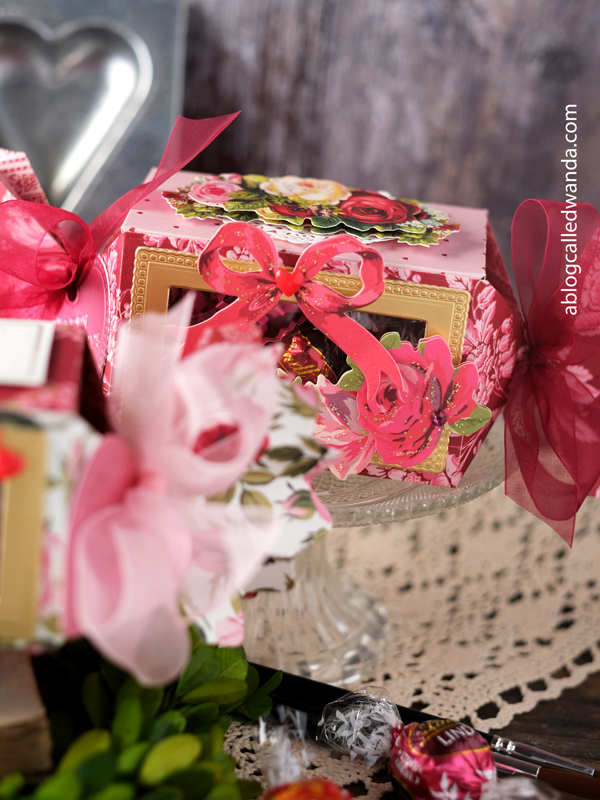
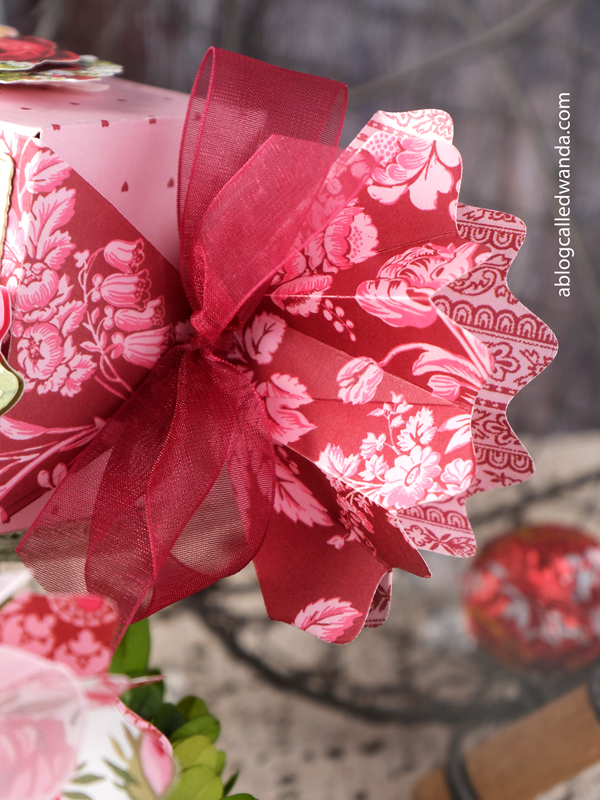
For today’s project I made some over the top treat boxes for some of my Galentines at work. Hee hee. The gurls always appreciate a chocolate treat. All the supplies I used today are from Anna Griffin. The paper, the dies, the embellishments – everything. It all mixes and matches together in the best vintage way. I buy my Anna Griffin supplies straight from her website or from HSN! I added ribbon and glitter and gems from my stash. These treat box dies are brand new – they cut like a dream and go together very easily! I already am thinking of ideas to make these boxes for Halloween!
The boxes hold a fair amount of candy and would definitely hold a small gift – like earrings or a gift card. The dies set has different rectangles to use to cut an opening in the box – like I did here. They you put some acetate behind the opening. You also could leave the box solid without the window – total preference. Okay, enough yapping, I have lots of photos to share!!
This photo shows the tops of the boxes – because as I always say – more is more! Hee hee. I added some gold paint splatters too and a doily, and and and… 🙂
Do you ever go through your stash and think… That ribbon is probably from 20 years ago!? LOL. You never know what you might find in your crafty stash!
Thank you for stopping by today! It’s good to see you! Happy Valentine’s Day! Happy Galentine’s Day! XOXO
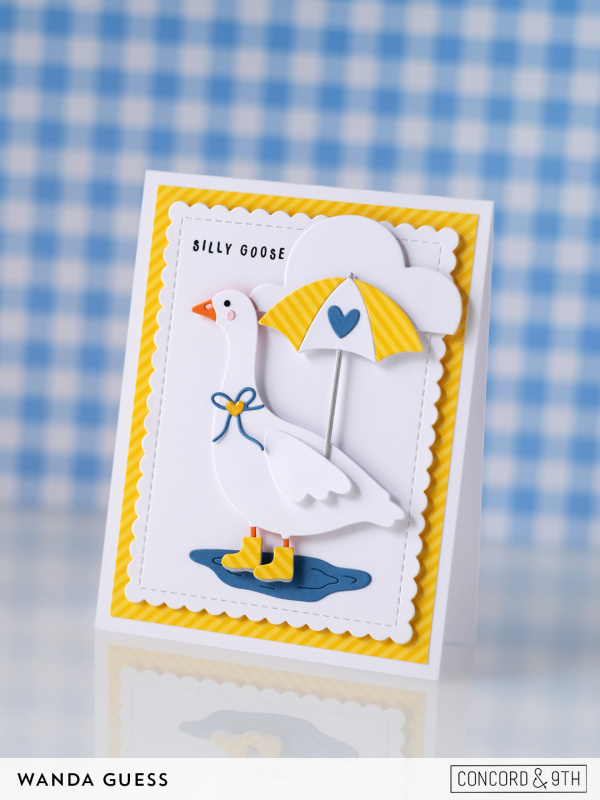
Honk Honk! Silly Goose! Gosh, today I’m sharing a new stamp/die combo that just might be the CUTEST thing everrrrr! Concord and 9th just released their February new products and everything is SOOOO fun! I’ll be making more cards soon, but I couldn’t wait to share this card asap! Hee hee. The cuteness factor is off the charts! Everything in the new release is available now for shopping and I guarantee you’re gonna like it too! Hope you’re having a good week so far everyone!
My finished card is a white A2 card base, layered with pretty yellow stripes and then a second white layer. This card is clean and simple, lots of white space. My color palette is yummy for Spring. That goose is ADORABLE! And, are you kidding me? She is wearing galoshes!! I am obsessed with those tiny yellow boots! I combined some previously released C9 die sets to create my perfect-for-spring scene! (It’s actually raining while I’m typing this!)
Of course, because it’s Concord and 9th, they thought of everything.. A bow, little cheeks and a die to easily make the beak! I really love this fun set, and it made me smile the whole time I was crafting! Take care, everyone! I’ll be back on the blog on Friday with some pretty vintage Valentine treat boxes! XOXO
Hi friends! I’m back today with one more project I made with the beautiful new Pretty Pink Posh Spring 2026 release! I have been so excited to share this card with you! In case you missed my other PPP new release projects, go back one more post to see them!
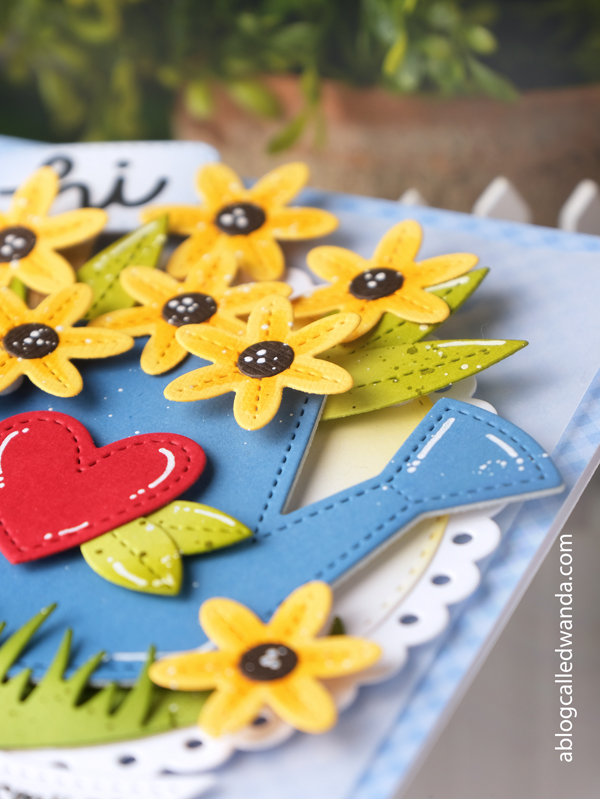
Today’s card features the brand new Watering Can Shaker dies, and the Stitched Spring Flowers, AND the new Banner Greetings Easter! Lots of pretty dies combined together in this card. My finished card is a white A2 card base, layered with blue gingham, a bit of vellum, and then an eyelet circle. I die cut the watering can three times and layered them so that it would be a little thicker. Then I die cut a bunch of flowers and leaves to layer into the can.
Here’s the side view of my layers. I tucked the watering can into the grass border. I added a heart to the front of the can – kind of reminiscent of Mary Engelbreit – who I love!
Here’s a close up of the flowers and the little sign!
Good day my little chickees! Hope your week is going great! Our craft rooms are getting ready for Spring time! I’m ready to go! Ready for pastels and cute themes and happy crafting! Today is the day for the beautiful new Spring 2026 release from Pretty Pink Posh! PPP Easter is truly one of my favorite releases each year, and this year is no different! Today is release day, so everything in my post is ready for shopping. I’m sharing two cards today, and then one more card next week, made with the new release! Yay! I hope to inspire you too!
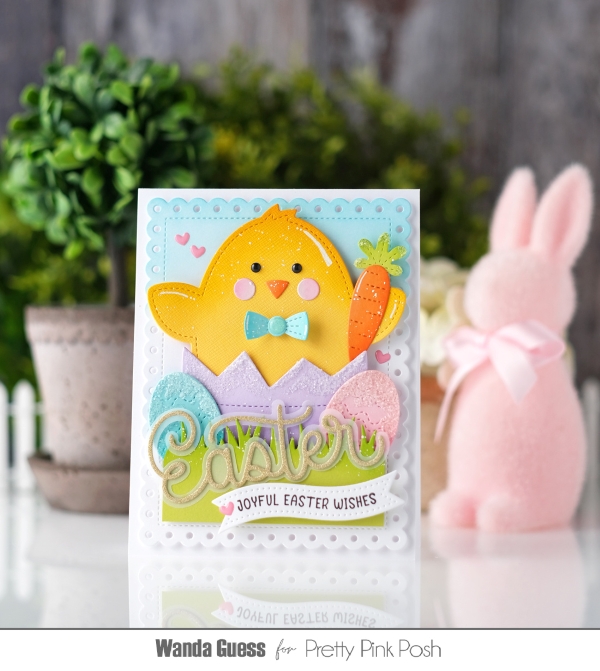
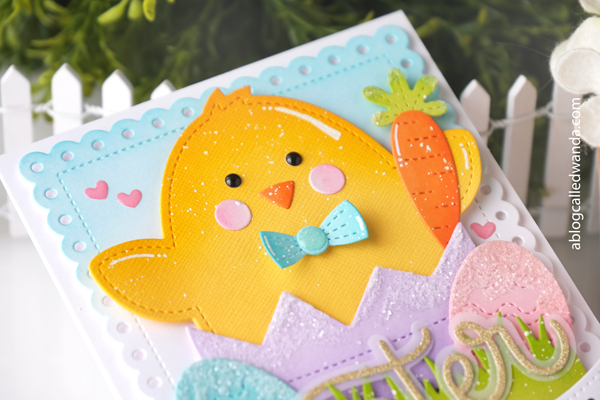
My first card today features the brand new Chick Shaker Dies, the brand new Large Easter Shadow dies and the brand new Easter Banner Greetings! So many fun new things! Of course I combined the new items with some of my previously released favorites from PPP! I created a pastel scene sure to make you smile!
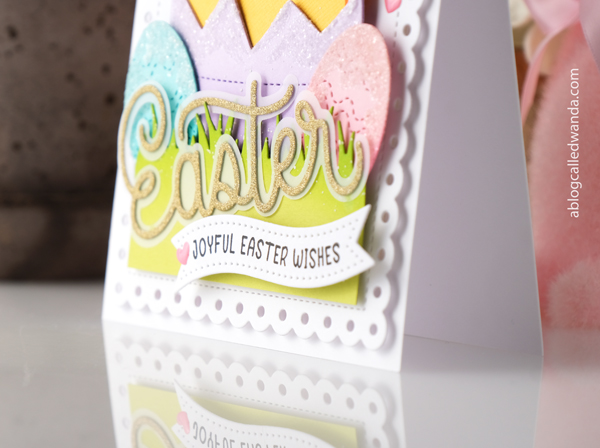
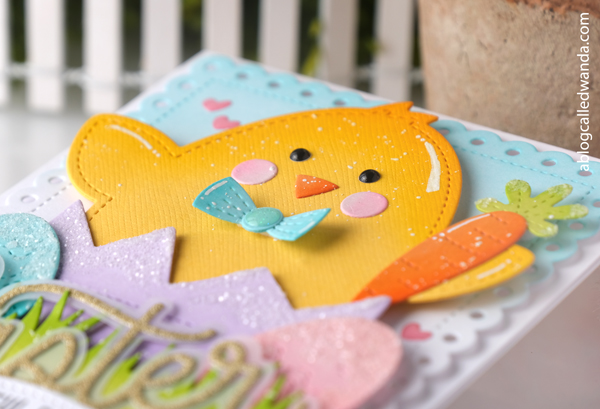
My finished card is a white A2 card base, layered with Eyelet Rectangles and then my Easter chick popping out of his egg! I die cut all the pieces and gently shaded them with Distress Inks. I used white gel pen, white splatters and chunky glitter as my accents/details. I wanted the eggs to look like those yummy sugared candy eggs. I gave my chick some pink cheeks and a cute bow tie too!
Here is a side view of my layers and pieces…. The Easter word is die cut from gold glitter cardstock and layered with vellum. I used the new Banner Greetings for the secondary sentiment.
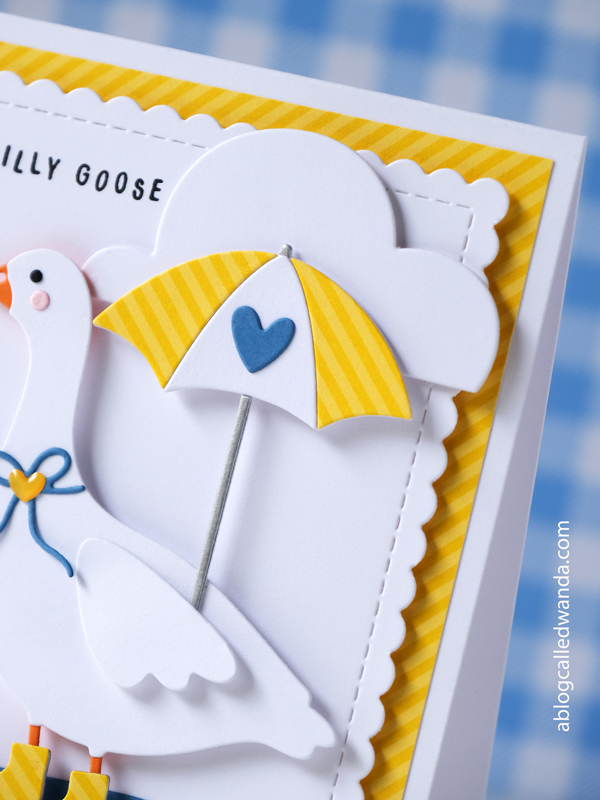
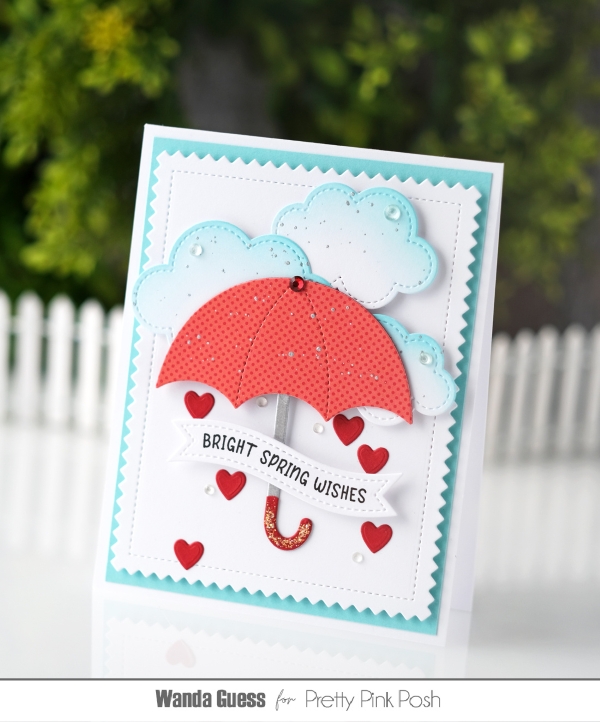
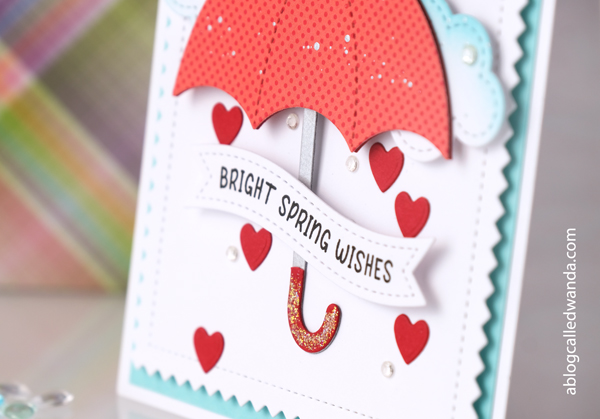
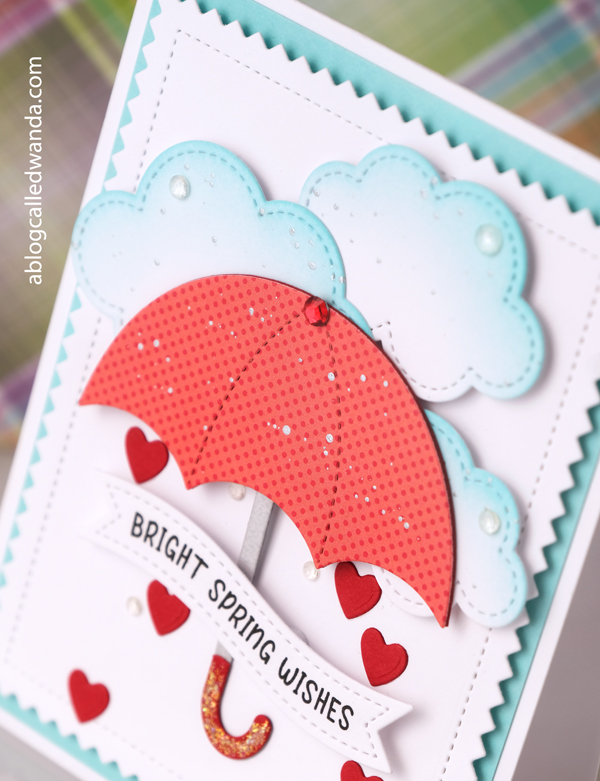
Next up today is my second card, which features the brand new Stitched Clouds dies and the brand new Spring Holder Additions dies…. These clouds are PERFECT!! The set has three different sizes of two different clouds. I am going to use these again and again and again. I think they’re a staple for any craft collection!
My finished card is a white A2 card base, layered with aqua and then a white layer. I kept my design very clean and simple and graphic. I do love an aqua and red color palette! I die cut out the clouds and the umbrella. I splattered everything with silver ink to look like rain… I added gems here and there and some raining hearts. This is just the right card to cheer up someone!
That’s it for today, friends! I hope I brought a smile to your face, and inspired you to do some crafting! I will be back soon with some more cards and such! Wishing you a blessed and beautiful day. Thanks for stopping by! XOXO
Hi friends!! It’s finally February! Gosh, January was 575 days long! I’m glad it’s now the month of LOVE! I have lots of ideas, and as always, I am going to run out of time. Boo. I ordered some cool Anna Griffin dies for Valentine’s Day but they haven’t arrived yet. I’m going to try to make a project with them for this year. If not, they will be Easter projects! LOL. I hope you had a great weekend and that you are not freezing cold! I know so many of you went through that huge storm. I pray and hope you are all doing well.
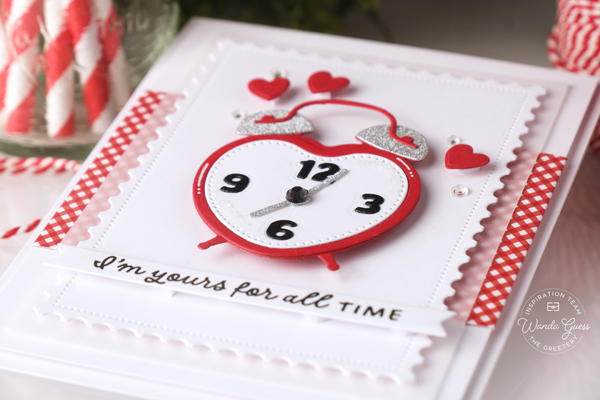
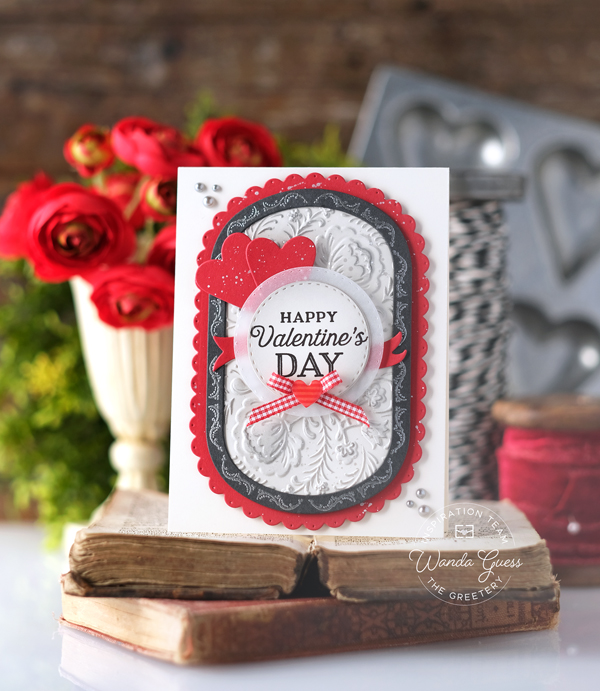
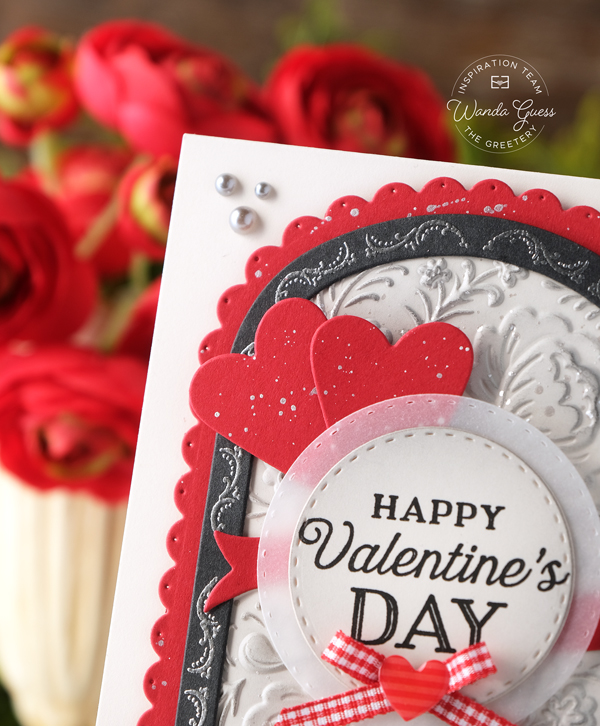
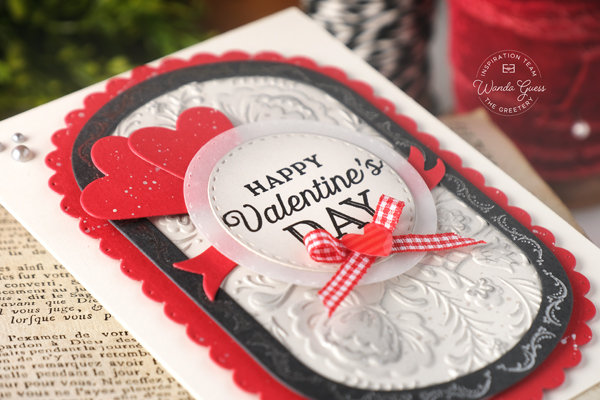
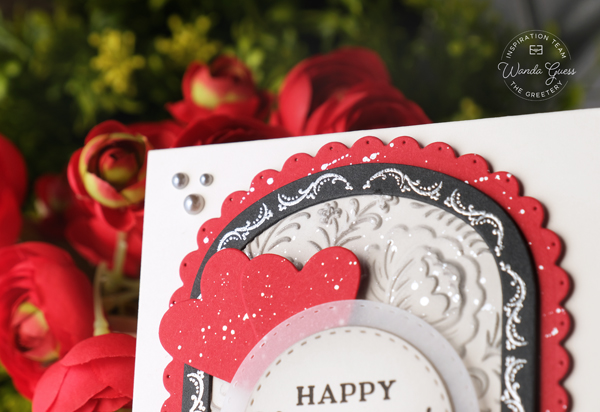
Today is my day on The Greetery Blog! Woop! And I’m sharing my cards here too. I made two cards today – Punny Valentines – with a clean and simple card design. My cards feature the fun Hearts at Home Toaster and Clock and the matching sentiments. I used a very basic Valentine color palette – red, white and silver. Both cards are A2 sized white cards….with lots of layers!
First up is A Toast To Us! Hee hee. That super super cute toaster with poppin up toast! Fun fact about me – I LOOOOOVE toast! Breakfast, Lunch, Dinner or Snack! I started by doing loads of white and vellum layers and then popped in a bit of gingham to make it fresh. I die cut out all the elements and gently shaded the pieces using distress inks and sponge daubers. I added white gel pen accents and some glitter too. Even the little lever on the toaster is a heart! Cheers!
My second card uses the exact same layout and design. But this card features the Hearts at Home Clock dies! I’m Yours For All Time! So sweet! Again I used red and white with a bit of silver. The fun thing I like to do is add hearts to everything. So here I added some red hearts and a few clear gems. Just a bit of sparkle and visual interest. Everything is popped up with foam tape also. Even though this card is clean and simple – it is THICK! Hee hee.
Here’s a side view of my clock card. I used the Pretext Banners dies for the sentiments. The sentiments are from the Hearts at Home stamp set. Love the mix of fonts and the sayings!
That’s it for me for today! I’ll be back in a couple of days to showcase the new Spring/Easter release from Pretty Pink Posh. And you definitely don’t want to miss that! I love how my cards came out and I can’t wait to share them with you!! XOXO
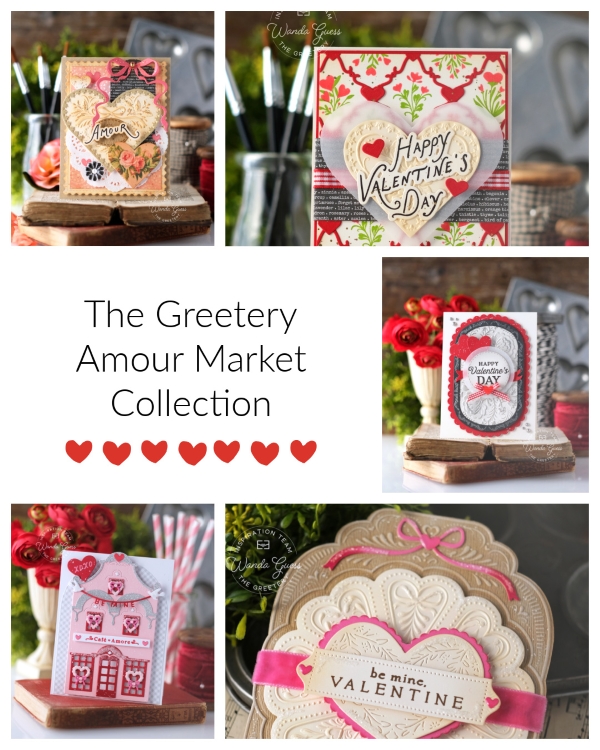
It was my pleasure to introduce the brand new and gorgeous Amour Market Collection to you this week! And, I hope you love it as much as I do!! Happy Crafting!! If you scroll back to my last two blog posts, you can see all my projects from the new release! If you have any questions – reach out!! Thanks for all the love and kind comments! Happy Creating! Can’t wait to see what YOU make! Feeling the Valentine’s love for sure! Have a great weekend!
Hi friends! Welcome back to Day Two of our showcase days for the new Amour Market Collection from The Greetery! Are you feeling the love? What was your favorite thing from yesterday? You are in for more fun today, lemme tell ya! More hearts and more romantic vibes! Yeah. Remember that release day is tomorrow at 10am EST. (I already know you won’t forget!) This is such a beautiful release. I know that I will use all these hearts in more ways throughout the year. I have three more cards to show you today. Thanks for joining me!
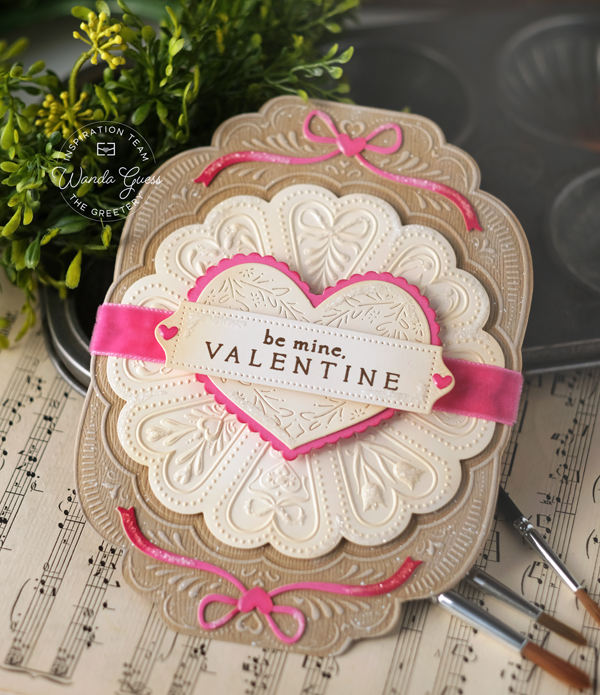
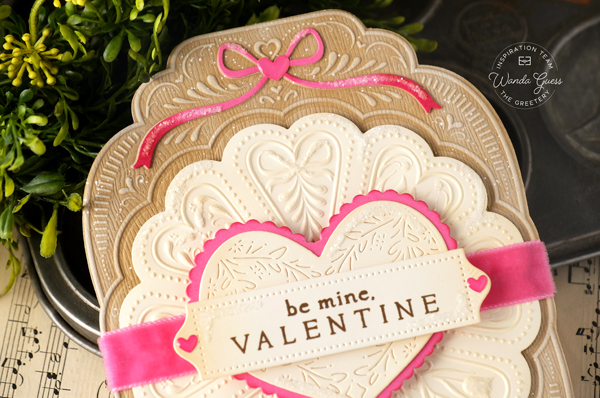
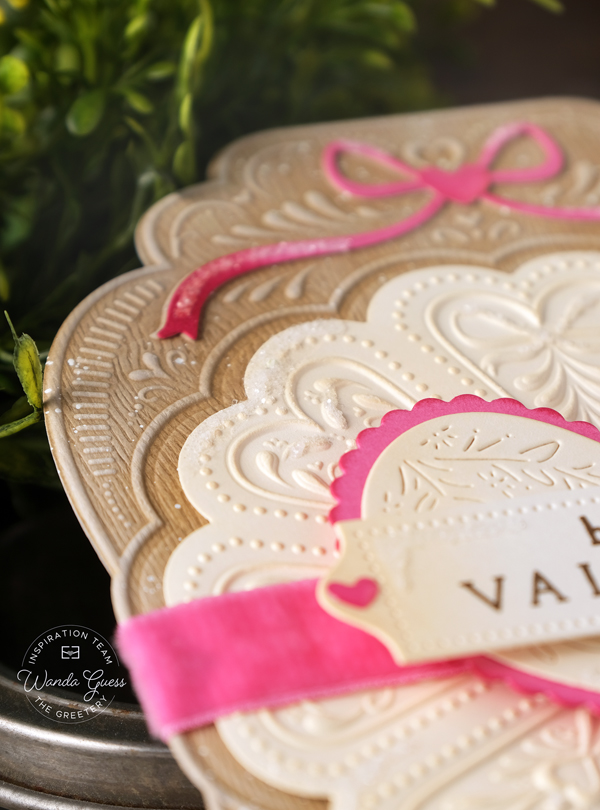
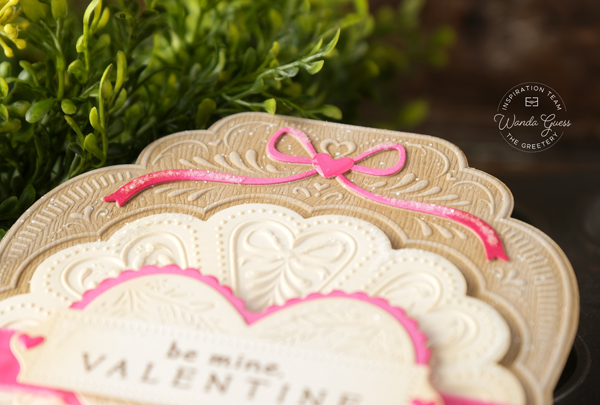
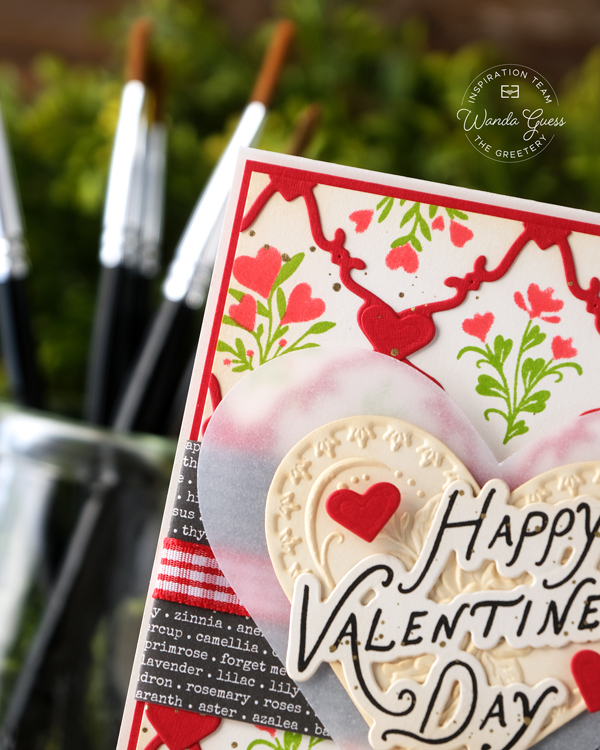
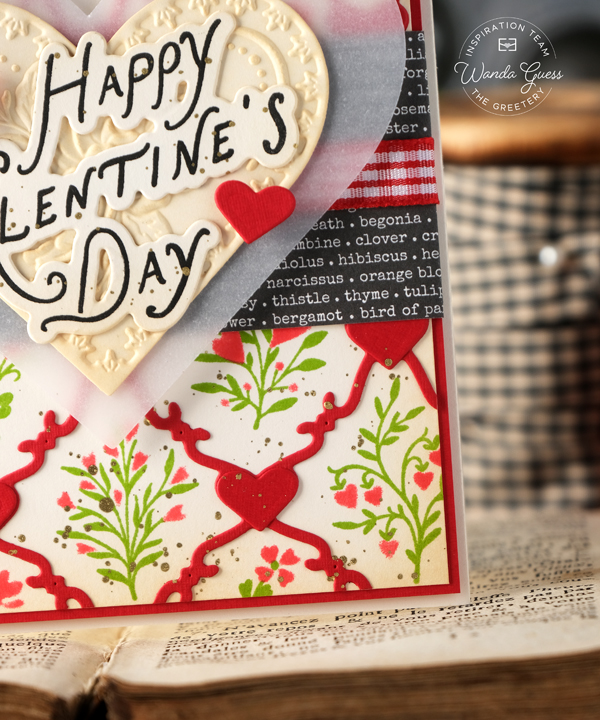
My first card for today features (one of) the newest additions to the Shortbread Shapes Collection. For this card I used the Shortbread Shapes Scalloped Hearts! OHHHHH these are gorgeous! And the matching Embossing Folder??? LOVE! My card also features the new Simple Valentine Sentiments…and the beautiful previously released Nordic Hearts! I used a pretty color palette of kraft, cream and bright vivid pink! Perfect for a valentine! This card is an A7 size – 5×7.
I used woodgrain paper for the background embossing and then gently inked over the embossed parts with a small sponge dauber and white pigment ink. Just makes the raised parts pop!! On the cream embossed portion I used Antique Linen Distress Ink to add a bit of color. I also splattered on white paint and added bits and bobs of chunky glitter. It’s soooo romantical!!
Here’s a close up of those delicious layers…All those textures and features. I am kinda obsessed. Just sayin.
So I had to make at least one non-valentine!! Hee hee. To show you how versatile everything is. Spring is coming fast so I decided to make a pretty, fresh tulip card! This card features another one of the new Shortbread Shapes. This one is called Shortbread Shapes Rectangle Hearts. My finished card is an A2 kraft card base. I layered that pretty Shortbread background and then added tulips and a bow. The sentiment is from the brand new Simple Valentine Sentiments…but I feel like this might be a nice get well card, or just because card…
Here’s a close up of everything… I heat embossed the sentiment in gold embossing powder for an elegant touch. I gently inked the top part of the cream panel using yellow ink and a blending brush. It’s very subtle, but picks up just a bit of color.
I made that pretty Recency Bow out of gingham paper and shaded it just a bit with a yellow Copic Marker. A golden gem in the center!
And my last card for the new release! I went kind of rogue for me! A big bold graphic color palette! Red, cream, black and silver! Usually I love gold, but I switched it up here! This card features the brand new Small Capsule Fixed Borders dies (the black part), and the new Sweetest Frames Capsule Edition…of course along with other beautiful Capsule Collection elements too! I used the hearts from the Shortbread Shapes dies. They are perfection! This finished card is an A2 cream card base, then allllll the layers!
I used the Rosemal Reflections embossing folder and inked it with black!! Looks really cool. I splattered silver ink all over everything… In this photo you can see the beautiful details of the new stamp set. I embossed with silver embossing powder onto black. The new dies cut out the border perfectly! (Genius)….
a bit of vellum to layer, and then my sentiment is stamped into a circle panel. A tiny bow and of course one more heart complete the look!
That’s it for today – and day two of our showcase of projects for the Amour Market Collection! Thanks for stopping by to share with me yesterday and today! It’s my pleasure to introduce the new release. TOMORROW is release day! Enjoy and happy shopping AND crafting! XOXO
Giveaway Information: The Greetery is giving away two $50 gift certificates! The comment deadline is 1/23 at 6:00am EST (comments from team blogs entered into giveaway). Winners announced on The Greetery blog on 1/23 at 9:30am EST (right before the new products go live) GOOD LUCK!!
COMMENTING NOTE: On my new blog – to leave a comment, you must open the post first. Then the comment box will appear at the bottom. You can click here to do that!
Hello hello hello my sweet friends! Something romantic is in the air today! Are you ready for Valentine’s Day crafting? Love, Liebe, Amore, and of course Amour!!! The Greetery has a brand new release this week, and it’s called the Amour Market Collection! As you would expect, it’s lovely and pretty and classy! I’m definitely in the mood for love after seeing this collection! The design team and guests will be showcasing our projects today and tomorrow, and then release day will be on Friday, 1/23 at 10am EST. I am so excited to show you everything! Three cards today, and three more tomorrow. I’m hoping to inspire you and get you looking forward to February! I feel like January went really fast so far…
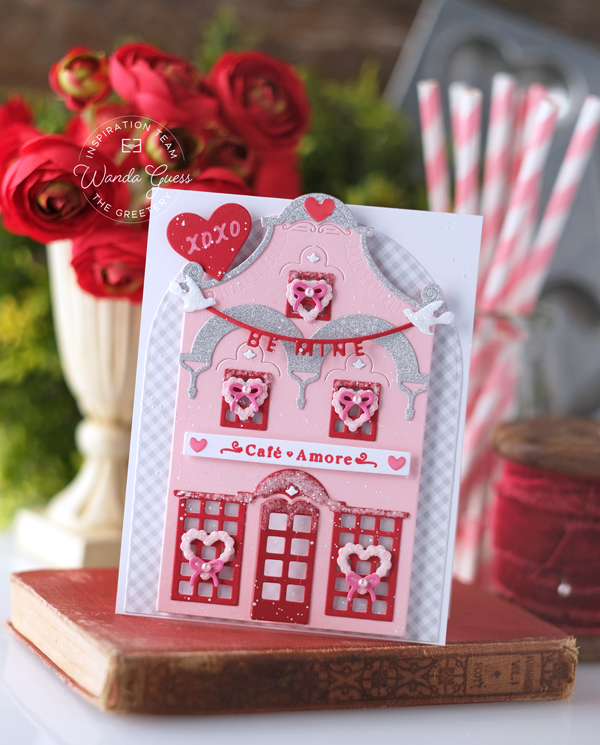
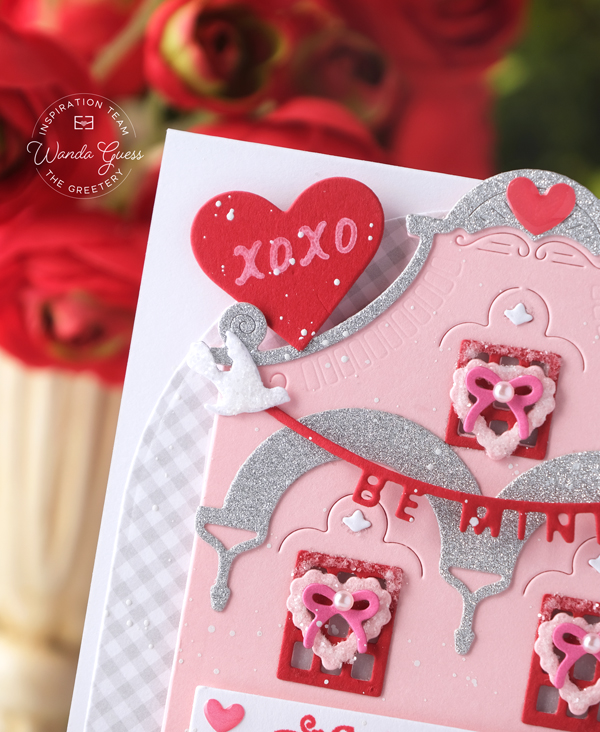
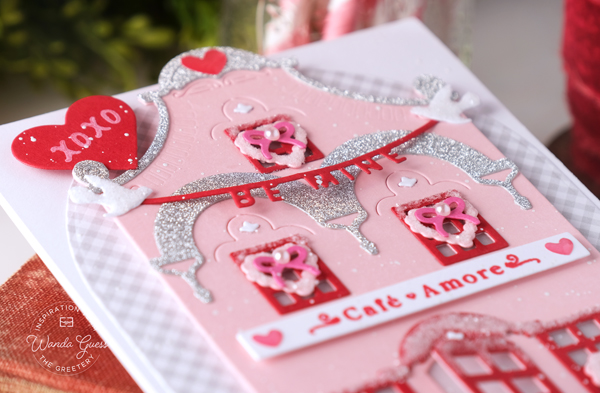
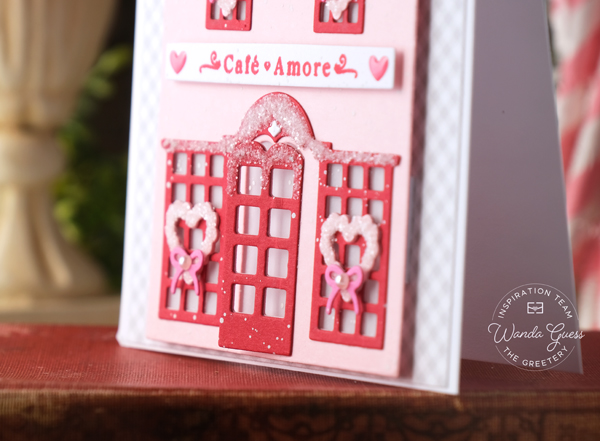
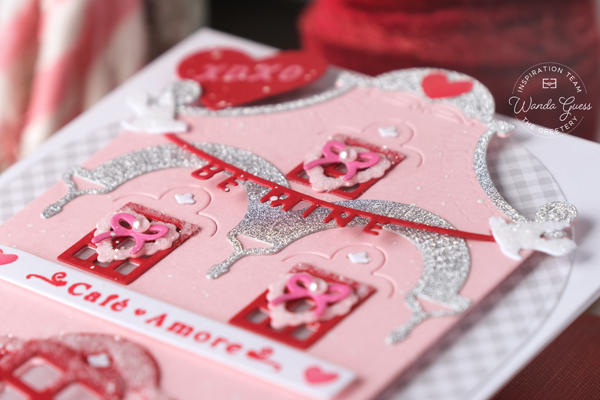
My first card for today features the newest addition to the amazing Market Place Dies – Market Place Lover’s Lane Dies! Heart wreaths, heart garlands, even some tiny doves too! My card also features the new Lover’s Lane Stamp Set – to make different shoppes! I made a sweet little pink cafe with ALL the hearts and all the Valentine colors! The door is always open – come in for a latte!
My finished card is a white A2 card base. I started by die cutting out all the elements, using pink, red, white and silver cardstocks. I added lots of glitter and some white paint splatters too. The details are crazy – those tiny lovebirds holding the banner, the tiny heart wreaths. I absolutely love it all. It was really fun to make this card. I used an arch in the background using grey gingham paper. I added pearls and more hearts as my embellishments. I say – more is more! Hee hee.
I love to add lots of sparkly glitter to these houses. Just looks so pretty in my opinion! I also coated the heart wreaths with glitter. I placed vellum behind the windows for a frosty look. If I built a cafe, it would look just like this!
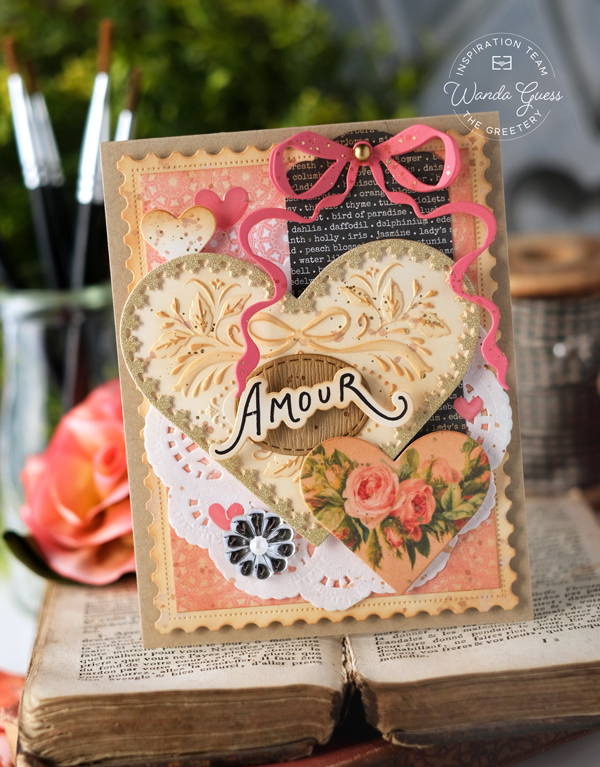
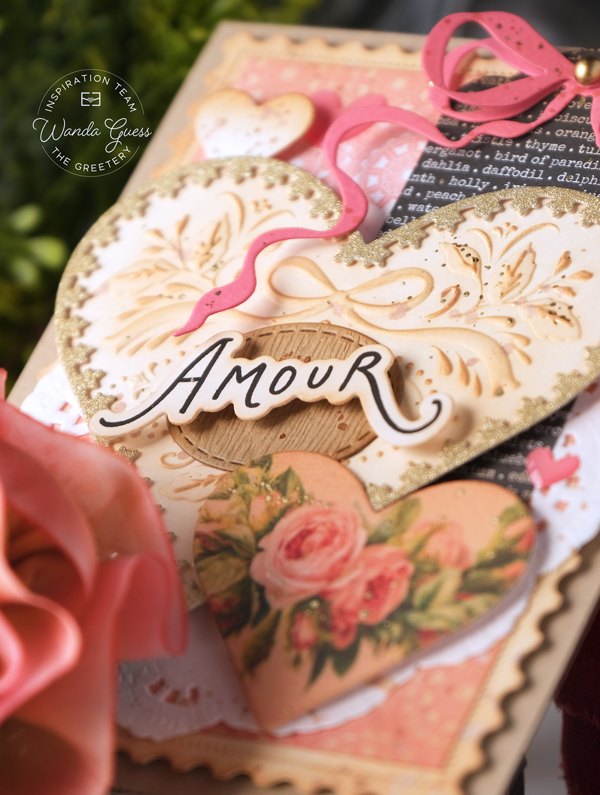
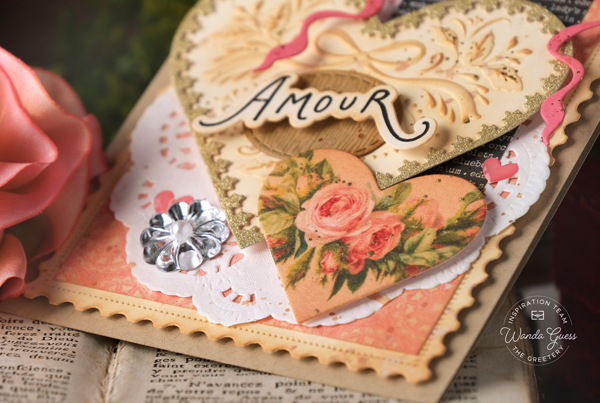
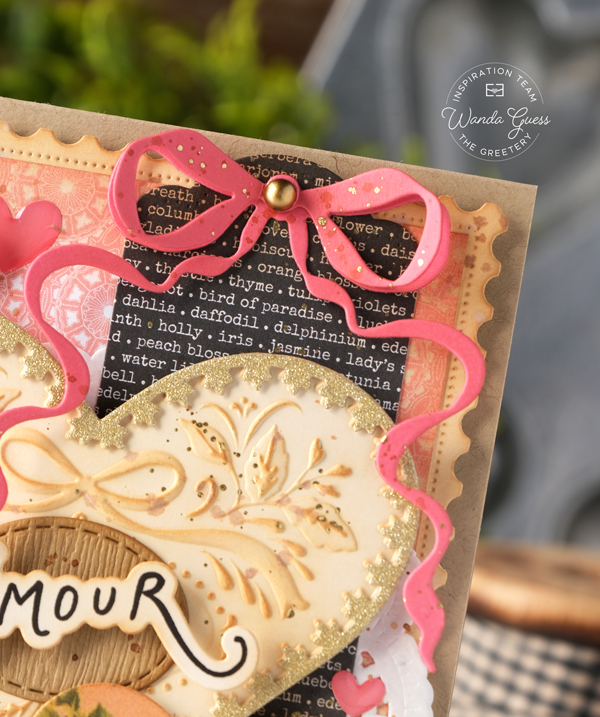
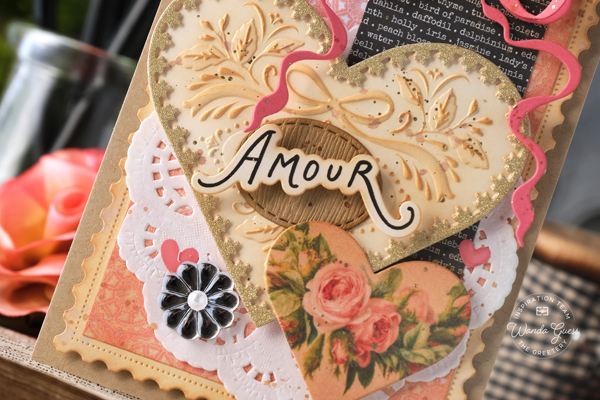
For my second card today I went full vintage! I love that look. This card features lots of different new products – the Coquette Hearts Embossing Folder (Wowza), the Whole Hearted Die (Genius), the new Valentine Gallery Prints (Stunning), and the Filigree Hearts dies. I also used some of our older favorite items from the Greetery! Everything is all inky and splattery and yummy! A vintage color palette of cream, black and peachy pink. My finished card is an A2 kraft card base. I layered a cream panel, then patterned paper, then all those hearts.
I die cut a tag from the Speed Tagging Set and added the Regency Bow at the top. The heart is embossed to perfection! I die cut one of the Gallery Prints into a smaller heart shape… I used the new French Kiss Sentiments and matching dies for the Amour word.
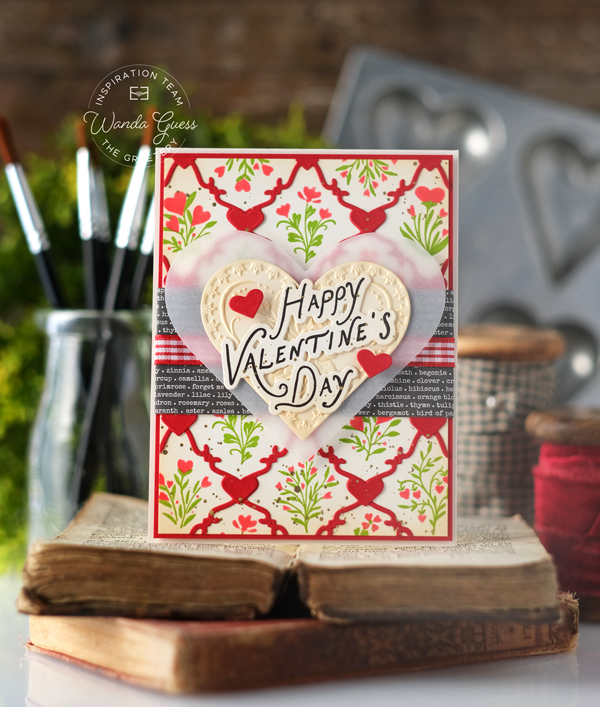
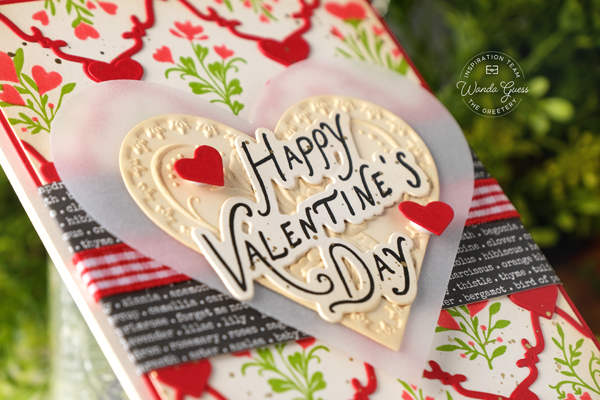
My final card for today features the newest addition to the Bitty Blooms collection – Bitty Blooms Hearts! My card also features the brand new Diamond Hearts Dies…and more of those Coquette Hearts…. My finished card is a cream A2 card base. I stamped and stenciled the background – just two colors – looks so good! Then I layered on the Diamond Hearts Dies in red! Valentine perfection I think! I stamped and die cut the sentiment (French Kiss Stamp Set)…. I wrapped a bit of gingham around the card too. I used a lot of stuff on these cards. I couldn’t help myself. Everything works so nicely together!!
Here’s a closer look at all my layers and those yummy embossed areas!!
That’s it for today – day one of the showcase of projects for the Amour Market Collection! Thanks for stopping by to share with me today! It’s my pleasure to introduce the new release. I will be back tomorrow with three more cards!! YEAH!! Don’t miss it!!
Giveaway Information: The Greetery is giving away two $50 gift certificates! The comment deadline is 1/23 at 6:00am EST (comments from team blogs entered into giveaway). Winners announced on The Greetery blog on 1/23 at 9:30am EST (right before the new products go live) GOOD LUCK!!
COMMENTING NOTE: On my new blog – to leave a comment, you must open the post first. Then the comment box will appear at the bottom. You can click here to do that!
Hello there my sweet little ladybugs! How are you today?! I hope this week is going great for you. The sun is finally shining here – dang we have had a lot of rain! The sunshine feels good and I am in the mood for Springtime! The good thing about January is that things get back to normal and our usual routine… I kind of like that actually. Started a new Theology class, my meetups are going again…. It’s all good. The only thing is that I wish I had more time for crafting!! (So many projects, so little time!)
Today I’m part of the giant Instagram Hop for the PPP new release! Be sure to pop over to my Instagram page to leave a comment on my post for a chance to win a prize! Of course I’m sharing my card here too! I used products from the brand new Pretty Pink Posh January release. My Lucky card from the 5th was also part of this new release – it’s so good.
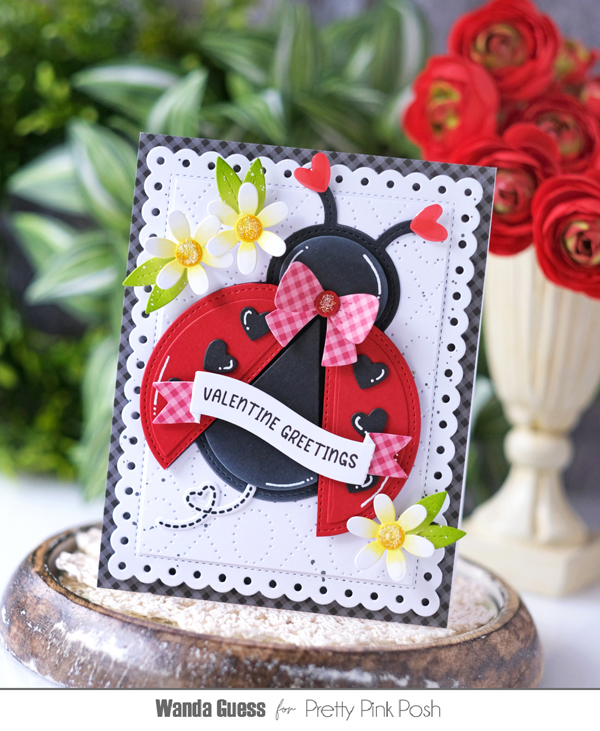
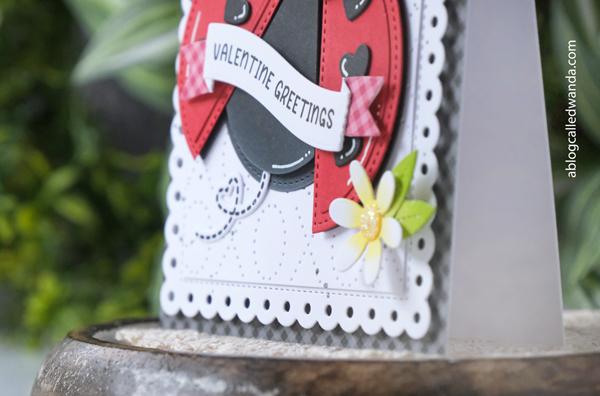
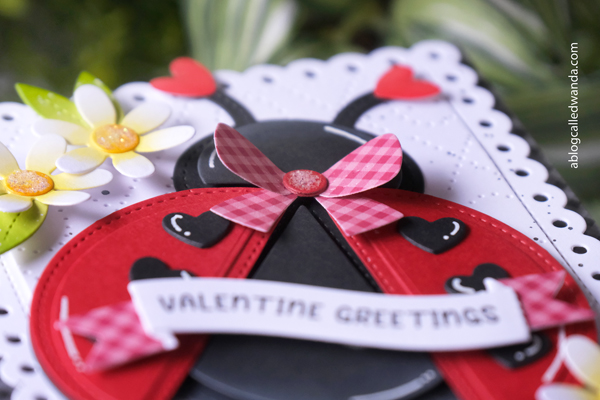
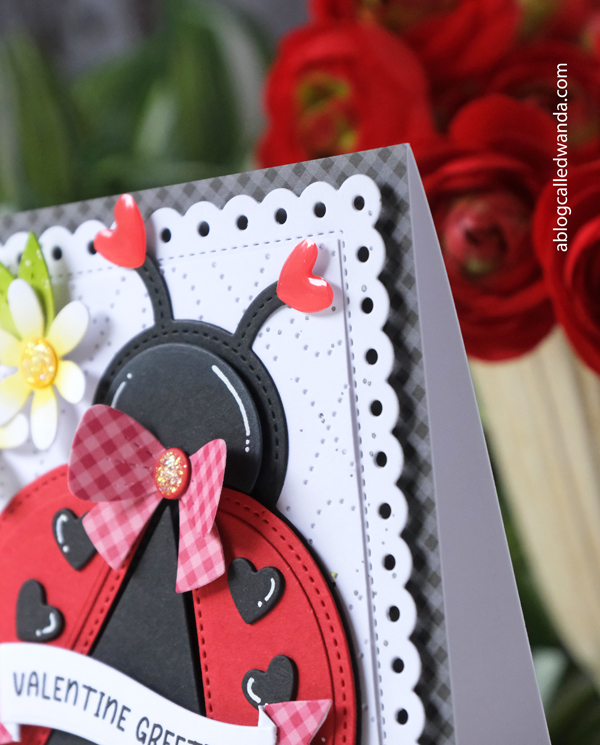
Today’s card features the brand new Ladybug Shaker Dies, the new Banner Greetings dies and stamps and the Lovely Ladybugs stamp set. I combined the new items with some of my older favs. Don’t you love how everything works together perfectly from every release? My finished card is a white A2 card base. I layered on black gingham and then two white panels (eyelets and then the XO plate)…. The focal point is of course that giant Ladybug!
Here’s the side view to show you all my layers! I die cut the XOXO plate and then trimmed it to fit inside the Eyelet Rectangle. It adds another layer and some visual interest while still being all white! I splattered on some black paint splatters too. The flowers are white with yellow ink blending and then Stickles on the yellow centers.
I felt like this little lady needed a bow of some sort! Ha! She is so perfect for Valentine’s Day with her heart spots and heart feelers. I dunno, a bow just seemed like a good idea! Red gingham for the win.
Here’s a close up of the paper layers. Also, you can see that I gently inked the edges of the black parts of the ladybug using white pigment ink and a sponge dauber. Then I added white gel pen accents!
I wanted some kind of floral element on this card so I chose these small daisies for a bit of a pop of a different color and more visual interest. I love that fresh green too!
I LOOOOOOVE the new Banner Greetings Dies! Like love love. I used the new Banners to stamp my sentiment and mounted it across the ladybug body. Everything is popped up with foam dots.
It’s nice to see you today! Thank you for visiting my blog! I’m still trying to get back all my blog traffic since starting on this new platform. It’s been a little slow, so I’m grateful when you come by! Wishing you a blessed and happy day today – and always.
If I did things correctly, at the bottom of the post you should see a subscription box! Enter your email address to be notified whenever I publish a new blog post. Fingers crossed. LOL… Still getting used to my new blogging platform. CLICK HERE to open the post and find the subscription box!! Yay!!
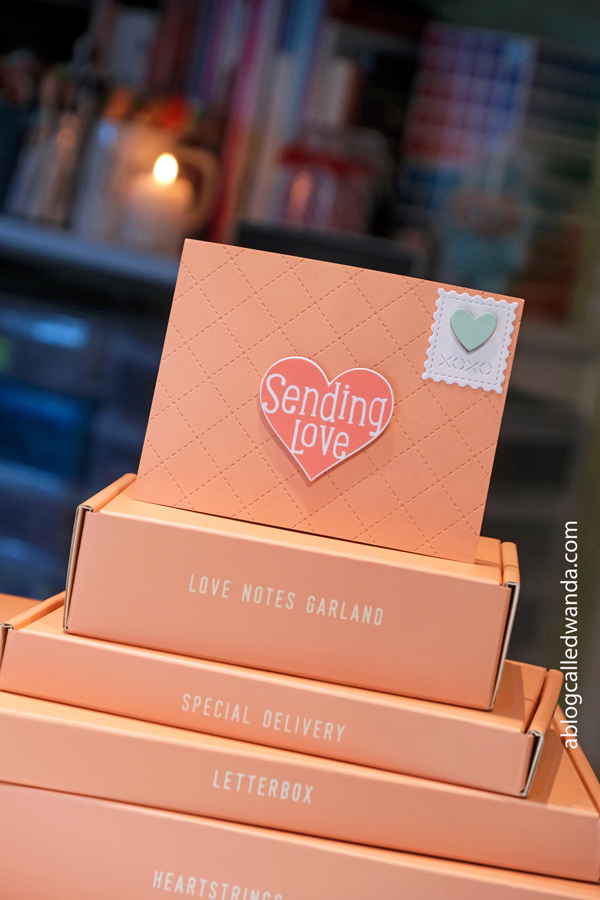
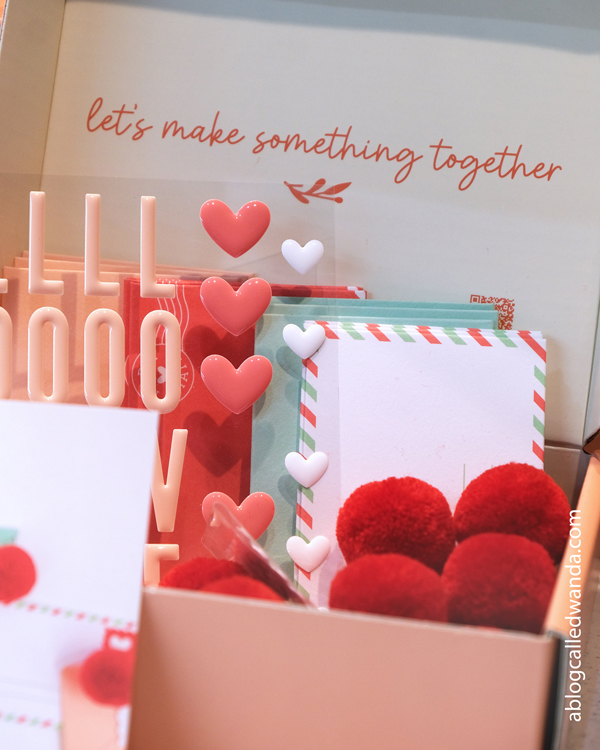
Hi everyone! It feels so good to be back crafting, sharing, blogging…. I have lots going on in my craft room already this year! It was nice to have a bit of rest over the holidays and it’s nice to be back working too! All the new valentine releases are coming at us fast! And I love it! Remember at Christmas time, I shared with you the awesome craft kits from Concord and 9th?? (CLICK HERE TO SEE) Well, guess what? They have a super cute Valentine release – from Crafted by C9! It launched officially on Monday, and everything is available to purchase now! There are five kits total and you can purchase all five of them for $120!! Or purchase each one that you like, or multiples of some, or whatever your heart desires. These are the CUTEST projects! And, just like the Christmas ones, they are the highest quality and SO well curated and thought out. The perfect thing to buy and have for a Galentine party!! Hee hee!
Well, lovelies, I put all five of them together and I’m here to share! Lots of pictures in this post, but I wanted to show you everything! I know you’re going to love them too!
Each kit comes with EVERYTHING you need! Even down to the glue and tape…. The only think I used was my own scissors! They thought of every last detail. Each kit comes with a QR code to scan and that leads you to both written instructions and a short charming video explaining each step of the creative process. Easy for a beginner or an expert crafter – and all ages!!
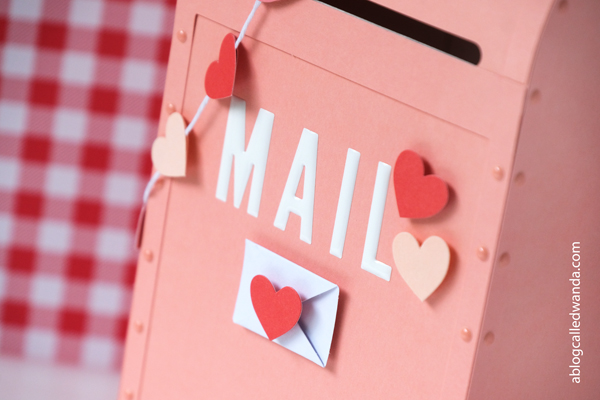
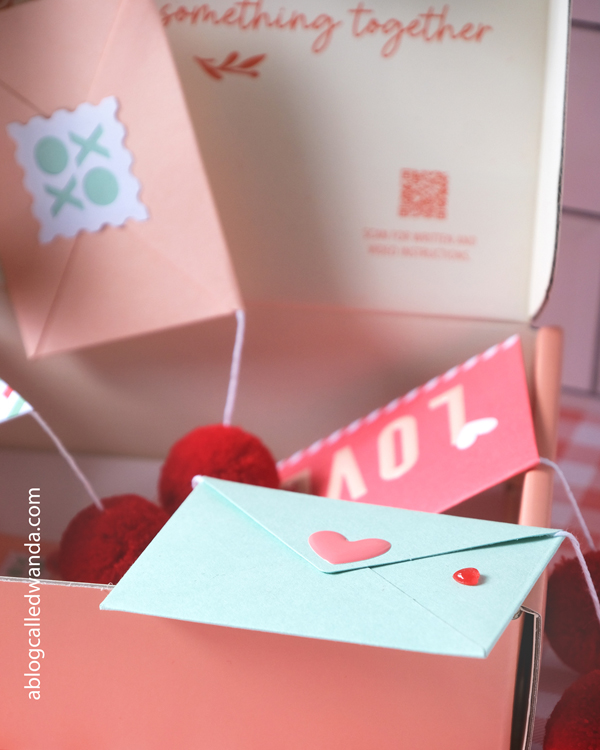
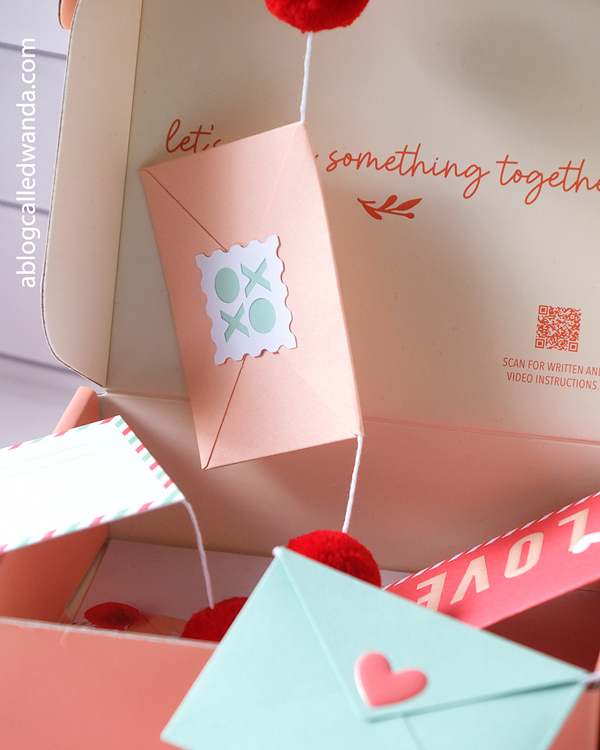
First up is the Letterbox! Like seriously I cannot stand it. The most adorable mailbox you ever saw! The cardboard shape is incredibly sturdy and thick and the addition of those pink ‘rivets’ just make the entire thing…. The stickers and all the supplies to make the heart garland come in the kit also. I forgot to take a photo of the bottom – but the bottom pops out (easily) so you can put little letters and/or gifts inside of the box. Genius. I AM OBSESSED!!!
Look at the sides! Little heart vents! Perfection!
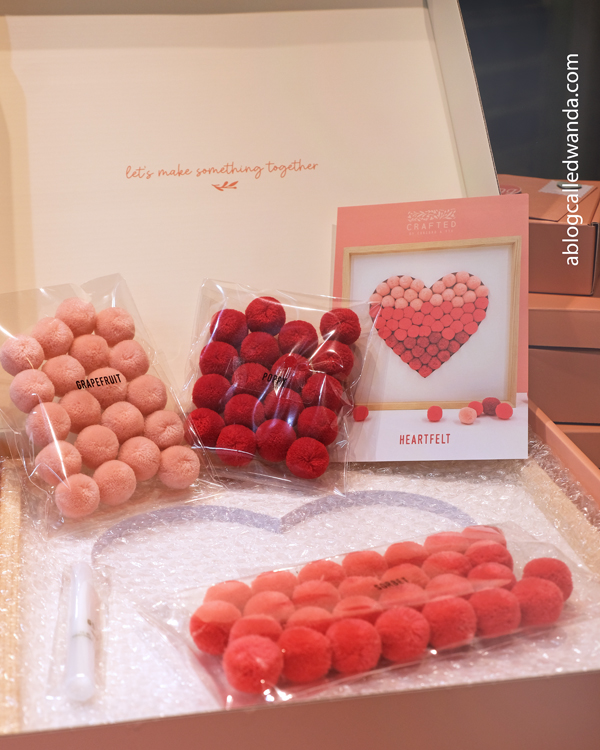
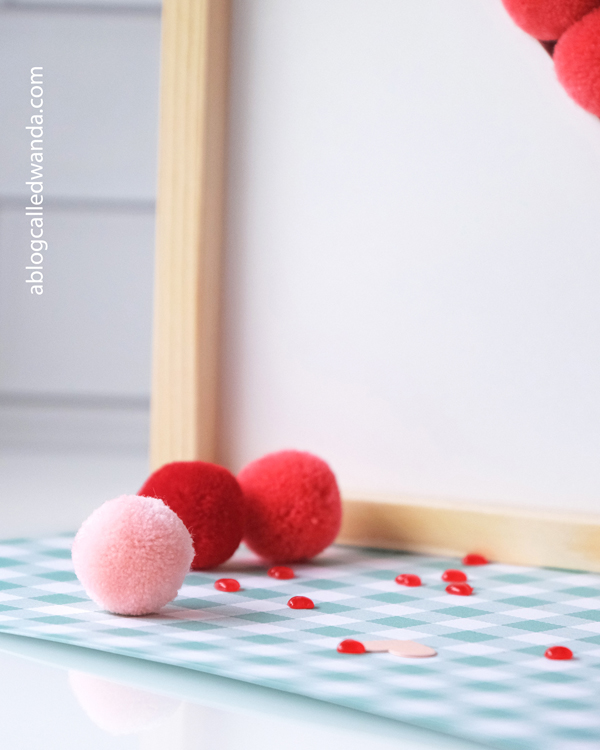
Next up is the Heartfelt Kit…. This kit makes a large wall hanging or stand alone home decor piece – made from pom poms!! Your kit includes the beautiful framed heart and all the pom poms your pom pom loving heart could want! The glue is also included and this is the most fun kit to put together!!
I chose to make mine a little different than the inspiration photo. You can design this however you want – no rules – just fun!! I can’t wait to hang this one up – probably in my craft room!
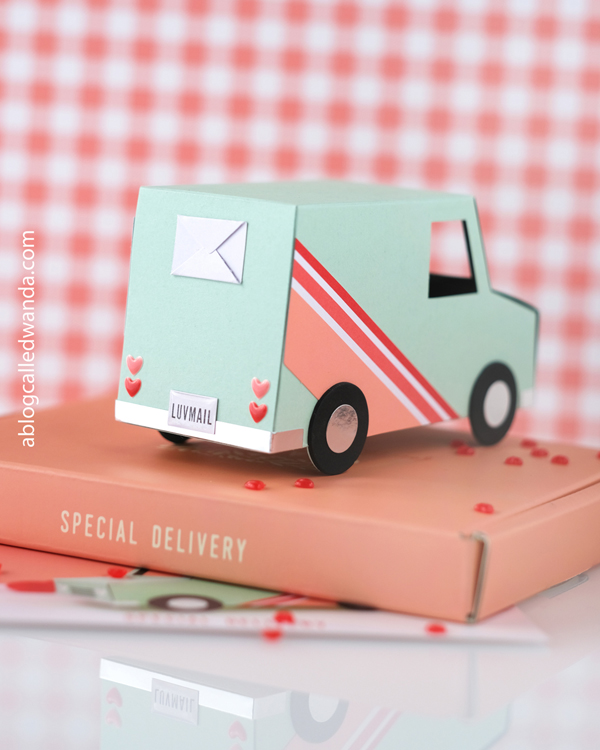
The next kit is the Special Delivery Kit! Beep Beep! An adorable little mail truck is coming your way! Full of love letters of course! Again, super easy to put together and decorate. It opens up for a way to put some sweet treats inside. Love it!!
The kit even comes with a tiny license plate! EEK! I would totally drive around town in this rig!!
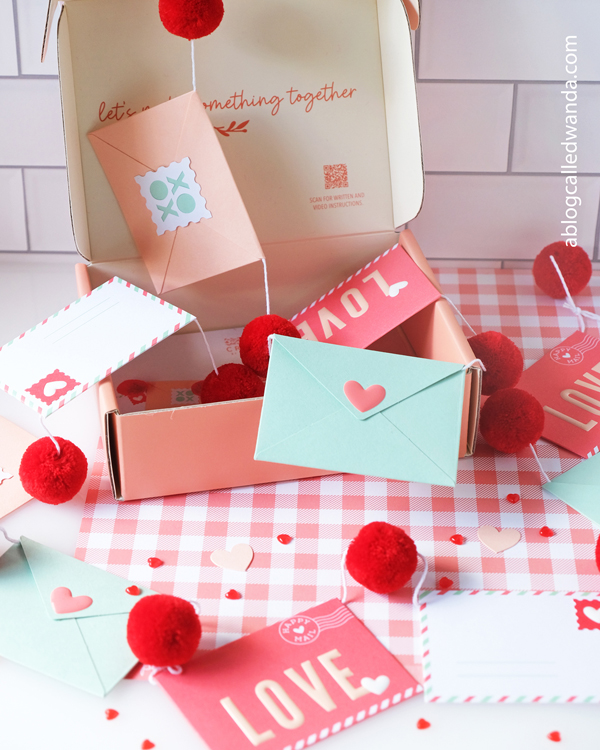
Next up is the Love Notes Garland Kit! A sweet and pretty decorative garland that alternates envelopes and pom poms! So festive! I personally love anything that has a mail/envelope theme to it, don’t you? Here’s a photo of the kit – so nicely packaged and presented. It’s a treat just to open each box. I am particularly fond of this color palette also!!
And, last, but certainly not least, is the Heartstrings Kit! A sewing kit, home decor piece! You guys!! This one is sooooo fun to do! The kit comes with all the yarn and the needle and even a pretty backing piece for your project. The holes are cut into the frame and you simply backstitch all the pretty colors onto the frame! So nice to display in your home!
Here’s a close up of that yummy chunky yarn! It looks so nice!
And, when you’re all done, there is a pretty cardstock backing piece that you put on to hide all your stitching! I think this would be a fantastic gift item also! It looks so professional when you’re finished!
Alrighty friends, that’s it for this long post! Lots to show you and share! The five Valentine Kits are available now for shopping and shipping – so you have plenty of time before Valentine’s. I would really encourage you to buy some kits and have a get together with friends and family. There is nothing better than crafting with loved ones! I wish I could craft with all of you!! XOXO
Hello my sweet crafty friends! Happy New Year! 2026 can you believe it? Wow! I wish you a blessed and happy and peaceful new year. I hope your year is full of laughter and love, and of course, crafting! We had a crazy holiday season this year with me being back at work full time. I’m like what day is it? Am I supposed to go to work today? Is it the weekend? What day is church? Hahahaha. But, as always, we survived the holidays. Now the sun is shining and it’s time to put everything away and get back to ‘normal’ life! Hope you are doing great today! As the new year starts, we begin crafting for Spring, and I love that. I have lots of awesome Valentine goodies that have already arrived in my craft room. Can’t wait to show you everything!
I’m here today with a FUN and FABULOUS new release from Pretty Pink Posh. As usual, Paulina knocked it out of the park. This new release is available now. It’s everything you can think of for Valentine’s Day and St. Patrick’s Day! I love it all! I made a couple of cards and I’ll be sharing more here and on Instagram. I swear the ideas flow so hard whenever I see what PPP has for us! The products are magic I think!
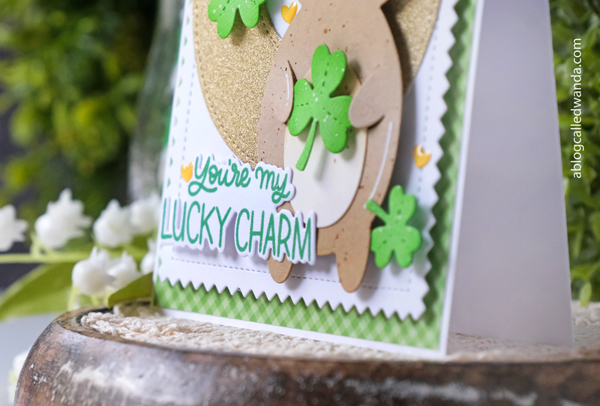
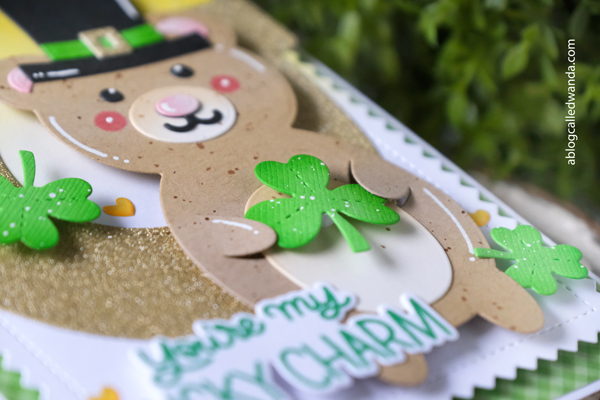
For my card today – release day – I am featuring tons of brand new items: The Bear Holder, The new Pinking Rectangles, the new Horseshoe Shaker, the new Lucky to Know You Stamp Set and more! My finished card is a white A2 card base, layered with green gingham (of course) and a white layer that I ink blended in golden shades…. You guys know that my kitty cat is named Lucky, because he was born on St. Patrick’s Day and he has big green eyes! He is my lucky charm for sure! Here I made that cutie new bear into a Leprechaun!!
I stamped that perfect sentiment in green this time! I hardly ever stamp a sentiment in a color – but I think it fits! Of course there are matching dies too – to make it professional and perfect. In this side view you can see all my layers…
Here’s a close up of that adorable new bear – the newest addition to the holder dies suite! You can make him any kind of bear by changing the colors! I made a teddy bear, but you could make him a polar bear or even a panda! I added pink cheeks and some white gel pen accents. I gave him a classy top hat! Hee hee.
I sprinkled a few extra shamrocks around the card. The big horseshoe is die cut from gold glitter cardstock – like a pot o’ gold! I think I heard him say Top O’ The Morning to you!
To leave a comment on this post (Please Do!) CLICK HERE!
If I did things correctly, at the bottom of the post you should see a subscription box! Enter your email address to be notified whenever I publish a new blog post. Fingers crossed. LOL… Still getting used to my new blogging platform. CLICK HERE to open the post and find the subscription box!! Yay!!
Hey hey friends! How are you today? It’s two weeks until Christmas! (Otherwise known as my husband’s birthday!) SO much happening this time of year, and I am ready and excited. Hope your Christmas preparations are going well and hope that you are enjoying the magic of the season. We’ve been out and about doing things, craft fairs, church events, Christmas lights, meeting up with friends, and of course shopping! Today I am sharing something fun – it’s a big end of the year Instagram Hop with Concord and 9th! I am posting my projects here on my blog too of course, but please head over to Instagram to see ALL the projects! I’m calling this post – cheerful jolly holidays! I have two cards to show you. Everything can be found on the Concord & 9th website!!
My first card features one of my favorite things of the whole season – this adorable stamp/stencil/die combo Jolly St. Nick! He is a giant Santa that fits onto an A2 card, or you could make him into a tag or shaped card. I absolutely am smitten! My finished card is an A2 white card base layered with red and stenciled snowflakes…. Then the Santa image. The stamp set comes with sentiments that fit perfectly onto his beard area. The whole thing is just CUTE! I added glitter glue to the white parts of his hat. I used Concord and 9th ink pads to stencil everything… I hope he makes you smile too.
My second card for today features the brilliantly pretty Yuletide Lane stamps and dies! You know I love me some Christmas cottages! My finished card is an A2 white card base layered with patterned paper from C9 from a couple years ago…. Then that gorgeous cozy cottage. It’s so fun to mix and match windows and doors and wreaths…. Even perfectly matching snow drifts for the roof!! I’m imagining myself inside watching Christmas movies by the fire with some cocoa…. I love this festive color palette with a bit of blue thrown in for good measure.
Okay, friends, that’s it for today! Be sure to go over to Instagram today to see the big hop! CLICK HERE! Wishing you a wonderful, happy, creative day! XOXO
If I did things correctly, at the bottom of the post you should see a subscription box! Enter your email address to be notified whenever I publish a new blog post. Fingers crossed. LOL… Still getting used to my new blogging platform. CLICK HERE to open the post and find the subscription box!! Yay!!