Hey friends! How are you? Hope you had a lovely Valentine’s Day weekend! It was fun that VD was on a Friday and it just so happened to coincide with my husband’s day off! We went out for a really nice romantic dinner – and we never do that! It was so delightful! And we went out for a nice coffee afterwards. It’s fun to still be made to feel special after 32 Valentine’s Days together! Romance is still alive! It’s been super cold and rainy here but our front yard is coming alive with tons of daffodils already. Spring will come soon I think! Hope you are doing great!
Today I’m up on The Greetery Blog with a pretty in pink birthday card! I’m sharing my card here today as well. A clean and simple design with pretty spring colors…. Just a few supplies and some cool gold ink… My finished card is a horizontal A2 card base in light pink cardstock.
My card features the All Aglow stencils and dies…. The sentiment is from the Make a Wish stamp set. I used the stencils and lots of ink pads to create the multi colored candles. I die cut out the stenciled panel and then trimmed the candles to fit my horizontal card… I used foam tape strips to mount the candles to the card. I used gold ink to stamp the starbursts behind the candles. The sentiment was stamped in crisp black ink along the bottom.
A little bit of Stickles on the candle wicks! Pretty and shiny!
That’s it for today! It’s time to start Easter and Spring crafting now! I can’t wait! XOXO
Hi friends! Happy Friday! I hope you had an awesome week! Do you have fun plans for the weekend? Thank you for all the comments on my Greetery release post! You are all so kind and I appreciate you leaving a note of encouragement. Hope you got some Greetery goodies and that you’re looking forward to creating! Are you working on Valentines yet?? I am definitely in Valentine mode!!
Today’s card is another L O V E card! It can be a Valentine, or an anniversary card, or a just because card! Pretty, cheerful, fresh colors, gingham (of course) and wonderful new supplies from Concord & 9th! Yeah!
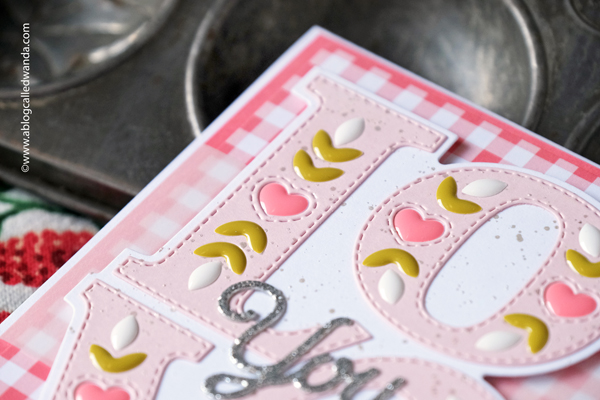
My finished card is a white A2 card base. Layered with watermelon cardstock, gingham, a bit of vellum, and then those big bold letters! My card features the brand new Love Letters Dies and matching enamel shapes, along with the Sweet Sayings Die set…. The concept for these dies/enamel shapes is so cool! You die cut out the letters from one color, and then the background from another color (so many options) and then the matching enamel shapes fit into the dies perfectly! Love this!
Here’s a close up of the letters and enamel shapes! SOOOOOOOO fabulous. Those crazy peeps at Concord and 9th are always thinking up something cool! I die cut the LOVE from Pink Lemonade cardstock and layered the letters onto fresh white. I splattered on silvery shimmery ink splatters, then added on all the hearts and leaves.
I used the Sweet Sayings dies and silver glitter cardstock to die cut out the ‘you’ to add in the center. You know, glitter paper is always a good idea!
That’s it for today! Be well, and keep on creating! I will see you soon my dears! XOXO
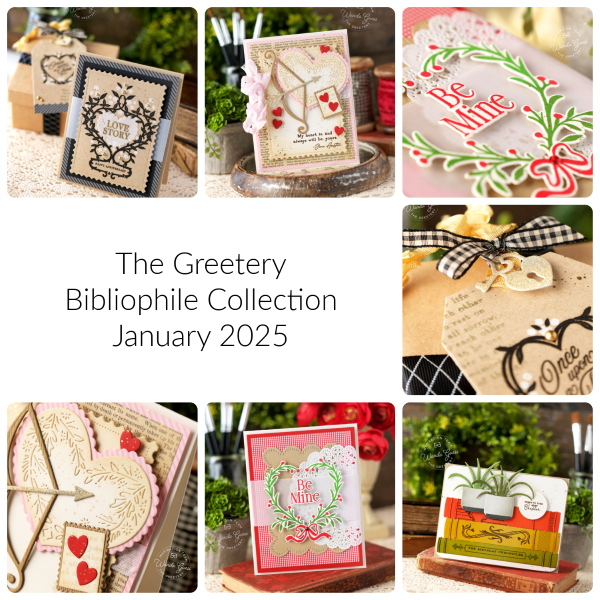
It was my pleasure to introduce the brand new Bibliophile Collection to you this week! And, I hope you love it as much as I do!! Happy Crafting!! If you scroll back to my last blog post you can see all my projects from the new release, and the accompanying supply lists. If you have any questions – reach out!! Thanks for all the love and kind comments! Happy Creating! Can’t wait to see what YOU make!
Hi crafty friends! Hope you’re enjoying a beautiful Winter week! We are doing good here – having a bit of a cold snap, like everyone else – and staying warm and cozy in the craft room. It’s been a busy month already and another year is in full swing. Our daffodils starting getting their fresh green stalks so that’s the first sign that a change will soon be here. Looking forward to longer days, and love in the air for Valentine’s Day too!
Today is VERY exciting because it’s the reveal/showcase day for the first Greetery release of the year! WOOHOO! The new release is called the Bibliophile Collection! It has stamps, dies, and stencils for the book lover, the romantic, and the vintage lover too! Think hearts, and more book items, and even a cupid’s arrow! I adore this new collection and I know you will too! The design team will be sharing all of our projects today, and showing you all the new products. Just one day of features – then the new release will go live TOMORROW at 10am EST! (So you don’t have to wait too long -yay for that!)
I have four projects to share today – can’t wait to show you! All the prize information, details, and design team links are at the bottom of my post. Lots of pictures for you today, friends!
My first project for today is a pretty, vintage inspired Valentine card made with lots of things from the new release! This card features the brand new Nordic Hearts Dies, the brand new Cupids Arrow Dies and the brand new Love Stories Stamp Set. You’ll notice I also used a lot of other Greetery favorites! I love a Valentine color palette of red, pink and cream – with a touch of gold too! My finished card is an A2 cream card base, layered with pink stripes and text paper, and then a cream top layer. I die cut the beautiful new Nordic Heart die from cream and pink. I inked Distress Inks on all the cream parts and generously splattered gold paint too.
I made a pretty postage stamp using the text from the new Love Stories stamp set and some hearts…. The bow and arrow was made using woodgrain cardstock and gold glitter paper. The sentiment was stamped in dark brown ink…so pretty!
My next project is a matching tag and card combo! With all of these beautiful supplies, I thought it might be nice to make a more masculine project. And I’m going to save this one for my hubs for our anniversary! A dark and classy color palette of kraft, white, black and gold. Love it! These projects feature the brand new Bookish Frames – Romance, the brand new Lock and Key Dies, the brand new Love Stories stamps…and more!! The tag of course was made using the versatile Tag Team dies…. The tag and the card are a perfect match.
My finished card is an A2 kraft card base, layered with black stripes, black cardstock and then the kraft top layer. I made the card using the stamps and stencil combo – perfection!! I stamped the black heart vines and then stenciled the white floral parts with white pigment ink. I splashed gold paint on the top and added pretty gold pearls.
I added a vellum strip around the top layers for more visual interest. The heart with the sentiment ‘love story’ is heat embossed in gold onto a vellum heart.
The tag was die cut using kraft cardstock. I stamped the heart, flowers and sentiment in the center of the tag. I added some stamped text around the main sentiment – very vintage!
The new Lock and Key Dies make the perfect tiny accents for the top of my tag!
My next project is another Valentine Card – but this time it’s bright and vivid! Red and white! So classic. This card features the brand new Folk Heart stamps and dies… My finished card is an A2 white card base, layered with red and gingham and then kraft. A doily is always appropriate on a Valentine card – don’t you think?! I stamped the pretty heart shape and the bow and die cut them out with the matching dies. I added the perfect sentiment in red in the center. This card would be a good one to mass produce and it’s fairly flat for mailing also.
And, last, but certainly not least, a card for the book lovers! This card features the brand new Shelved Product Suite! You guys are going to love this!! I made a birthday card since I know so many book lovers! I used a warm and boho chic color palette, reminiscent of a bookshop. And I even added some plants. I adore the cute sentiments in this new suite. “Here’s to your next chapter” is so clever for a birthday card. My finished card is a cream horizontal A2 card base. I die cut out the books for my stack and then used the stamp set to add accents onto each book. I also gently inked the edges of the books. I made two little plants using previously released Greetery dies. I love this look!! I’m very excited to see what everyone else makes with this product suite – the possibilities are endless.
CLICK HERE FOR THE SUPPLY LIST FOR TODAY’S PROJECTS!
That’s it for today – and for the reveals of this awesome new release! I’m in the mood for love! And Books! Thanks for stopping by to share with me today! It’s my pleasure to introduce the new release. Enjoy and happy crafting! XOXO
Giveaway Information: The Greetery is giving away TWO $50 gift certificates, the comment deadline is Thursday, 1/23 at 6:00am EST (comments from team blogs entered into giveaway). Winners announced on The Greetery blog on Thursday, 1/23 at 9am EST (an hour before the new products go live) GOOD LUCK!!
Helloooooo! Or should I say BOOOOOOO! I have a little something just for BOO today!! This is another project I made with the brand new PPP Valentine Release for 2025! Paulina made the cutest stamp set – with Ghosties! Valentine Ghosties! Really a fun idea! And so clever. I love them just as much as the original Ghost Friends for Halloween!! My card for today is part of the big Instagram Hop for the new release. So if you’re on Instagram, be sure to find my post and leave a comment for a chance to win a prize!
My finished card is a clean and simple design with traditional colors of red and white for Valentine’s Day. I love the sentiment! It’s a white A2 card base, layered with gingham and red, and then a pretty white scalloped panel. I stamped and die cut the ghosties and colored them with Copic Markers and assembled the flying cuties onto the card with foam squares… The sentiments in this stamp set are perfect too! A few little red enamel hearts finish off the look.
What do you think of Valentine ghosties? I love it when the holidays are fun and silly – it’s good for us to be silly! So I am a YES to ghosties with love letters! Hee hee. I’m wishing you a very happy day today and I’ll see you soon! Remember to go over to Instagram to do the hop today. XOXO
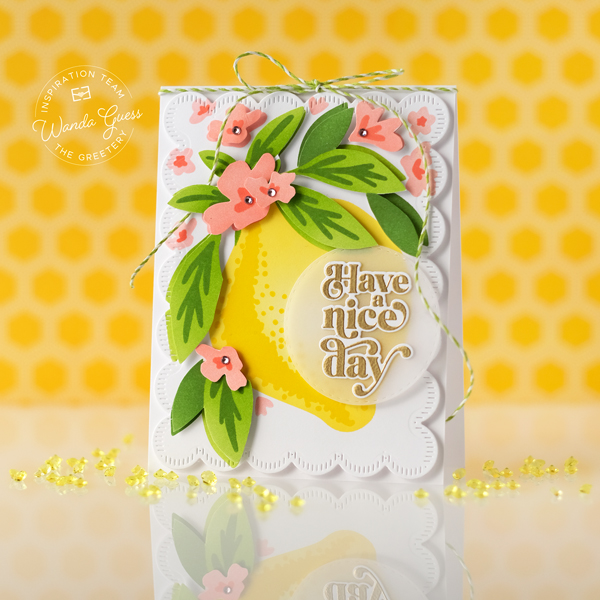
Hi friends! This week was my turn to have a project up on the Greetery Blog! Hope you’re doing great and having a great week! The first full week of the New Year!! In the new year, it’s time to turn to themes other than holidays, and to have fresh eyes on our projects. So I thought – what is the freshest thing? Lemons!! In that tone, I chose to share a card today featuring the lovely Large Lemon stencils and dies. The perfect colorful start to non-holiday crafting!!
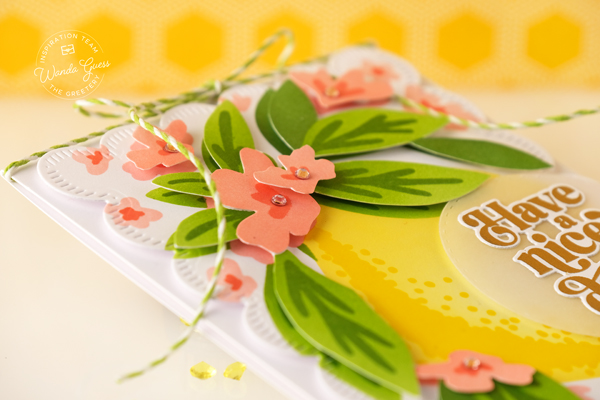
My finished card is a white A2 card base. I layered a white layer die cut with the A2 Scallops Dies – so pretty! I stenciled two lemons and leaves, using the Large Lemon stencil/die set. One lemon is on the scallop panel, and the other set I cut out the leaves and flowers to create a dimensional look. I stenciled using shades of yellow, green and pink ink pads, and my blender brushes.
For the sentiment, I used the One Fine Day stamps and dies and heat embossed the sentiment with gold embossing powder. I die cut out the sentiment and attached it to a vellum circle. I attached the extra leaves and flowers onto the card using small foam circles to make them pop. As a finishing touch I added some light pink gems. I also tied pretty twine around the top of the card. I really love these colors….so bright and happy.
That’s it for my project for today! I hope you have a fantastic and creative day! Wishing you a very happy, healthy and creative new year! It’s my pleasure to share The Greetery with you, and I look forward to sharing with you again soon – and through 2025! Be on the lookout for a new release soon! In the meantime, happy crafting! XO Wanda
Hi friends! Happy 2025! How was your new year’s? I hope you had some fun and gave a toast to a sparkling new year! Man, the time sure does fly nowadays. I can’t believe it’s 2025 already. Some of my friends and I were talking about the big party we went to on NYE 1999 and how it was a big deal to go forward to a new century…well, here we are! I’m hoping this is a great year for everyone! Happiness, Health, Prosperity, and CREATIVITY!
I’m here today as part of a big blog hop to celebrate the new 2025 Valentine Release from Pretty Pink Posh! It’s a favorite release of mine all year – everything is always so fun and cute. And this year is no different! I’m sharing two projects today, and then I’ll have another project next week for the Instagram Hop too! Let’s get started!
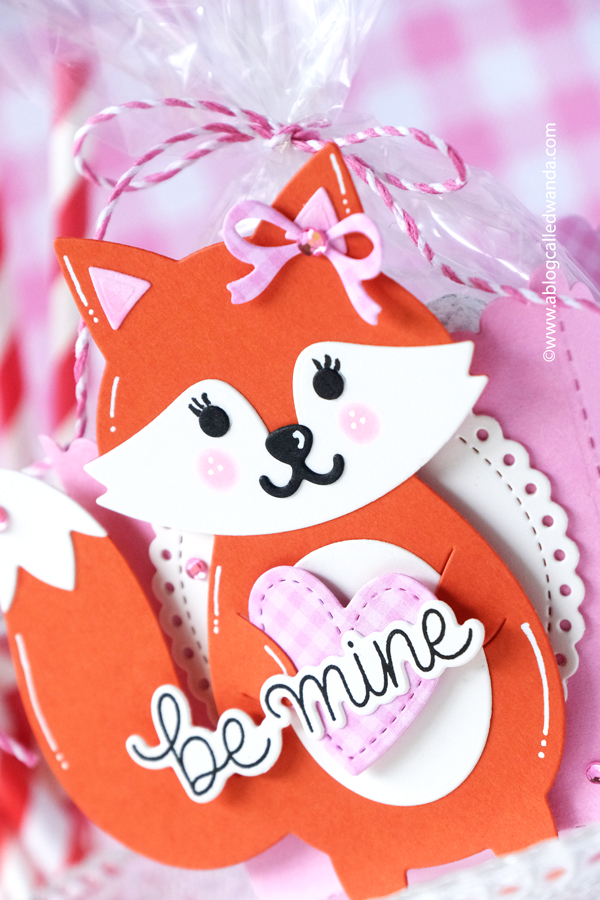
My first project for today is an adorable candy treat box Valentine featuring the brand new Fox Holder dies, the new Valentine Holder additions, and more! I used the (fan favorite) Birthday Treat Box for my treats! Such a fun project – I always like making treat holders/boxes. To make this was very simple – I die cut out all the Fox parts from colored cardstock and assembled her. I added rosy pink cheeks and I drew on some eyelashes. Added a gingham bow for her hair and a gingham heart to hold in her cute paws…. To make the box I used pink cardstock and pink gingham to line the back. I put candies in a cello bag and tied it with twine… A few gems to finish off! I used cream cardstock instead of vivid white…. I can’t wait to make some more of these.
The sentiment is from the new Valentine Greetings stamps and matching dies! LOVE.
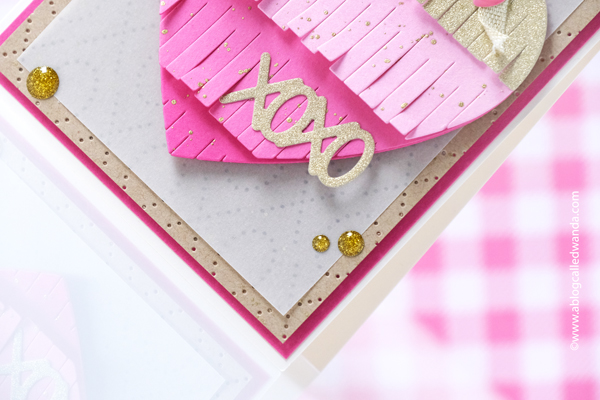
My card for today features the brand new Fringe Heart dies and the brand new XOXO Pierced plate… I used shades of pink, kraft and gold for kind of a vintage look. My finished card is an A2 Cream card base, layered with kraft and vellum. The Fringed Heart dies are large, and take up the whole card front – which I love!! I added some pretty ribbon the the top. Finishing touches are gold enamel dots and gold paint splatters too!
Well, I truly hope the new release has you in the mood for LOVE! I like it when Christmas crafting is done and we can make all the heart things! It’s so fun being part of this great blog hop!! The links to the other bloggers for today are at the very bottom of my post! Be sure to visit all the blogs and leave your comments!! Remember to come by next week and see the rest of my projects! It’s my pleasure to share with you today! XOXO
PRIZE INFO: There are FOUR $30 gift certificates up for grabs (one winner each day). Winners will be picked randomly from comments along the blog hop. All comments must be left by 11:59 PM PST on 1/15/25. Winners will be announced on the PPP blog. GOOD LUCK!!
Hey friends! Happy Monday! Today is a very Monday Monday! LOL. The first Monday of the new year. Back to normal, back to routine, back to non holiday things…. I put away the last of the holiday decorations at our house yesterday and now the house seems so….empty! Lucky misses the Christmas tree (he likes to sleep under it) and I miss all the coziness.. But here we are ready to get started on a fresh new year.
My husband went to bed early last night and the crafting inspiration struck me around 11pm….and I made a fun, fresh, colorful card to share with you today – courtesy of new supplies from Concord and 9th! You’re my JAM!! Hee hee. This would be a great punny Valentine card, and I love that berry purple…. My finished card is a white A2 card base, layered with Berry, then white, then gingham, then more white… Yeah, I like big layers and I cannot lie. The star of the card is that cute little jam jar! I added hearts and flowers and some strawberries to make a happy scene. I used ink pads to shade the jar and the berries. White ink was used to stamp the pattern on the kraft jar topper…. I love the little details so much.
One final Christmas card to share with you today! I made this large slimline card using all supplies from Anna Griffin! It's so lovely and I just adore all those tiny details from the window candles to the snow, to the trees. Hope it makes you smile!!
Hi creative and crafty friends! Today is my turn up on The Greetery Blog! And, as usual, I'm posting my project here too! I hope you're doing great and having fun getting ready for the Christmas this week! I love to decorate my home for Christmas and make lots of pretty crafty things to put around… For my project today I created a cheerful and happy snowman banner using the brand new Honeycomb Snowman dies and the Snowflakes #2 dies. This project brought a smile to my face the whole time I was making it, and now it's hanging up in our dining room! Do you enjoy making home decor items too?! This is a Winter themed project, so I'm going to leave it up through January probably. When I decorate the house for the holidays I use all kinds of colors and themes. Then, once Christmas is over, I take down the obviously red/green/Christmas decorations, but I leave the snowmen, snowflakes, and Winter decorations up for the month of January. It just makes the holidays last a little longer during the foggy January days….
To make my snowman banner, I started by die cutting out all the pieces to make four snowmen from the new Honeycomb Snowman Die set. I assembled the snowmen and then added those most adorable snow white honeycombs! I die cut out five silver glitter paper snowflakes to put in between the snowmen on my banner. I used a long length of twine – around six feet – and used my hot glue gun to glue the snowflakes and snowmen onto the twine. It was really a fun and easy project and I love how it came out. I used bright colors for their ear muffs.
A few of my little finishing touches include – Copic marker shading on the die cut pieces of the snowmen, White gel pen accents, and bits of Diamond Glitter to give them a bit of shine! This would be a great group project or one to do with the kids too. The goal is to have F-U-N!
Here is a photo of my banner hanging up in our dining room!! We've already been enjoying it!
That's it for my project for today! I hope you have a fantastic and creative day! Wishing you a wonderful week and all the magic of Christmas…. It's my pleasure to share with you all year. Blessings to you and your families. I look forward to sharing with you again soon – in the new year!! In the meantime, happy crafting! XO Wanda
Hello there!! Today's blog post is both festive AND jolly! Today I'm sharing some super cute and colorful Winter cards I made with supplies from Concord & 9th! There is an Instagram Hop today too, so if you're on Instagram, be sure to stop by my page and leave a comment for a chance to win a prize! The theme for today's Instagram Hop is My Favorite Things – from Concord & 9th 2024! There are a bunch of creatives sharing our favorite stamps and dies and colors from 2024… It's going to be a fantastic hop! It always brings a smile to my face to use stamps and dies from Concord and 9th – truly one of my favorite companies!! So grab some cocoa because today's post is chilly!!
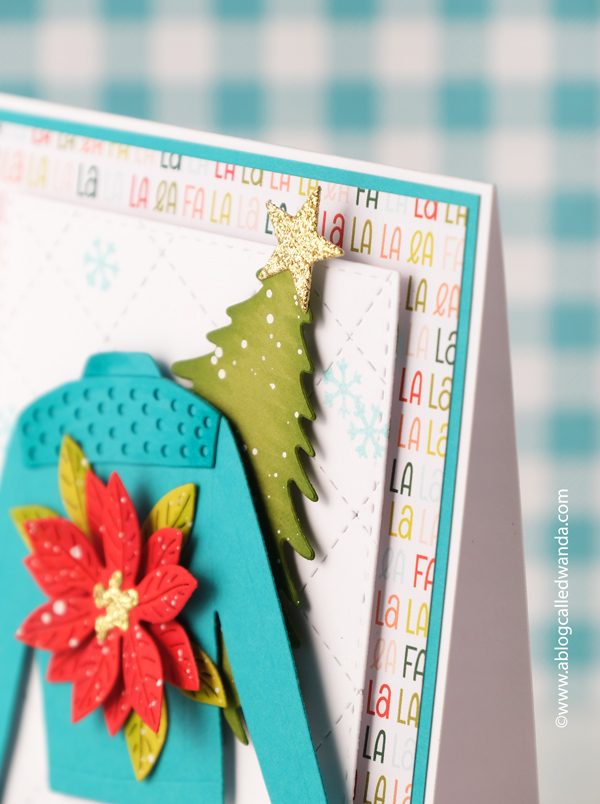
So you know I did THIS POST earlier this year using the Carpe Denim set – the cutest jean jackets you ever did see! Well, today I made a Christmas jean jacket! Hee hee. I am one of those gurlz that loves to wear holiday apparel! I always have a fun Christmas sweater or sweatshirt on during the month of December! So that was the inspo for this card…
My finished card is an A2 white card base layered with Falala patterned paper and then a white panel to feature my jacket! I die cut a beautiful bright red poinsettia to adorn the back of my jacket… Oceanside and Poppy cardstock are great together!! I added some snowy paint splatters and bits of gold to finish my look. Let's be jolly indeed!! (I actually wish I had a denim jacket like this!) I added a tree and a sweet sentiment banner to finish it off!
I just received the AMAZZZZING Alpine Village Dies in the mail last week and I had to use them today too! EEK!! This finished card is an A2 white card base. The layers are all from the super genius die set. I die cut all the pieces using my fav colors of Concord & 9th cardstocks. I really wanted to create a little Swiss village so I used red, dark green and brown…. That little ski lift makes me giddy!! I added little white snowflakes to their Winter skating sweaters… I used glitter glue for the rooftops and skating pond… Snowy splatters finish it off. The sentiment is just perfect!
That's it for today's Wintry goodness! These cards were so much fun to make! I hope your week is going great, and your holiday prep is going smoothly… Sending you Winter good wishes today and always. Happy Crafting!
Hi friends! Happy Sunday! I hope you had a great Thanksgiving and a great long weekend! It's the official kick off to the holiday season and it's December first! Christmas will be here before we know it! We enjoyed a very quiet and peaceful Thanksgiving here at our house and then we got up at 5am to go shopping on Black Friday. We have had a shopping tradition for many many years. I love being out in the hustle and bustle of the mall and the stores – everyone wearing their holiday sweaters and feeling festive! We shopped til we dropped – having fun. Didn't really buy too much, mostly just looking. I feel like the store/mall decorations this year were super amazing!! I love that kind of stuff. It makes me inspired and in the spirit of the season!!
We had a Christmas miracle happen also… I left my iPhone on a bench at the mall (right by the exit to the parking lot) and didn't realize it for 10-15 minutes. I FREAKED out. We ran to the Apple Store and they turned my phone to lost mode and we were able to track my phone – to still being inside the mall (I thought for sure someone would take it and run)… The Apple store employees were so nice. Since my phone was locked, they sent a message to it which allows the person to call a number…. Well, through divine intervention an honest person had my phone and she called me. Boy did I feel grateful!!!! Whew.
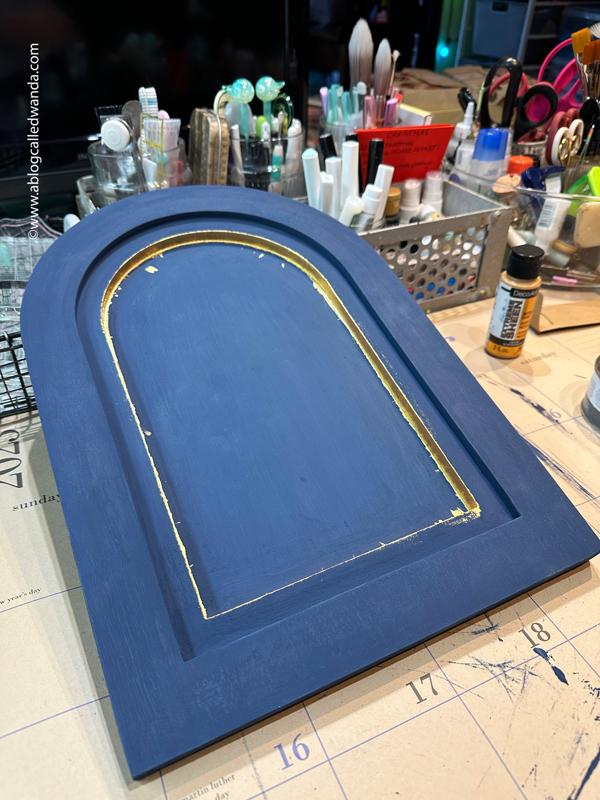
I have a couple of projects to share today since it's December! I love working with my supplies from Iron Orchid Designs….gorgeous molds and transfers and stamps…They are really wonderful to work with and create beautiful things. I made a home decor piece and some ornaments and I have some more to make also. Here's my home decor piece…. It's hanging in our entry way now…. This started with a plain wood arch piece, which I painted with navy and gold, then a big fabulous transfer, and then more gold paint and a few coats of wax. Annie Sloan Chalk Paints and waxes are the BOMB!!!
The piece is painted Navy (I combined two blues for a dark starry night color), and then I painted gold on that inside edge to look like gold leafing… I also splattered gold paint (of course). I used three coats of the blue paint and about five coats of the gold paint on that inside edge. The entire piece is coated in two coats of clear Annie Sloan Wax and then buffed out to a shiny finish. The tree is actually a giant rub on transfer! I cannot even tell you how pretty it is in person.
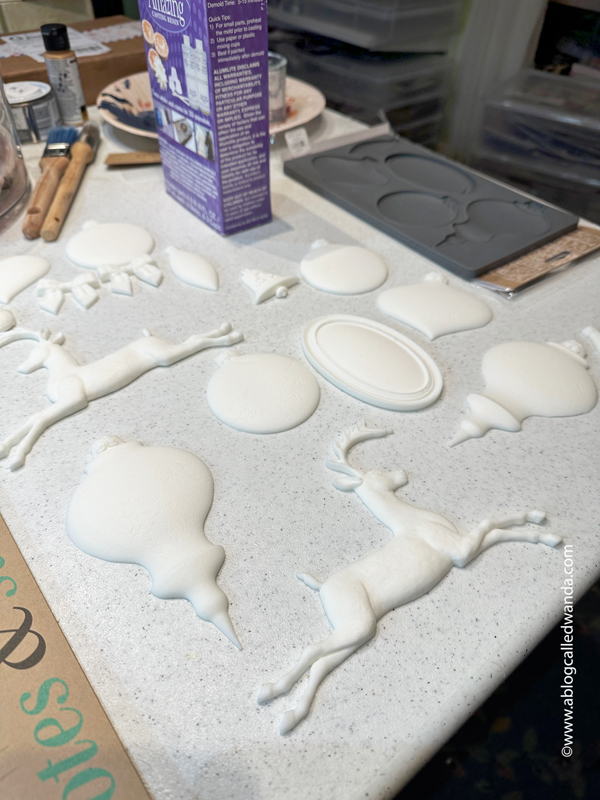
I also made these resin ornaments using my supplies from Iron Orchid Designs supplies also. The shapes were made using resin and then I painted 2-3 coats of deep charcoal chalk paint onto them. I used sweet woodland rub ons and then gold wax as shading. The ties for the ornaments are Tim Holtz velvet ribbon from my stash. These came out soooooo nice. I love them and can't wait to make more!!! I like to use the quick set resin so they set in about 10-15 minutes and then I usually let them sit until the next day before I paint them.
Here's another photo of my home decor painting piece – on our dining room table – in different light. It was a very hard project to photograph!!
I took some in-process photos with my iphone – so you could get a feel for the projects…. Here I'm starting with my first layer of paint…
The two colors I mixed for the blue color….
That gorgeous transfer!!
Starting on the gold paint…
Ready to put the tree on!!!!
And it's almost done! I let it sit overnight and then did the wax! I used two coats of wax and let that sit for a day and a half and then buffed it out. You can see in my final project photo that it has a pretty sheen to it now. LOVED making this!
I only took one photo of my ornaments! Ugh. I get caught up in the moment and the fun and forget to take more pictures!!
Thanks for spending a little time with me today. Happy Sunday! Happy December! Wishing you a bright and lovely holiday season! XOXO
Hi crafty friends! Happy Thanksgiving Week! I am sending love and wishing you and your families a wonderful holiday together! I can hardly believe it’s time for turkey already. This year is going to finish up fast! I am looking forward to a quiet week at home with my family, staying cozy and watching Christmas movies and eating tooooo much! Happy Thanksgiving everyone!
Today is a VERY exciting day because I’m here to announce a NEW RELEASE from The Greetery! The last release of the year! The new release is called the Icing Collection – as in the icing on the cake! The new release is full of more holiday goodness and things for packaging and giving. So here’s the deal – and it’s good. Today, the design team is showing you everything! And guess what? Today you can BUY everything too! No need to wait until tomorrow! The new release will be available at 10am EST today! Yeah!
I will be sharing four new projects with you today! Lots of photos and inspiration. Let’s get started!
My first card for today features the brand new Nordic Tree Die set! I combined it with the Warm and Cozy sentiments from the last new release. I created a clean and simple Christmas card with Dr. Suess colors and vibes! My finished card is an A2 white card base, layered with soft pink and vellum. I die cut the tree layers (there are three layers to create the tree) from green cardstock and then added white paint splatters and a bit of snow too! I finished it off by adding a pretty gold star and some enamel dot ornaments. The sentiment is heat embossed in white onto kraft cardstock. Classically Christmas! I love the details in the die cut – makes for a gorgeous tree.
My next card for today features the brand new Nordic Birds Dies and the brand new Crystal Charms Dies! Also featured are past favorites Joy and Pine Wisps! My finished card is an A2 kraft card base, layered in Christmas red, then a pretty arch to feature my design elements. I ink blended the top of the arch for a bit of warmth. My color palette is classic red and green for the holidays… I made it a bit rustic by using kraft paper also. I die cut all the pieces and added bits of sparkly glitter for a snowy feeling. My final touch was some red enamel dots.
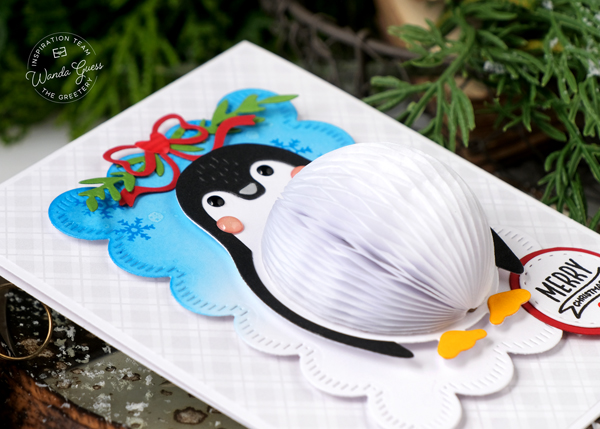
My third card for today features the brand new Hey Honeycomb Penguin Dies! More cute additions to the Honeycomb product line! And also, just releasing today, white honeycombs! Wait until you see all of these!!! I kept my card cute and sweet! My card base is a white A2 card, layered with some Doodlebug plaid for a subtle background. I die cut a scallop panel and added icy blue ink blending… I used the new Hey Honeycomb Holiday stamp set for my sentiment. These are SOOOO fun to make!!
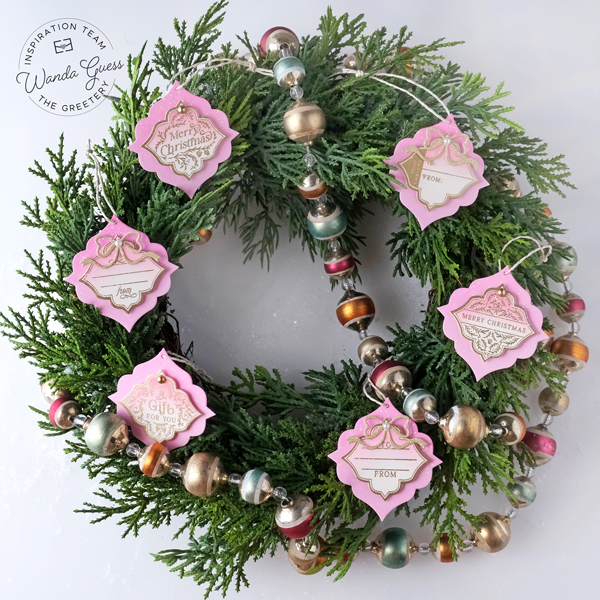
My final project for today features gift tags I made using the brand new Inside and Out Holiday Tags stamps, dies and stencils! I also used the brand new Ornamental Tags Dies. I love a soft color palette of pink, cream and gold… I do also love pretty pink packages! The stamp/die combo makes 8 tags at once, in a pretty, ornate shape! I stamped and heat embossed the stamp in gold embossing onto cream cardstock. I used the matching stencil to do ombre pink ink blending on the tags. I blended the ink only on the top of my tags… I splattered everything with white ink! I added some gold bows and classy pearls… The twine is natural with a bit of gold in it also.
That’s it for today – and for the reveals of this awesome new release! I am quite sure you must be in the holiday mood now! Thanks for stopping by to share with me today! It’s my pleasure to introduce the new release. Enjoy and happy crafting! XOXO
Giveaway: The Greetery is giving away TWO $50 gift certificates, the comment deadline is Wednesday, 11/27 at 11:59pm EST (comments from the design team blogs are all entered into giveaway). Winners will be announced on The Greetery blog on Friday, 11/29 at 7am EST! GOOD LUCK!!
Hi friends! Popping in this weekend to share a cute and cheerful Christmas card! The new release from Honey Bee Stamps is called Cozy Christmas – and boy is it cozy! And gorgeous! I will be making more cards with this fun new release, but I couldn't wait to share the first one! I do love a vintage reindeer motif – kitschy and adorable…. Well, Honey Bee came out with a die set that makes the MOST adorable little reindeer! I turned him into a card and used classic Christmas colors and a vintage vibe…. Stripes and holly and snowflakes, oh my!
Wishing you a very Happy Thanksgiving week coming up! Stay tuned next week, too, because there will be a NEW Greetery Release! YEAH!
My card for today is an A2 cream cardstock card base. Layered with candy cane stripes and red and more cream. The star of the show is my dapper reindeer in his winter scarf… I added lots of greenery and a few sparkles and snow flurries. It all worked together so nicely. I die cut the background with a subtle snowflakes pattern. Using cream cardstock instead of bright white cardstock softens everything just the right amount here. I used Copic Markers to shade my die cut pieces and also white gel pen accents…. Again – just SO fun! Happy crafting my friends – hope you're having a great weekend! XOXO
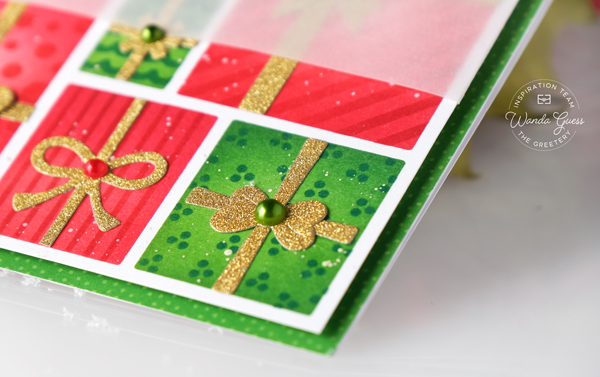
Hi creative and crafty friends! It's my turn on The Greetery Blog today, and I'm sharing my project here too! Hope you're doing great and enjoying this beautiful Fall season. My birthday is over, and voting day is over. It will be Thanksgiving before we know it…and then Christmas! The rest of the year is going to fly by!! For my project today I created a classically red and green Christmas Card using the gorgeous Gifts Galore Stencils and Dies… This card is nice and flat for mailing too! I added a bit of sparkle to it, and I used the new Warm and Cozy stamp set for the perfect sentiment. Time to make Christmas cards for sure!
My finished card is an A2 white card base. I layered green patterned paper on top of the white card base. To begin the card I used the Gifts Galore Stencils and kept my colors to only red and green. This idea has been in my head for a long time and I really like how it turned out. I used two shades of red and two shades of green for a clean monochromatic look. I die cut the bows and ribbons using the Gifts Galore dies – and used bright gold cardstock.
I trimmed my presents panel down to 4" x 5.25". I glued all the gold pieces onto the gifts and then added a few pearls as embellishments. I heat embossed the pretty sentiment onto vellum using white embossing powder for an elegant look. I wrapped my vellum strip around the presents and affixed that whole panel to the card base. I couldn't resist adding a few snowy white paint splatters too!
My 60th birthday was this past Sunday and I had a wonderful day! My husband spoiled me rotten and I am so super grateful!! On to a new decade as a sassy old lady!
That's it for my project for today! I hope you have a fantastic and creative day! Wishing you a wonderful November as we get ready to celebrate gratitude and move into the holiday season. I look forward to sharing with you again soon. In the meantime, happy crafting! XO Wanda
Hello friends! Happy Halloween Week! I love this week! AND, it’s also my birthday week! So I especially love this week! LOL. Saturday night we went to a fun and festive Halloween Festival and I dressed up (photos at the end of my post), and we had the best time. Sunday we carved pumpkins all day. The house is all decorated and the front yard is REALLY decorated! (My husband goes crazy with the decorations and it’s the talk of the neighborhood!) We are Halloween ready. We have a lot of fun – setting up a table in our driveway and playing spooky music, the fog machine going…passing out candy. And especially chit chatting with the neighbors and seeing the cute costumes.
On Sunday I am turning the big SIXTY! Gosh, it’s been bothering me for months. That seems like so many years. I’m not ready to be this age. In my brain I’m still about 25! No other birthday has really bothered me, but this one is. I can’t stop thinking about it and obsessing about it. (Nothing I can really do though, right?) My husband has been spoiling me already and I feel loved, and blessed by so many people. I do know that I am lucky to have had so many years. In the comments, leave me your one best piece of advice for graceful aging! Wish me luck!
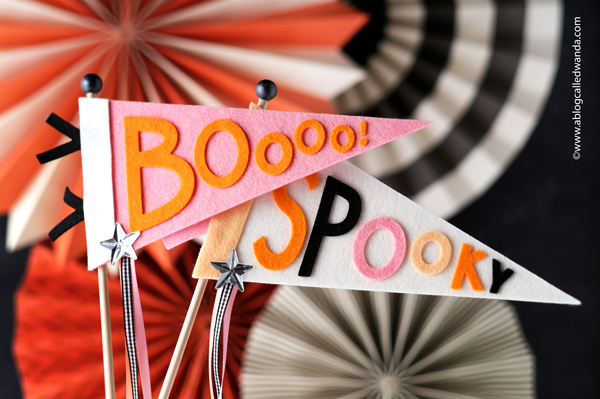
I have a reallllllllly fun project to share today. Maybe one of my favorite things I’ve ever made!! It came together exactly how I pictured in my head and I love how the color palette turned out. I made some Halloween Felt Pennants/Banners for decorations for our home! They were easy and fun to make – a cheerful project with minimum supplies…a quiet afternoon in the craft room…. The dies are from Ellen Hutson! Did you know that you can still buy EH stamps and dies on Amazon?? Well, you can! CLICK HERE!
I used the dies from Ellen Hutson (sadly I think the Halloween ones are sold out right now, but the pennant with different sayings is available) and my favorite felt (the only felt I use) in Halloween colors. The other supplies are either from Amazon or Hobby Lobby and I’ll talk more about that below. Let’s take a look at my finished pennants! EEK! Lots of photos ahead, because I was having too much fun actually. Aren’t they the cutest thing??
I made two pennants but I could have made tons more – I just ran out of time!! The dies + that felt = delicious! The felt cuts like butter with those dies. Couldn’t be nicer. I used orange and black of course, but then popped in some pink and peach. This is my new favorite Halloween combo.
The banners were kind of “floppy” with just the felt so I die cut a matching piece of cardstock and glued it to the back to make them look nice and finished and to stand out straight.
Like literally who knew that I would love pink and orange together??? I used ribbons from my stash and mirrored stars as a nice small accent. I tried not to go overboard as you know I like to do….
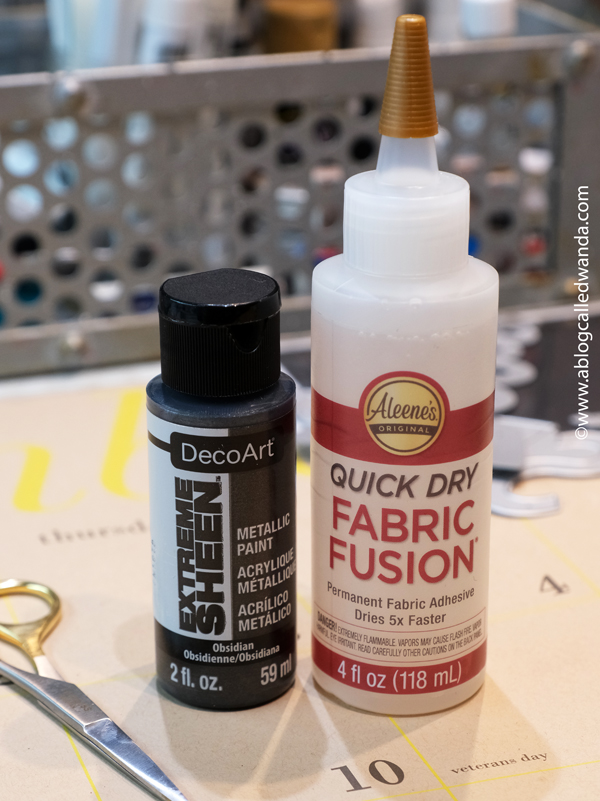
I used this fabric glue to glue all my pieces together – gave me a nice hold without lumps and bumps and it did dry quickly! I bought the dowels and the little wood balls at Hobby Lobby and used this metallic paint to paint the wood balls that are on top of the dowels.
I used my hot glue gun to attach the dowels to the back of the pennants and to attach the wood balls on the top. I also used hot glue for the stars…
And now for Wanda the Witch – the birthday witch! Here is my costume for the Festival! I had fun doing bright green sparkly eye shadow (hard to see because of my glasses) and a nice spider on my neck! (a temporary tattoo)….and that hat! Mark bought that for me this year!! My spider earrings and my face stickers are from the Spirit Halloween store.
And here I am at one of the antique stores on the street with the Halloween Festival. You can see I’m getting attacked by a giant spider! AAAAAAHHHHHHH!
That’s it for today! Hope you have a really fun and cheerful Halloween. Don’t forget to be a kid and be silly once in a while! Eat candy and have some laughter. It’s good for the soul. Stay crafty and I’ll see you soon – after I’m SIXTY!!! Now that is the real spook! Hahahaha. XOXOXO Wanda
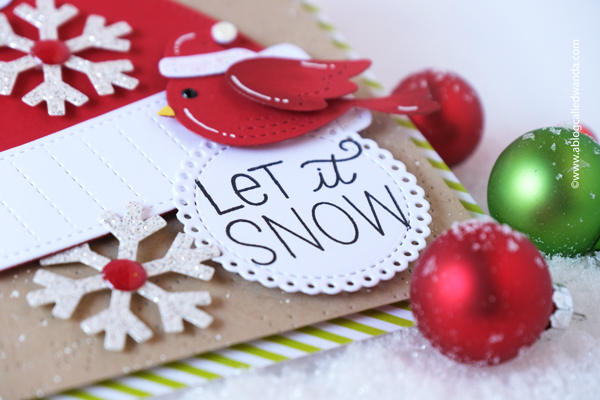
Hi friends! I'm so excited this week because it finally cooled off and it feels like Fall! This makes me giddy with excitement! The house is cool in the mornings and we can cozy up and have our coffee and watch the leaves fall from the trees across the street. I am renewed!! But, alas, we are also at the same time making all kinds of Christmas projects! Today is a big Instagram Hop to celebrate the new release from Pretty Pink Posh. If you have Instagram, be sure to pop over and leave some comments for a chance to win a prize from PPP! Here is my card for today's Instagram Hop!
I used new and old supplies from PPP to create a cheerful winter greeting! My finished card is a white A2 card base covered in pretty green stripes. I layered kraft paper (because I LOVE red, white and kraft together)… That adorable hat I made in traditional colors and added sparkly snowflakes and a tweet little birdie…. Such a happy card!
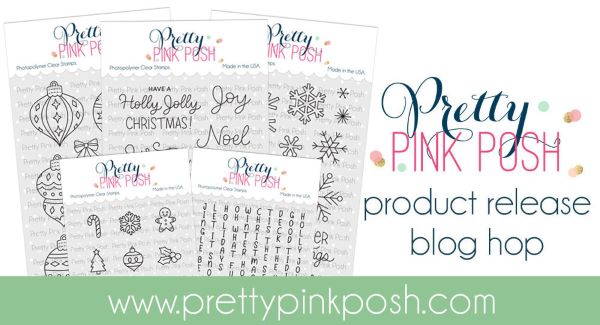
Hello sweet crafty people! How are you doing this week? It's so nice to have you visit me at A Blog Called Wanda! If you're new here – welcome! We like to have a good time here! Today is a fun celebration BLOG HOP of the new release for October – Holiday 2024 from Pretty Pink Posh! I am excited to be part of a big multi day blog hop to celebrate the wonderful Holiday new release – stamps, dies, stencils, and more! All with a Christmas/Winter/Holiday theme. I love how cheerful this release is – and you're going to love it too! Great news -the new release is available for shopping now! Enjoy the hop, and I'm excited to share a card with you today! I made another card with the new release and I'll share that next week! I always feel like once it's October, you blink and it's Christmas! So it's time to start on those Christmas cards!!
My card for today features lots of brand new goodies – and a familiar theme from our friends at Pretty Pink Posh – cupcakes – for every occasion! I had SO much fun making this happy confection! My finished card is an A2 white card base, layered in striped paper, white layer, vellum and then my featured cupcake! I used traditional colors and lots of bling bling! I want to take a giant bite of this cupcake for sure! I stenciled some aqua snowflakes on the background and used bits of gold cardstock for accents… I think it screams Christmas! I used the brand new Big Christmas Cupcake Dies, the Cascading Snowflakes stencils, and the Holly Jolly Shadow Dies!
Well, I truly hope this new release puts you in the mood for the Christmas season!! It's so fun being part of this great blog hop!! The links to the other bloggers for today are at the very bottom of my post! Be sure to visit all the blogs and leave your comments!! Remember to come by next week and see the rest of my projects! It's my pleasure to share with you today! XOXO
PRIZE INFO: There are THREE $30 gift certificates up for grabs (one winner each day). Winners will be picked randomly from comments along the blog hop. All comments must be left by 11:59 PM PST on 10/22/2024. Winners will be announced on the PPP blog. GOOD LUCK!!
Hi there my creative and crafty friends! It's my monthly turn on The Greetery Blog today to share a project with you! And I'm sharing here on my blog too! I am always so excited and happy to share more Greetery with you. You already know I love Fall, and today I have another Fall project to share, using a favorite die set…. My card features the gorgeous Vintage Type suite of stamps and dies, and lots of colorful Fall leaves…oh and touches of gold too! I typed out a message just for you!
My finished card is a cream A2 card base, layered with kraft cardstock die cut with the Postal Dies. I started by die cutting out the typewriter pieces and all the leaves. The leaves are from the Autumn Curio Die Set. I stamped the sentiment using one of the small phrases in the Fall Foodie Stamp Set. I stamped all the elements in brown ink for a softer feeling – instead of black ink. I used Distress Inks to gently ink the edges of all the leaves and then splashed on some gold paint to make it shine…. I also used gold accents on the typewriter. To finish up my card I used foam tape to attach all the elements. I mixed and matched all the leaves until I got a layout that I liked. So warm and inviting! I used a few fall colored gems to complete the look.
That's it for my project for today! I hope you have a fantastic and creative day! I look forward to sharing with you again soon. In the meantime, happy crafting! XO Wanda
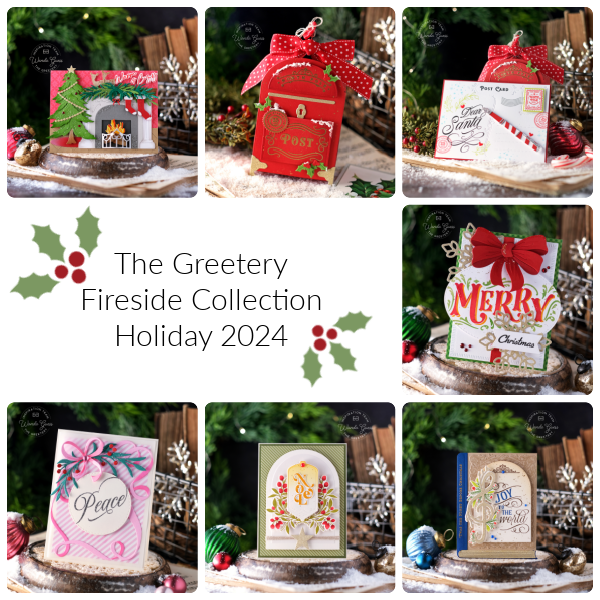
It was my pleasure to introduce the brand new Fireside Collection Holiday 2024 to you this week!! And, I hope you love it as much as I do!! Happy Crafting!! If you scroll back to my last two blog posts – from yesterday and Monday, you can see all my projects from the new release, and the accompanying supply lists. If you have any questions – reach out!! Thanks for all the love and kind comments this week! Happy Creating! Can't wait to see what YOU make!


