• Hey Pumpkin! Retro Sketches #83!

    Hey my bloggy friends! Are you ready for a fabulous sketch? I found an awesome sketch blog and I had to enter their cool challenge. The blog is called Retro Sketches (CLICK HERE) and I LOVED the layout for this week. This one is going in the repertoire for sure. A perfect clean and simple design…

    I have had this adorable Hey Pumpkin stamp set from Simon Says Stamp on my work table for a couple of weeks and wanted to ink and color it. It worked perfectly! A sweet halloween card! I colored a second one so I could give you a tutorial on coloring pumpkins with your Copic markers too. Thank goodness it's Friday and I hope you have a wonderful Autumn weekend! 

    Here's my card! EEP! That stamp set is so cute! This is Kristina Werner's cat Mannie, and I'm sure a lot of you know him already!  

    1


    Here's the sketch: 

    1


    Isn't that crisp black nice against the gingham? Can't go wrong with a traditional halloween color scheme. I fought the urge to add glitter…. That was hard! 

    1


    1


    I popped the top panel up on some foam tape. I also trimmed my image and popped that up too for some added dimension and shadow. These glossy dots are a nice alternative to gems….

    1


    1


    Here are all my supplies: 

    1


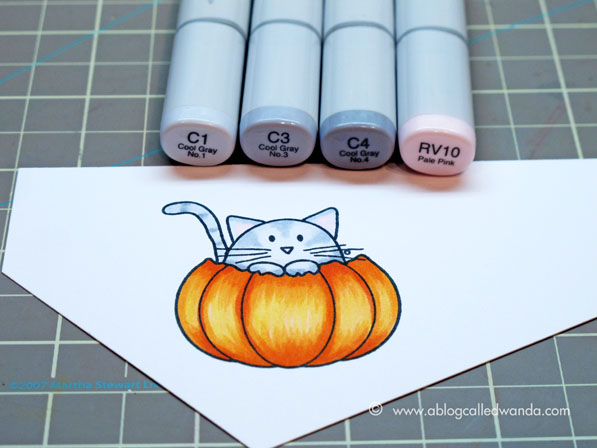
    And my Copic Palette for this project….

    1


    I did a step by step tutorial for you on how I color pumpkins with my Copic markers. First I start with a super light orange YR01 and feather in the color from the top and the bottom, making sure to leave some white space in the center. 

    1


    Next, i went over the same area with a slightly darker orange, YR04, feathering the color in a bit less than the other color.

    1


    I did the next two colors the exact same way. Adding less and less of the darker colors to give some depth and contrast. I also went over the lines of the pumpkin with the darkest color. 

    1


    As the last step, I added a mid tone yellow color, Y15 to make the pumpkin warm and glowy. This is always a matter of preference and personal taste so there is no right or wrong way to color! The only rule is to…HAVE FUN! 

    1


    1


    After I had all my coloring done, I added my jack-o-lantern face with dark rich StazOn ink. This way it really pops! 

    1


    Thank you to the lovely ladies over at Retro Sketches blog for the great idea for today's card. Take care, until we meet again! Mwah! 

    1

  • Taylored Expressions October 2013 Spotlights – Snowflake Cutting Plate!

    Another Taylored Expressions Release Week comes to an end….it all went so fast! Are you loving all the new products? I know I am all set for Winter now! So many great things to choose from. Today's the last day for the Bakers Dozen Design Team to share with you. I saved one of my favorite products for today…the beautiful Snowflake Cutting Plate. Yowza! 


    WANDASNOWFLAKECPFRI1


    I cut this GORGEOUS cutting plate image out of some sparkly silver paper and then used a bright blue as the background. I wanted my card to look all icy and wintery! I did a simple treatment for my sentiment and strung some satin ribbon through to attach it. 

    WANDASNOWFLAKECPFRI1


    The precise edges amaze me! This is so fab! 

    WANDASNOWFLAKECPFRI1


    So, because the silver glitter paper wasn't enough…I added some gems! LOL! I attached the whole thing to a nice crisp white cardfront. You can see that the cutting plate is the perfect size to fit onto an A2 card. 

    WANDASNOWFLAKECPFRI1


    WANDASNOWFLAKECPFRI1

    Thanks for spending the week with me and Taylored Expressions! It's been a great week I think! Happy Friday and have a super weekend! 

    One last link list for this week:

    WANDASNOWFLAKECPFRI1


  • Taylored Expressions October 2013 Release Day – Christmas Doodles!

    YEAH! It's officially Taylored Expressions October 2013 Release Day! Everything new is now available in the TE Store! I hope you have some fun shopping and thinking of pretty projects to whip up. There are many more projects today from the entire design team, and also one more day tomorrow. I know we all love sharing with you so much. 

    Today, it's back to sharing Christmas projects here on my blog. Some really cool and innovative new dies for you to check out. That Taylor is so creative! I have three things to share today and I hope you like them! 

    WANDACOLORBLOCKTHURS1


    Like most people, I love to give gift cards for holidays and occasions! This new die is called "Sack it to You" and makes this perfect gift sack/bag! It's fantastic! Taylor has created different 'toppings' for it too, so you can make it into a reindeer, santa, etc. ACK! I used the uber cool new Mix and Match Bows dies to make a pretty bow for the front of my sack! 

    WANDACOLORBLOCKTHURS1


    This card was made using three of the new Christmas themed stamp sets and the wonderful new Color Block Cutting Plate! The black portion is the outline of the cutting plate, and it makes perfect squares for stamping – or photos! This is a great tool for scrapbookers too!

    WANDACOLORBLOCKTHURS1


    WANDACOLORBLOCKTHURS1


    I colored in everything with my Copics and then added my favorite- touches of glitter! 

    WANDACOLORBLOCKTHURS1


    To give you a good visual, here is the graphic of the Color Block Cutting Plate. AWESOME!!! You see that all the rectangles and scallop shapes cut out too! I used the small scallop and plain rectangle for my gift sack. This is so versatile. 

    WANDACOLORBLOCKTHURS1


    My next project for today has kind of a clean and simple, yet vintage feeling to it. I stamped my swirls and holly stamps in brown ink on cream cardstock and then distressed the edges. I stamped my sentiment on an oval of cream layered in a nice bright red…

    WANDACOLORBLOCKTHURS1


    I like this card because it would be a good one to mass produce for Christmas cards – it doesn't have too much coloring, and it lays flat for mailing. Maybe I need to crank out about 75 of these!? 

    WANDACOLORBLOCKTHURS1


    WANDACOLORBLOCKTHURS1


    WANDACOLORBLOCKTHURS1

    Here is your RELEASE DAY links list! 

    Carole Burrage
    Charmaine Ikach
    Jen Shults
    Joan Ervin
    Kerri Michaud
    Pattie Goldman
    Regina Mangum
    Sankari Wegman
    Shannon White
    Shelly Mercado
    Stephanie Kraft
    Tammie Edgerton
    Taylor VanBruggen
    Wanda Guess

    WANDACOLORBLOCKTHURS1

  • Taylored Expressions October 2013 Sneak Peeks – We Give Thanks!

    Welcome back to day two of the Taylored Expressions October Sneak Peeks! Did you love all the new product sneaks yesterday? I know I did! There's more fun every day the rest of the week…and all the new products will be available for purchase tomorrow morning at the TE STORE! Wahooooo!

    Yesterday, my blog was all about Christmas and today it's all about Thanksgiving! I have a Fall themed card to share today made with the new set called We Give Thanks. So nice. 


    WANDAWEGIVEWED1


    I think this is my favorite project for this week! Because as everyone knows, I love Autumn. This cute Doodlebug paper just worked so nicely together – made the colors really pop. (Supply links below) I used the pretty Mega Leaves dies in pretty yellow and then made a nice rosette….

    WANDAWEGIVEWED1


    This font is so pretty for a Thanksgiving table or a card….

    WANDAWEGIVEWED1


    Here's a side shot showing all my dimension and textures… The pumpkin was colored in with my Copic markers. I edged the leaves with a bit of Antique Linen Distress Ink.

    WANDAWEGIVEWED1

    Thank you for joining along with us for this fabulous release week. Please click below to see what the rest of the Bakers Dozen Design Team has for you today! See you tomorrow! 

    Carole Burrage
    Charmaine Ikach
    Jen Shults
    Joan Ervin
    Kerri Michaud
    Pattie Goldman
    Sankari Wegman
    Shannon White
    Shelly Mercado
    Stephanie Kraft
    Tammie Edgerton
    Taylor VanBruggen
    Wanda Guess

    WANDAWEGIVEWED1


  • Taylored Expressions October 2013 Release Sneak Peeks – Baby it’s Cold Outside & O Christmas Tree!

    Hello my sweet crafty friends! Welcome to another week of extreme fun and new products from Taylored Expressions! Yep, it's Release Week again already! October's release is full of of lots of pretty things for your Thanksgiving and Christmas Holidays! I'm sure you will find something to fit your style. So much going on every day the rest of the week – and I'm looking forward to sharing it all with you. All the new items will be available for Purchase on THURSDAY morning in the TE STORE! 

    Today I have two winter projects for you. One is a set of little notes that you could use for package tags or as sweet notes for your friends and family. The other is a crazy pink/mod sparkly creation full of bling. Let's get started! 

    Here are my sweet note cards made using the awesome Bracket note card die. It makes perfect 3×3 note cards and I LOVE it in kraft with red for the holidays. 

    WANDABABYTUES1


    I colored my focal images with my Copics and then added some small touches of glitter! Can you see the tiny snowflakes at the top of the cards too? 

    WANDABABYTUES1


    This snowman is the cutest thing! 

    WANDABABYTUES1


    I thought I would leave them like this for now until I decide what I'm going to do with them. My other idea is to punch a hole in the upper left corner and thread some ribbon through it. Then the notes could be the perfect tie-on for a gift bag or a bottle of wine!! 

    WANDABABYTUES1


    Okay, get your sunglasses for this next card! I don't even know where the idea for a hot pink tree came from (my mind is a bit wonky sometimes) but I like it! This new O Christmas Tree Die is four pieces so you can mix and match colors. It has the shadow piece, the swirly piece and then the star and the bottom. Don't you love it already? ACK. 

    WANDABABYTUES1


    I cut out some Rolling Hills for the bottom of my card and then edged them with glitter first, before I added my tree. 

    WANDABABYTUES1


    Taylore makes these awesome snowflake dies in a set! Here is a side shot so you can see the layers….

    WANDABABYTUES1


    WANDABABYTUES1


    WANDABABYTUES1

    Here are you links for today's fun projects! Be sure to come back tomorrow! XO

    Carole Burrage

    Charmaine Ikach

    Jami Sibley

    Jen Shults

    Joan Ervin

    Kerri Michaud

    Pattie Goldman - Awesome Guest Designer!!

    Sankari Wegman

    Shannon White

    Shelly Mercado

    Stephanie Kraft

    Tammie Edgerton

    Taylor VanBruggen

    Wanda Guess


    WANDABABYTUES1


  • Papertrey Ink September Blog Hop – Wreaths!

    Hey! Look at me…two PTI Blog Hops, two months in a row! I saw the challenge image in my email yesterday afternoon and knew I wanted to play along today, and make a Fall wreath somehow! I got out ALLLL my Papertrey Ink goodies and spread everything out…hmmmm….waited for an idea…. And it came to me when I saw this one tiny leaf die from the Meadow Greens die collection! I scurried around in my craft room gathering fall colored papers! Hope you like my card. Thanks for hopping on by today!  

    6a00d8341c64e753ef016302de13ad970d-450wi


    1


    The challenge is Wreaths! Here is the inspiration image…. Are you going to play along today? There is so much I could make….and so little time! LOL. 

    6a00d8341c64e753ef019aff68ac7f970c-450wi

    Here is a close up of my wreath. I cut out a bunch of the leaf dies first. I took a circle die cut and drew a pencil line on my paper to make  a template. I layered the leaves with foam tape all around… The pumpkin image is from one of the Jar Fillers sets! And, I LOVE those word dies. Thankful is one of my favorites…

    1


    I layered my word die with chocolate brown onto an orange layer – just to give some dimension and more color. The background is embossed with a PTI Impression Plate. 

    1


    1


    1


    I can't wait to hop around and see what everyone else made. People are so creative and talented and I love seeing all the ideas! Have a wonderful day everyone! XO


    Floral signature

  • Taylored Expressions September 2013 Studio Challenge!

    1e


    Get-attachment
    Yay! It's time for our Taylored Expressions Monthly Studio Challenge! I love doing this every month with my fellow Baker's Dozen Team Mates! It's so much fun to see everyone's interpretation of the challenge. Each month Taylor and Jami come up with a fun question for us to answer as a way for us to share tips and tricks and ideas.
    The question for September is: "We're continuing our month-long TE Birthday Bash celebration with a special birthday inspired Studio Challenge! Sometimes all we need to help us create, is to simply see something that is beautiful, cool, or unique. Did you know that Taylored Expressions has over 30 Pinterest Boards filled with eye candy? (We'd love to have you follow us on Pinterest! CLICK HERE). Today's challenge is to choose a photo from Taylor's Birthday Inspiration Pinterest Board to inspire a stamped creation!" 
     
    Here's my card for today! 


    1

    Here is the inspiration photo I chose from the TE Birthday Pinterest Board! MMMMM.

    1

    I adore these ice cream scoops! I chose the color scheme from the photo – pretty pink and aqua…and of course the ice cream theme! I embossed my white shape using the circles cutting plate – love how that came out! 

    1

    Here is a side shot of my layers….

    1

    1
    There are several ways for you to play along, including creating your own stamped project! CLICK HERE for all the rules from the Taylored Expressions Blog! Please check out all the details! Lemme tell ya…there are PRIZES! And we are launching our first Catalog and Idea Book! WOOT WOOT! I'm very excited because some of my projects are in the catalog!

    Here's a peek at the Catalog and Idea Book:

    Attachment-1
    Four winners will be chosen from all the contest entries to receive a copy of the catalog (a $9.95 value). One grand prize winner will be chosen to also win a FREE STAMP SET!
    Here are your links for today's fun!!
  • Taylored Expressions Share Joy Campaign: Inspiration Challenge Week!


    5


    The Taylored Expressions 5th Birthday Bash is continuing this week with a new Share Joy Campaign, benefitting the Union Rescue Mission of Los Angeles, Prodigal's Home of Phoenix, and Iowa Homeless Youth Shelter of Des Moines. Taylor chose these wonderful charities because they work tirelessly to bring comfort and care to many homeless individuals and families throughout the year. One way they are sharing joy each and every day is by celebrating the birthdays of their participants, and you can help by sending in your handmade birthday cards! Hasn't this week been fun!? 

     
    ShareJoyBlogBadge


    This week, Taylored Expressions have helped you to create with a different Birthday Inspiration Challenge each day. These charities need birthday cards of all kinds: child, adult, baby, so send in your funny, sweet, pretty, elegant, works of art and know that you will be brightening someone's day in a way only a handmade card can do.  To get all the details on how to participate, please hop over to the Taylored Expressions Blog.


    1

     
    TESInspirationPhotoChallenge


    Here is the photo inspiration for today! I'm so excited that Taylor used one of my photos for this challenge and inspiration. TOO FUN! I decided to use the pretty color scheme to inspire me! Hot pink and bright green. YUMMMMY! I used the Butterfly Parade set and made a garden-y birthday card….


    2


    I cut out the quatrefoil plate in white and then trimmed it down to fit into this pretty label stacklet! I popped the whole thing on foam tape to add shadow and dimension to my card. 

    2


    2


    2

    There are several design team members and alumni who have samples to share for today's inspiration, and readers can get the full link list on the TE blog!  Hope you will go over and check out everything from this fun week. XO


  • Fall Leaf Card!

    Hey bloggy friends! How is your Sunday going? Are you having a nice weekend? Getting crafty at all? I hope you're having a marvelous day. It's been a busy weekend here. Whew. I think I am going to write this blog post, start the laundry, and take a nap. This morning I had a very nice breakfast out (don't you love breakfast out?) with all my aunts and uncles on my father's side of the family and this weekend has been the first time in a long time that we have all been together. It has been really great, and good for my heart. I'm so happy we are all together for a visit. 

    A couple of weeks ago I bought this super cool and amazing new stamp/die combo set from Tim Holtz, and then one night last week I got around to making a card with it. LOOOOOVE the blueprints stamps from Tim Holtz, don't you? Well, this oak leaf is the large size blueprint stamp, and it has matching die pieces. Talk about taking something great, and making it better!! (There's a picture of the packaging later in my post). 

    Here is the finished card! I also put a blueprint acorn on it….oh and used some of the new Tim Holtz Distress Glitter in Antique Linen! 

    1 ablogcalledwanda.com Tim Holtz Leaf Card


    In this side shot, you can see the different layers of the leaf pieces….

    1 ablogcalledwanda.com Tim Holtz Leaf Card


    I added some speckles onto the cardstock using my water paint brush and some Corduroy Distress Ink! The card base and the leaf pieces are cream cardstock. I used Memento Cocoa Ink. 

    1 ablogcalledwanda.com Tim Holtz Leaf Card


    I had this old metal piece in my stash and it was perfect for this card…. Because I always want to capture the moments of Fall, my favorite season! 

    1 ablogcalledwanda.com Tim Holtz Leaf Card


    I used a little library clip to add an acorn accent. The acorn is part of one of the Mini Blueprint sets. Have I mentioned how much I love those? Hee hee. 

    1 ablogcalledwanda.com Tim Holtz Leaf Card


    Here's a close up of my shading and coloring. I colored the leaves using Distress inks and a water brush. Just kept playing with it until I got the right look. More step by step pics are below….

    1 ablogcalledwanda.com Tim Holtz Leaf Card

    One of the coolest parts about this set is that the leaf has several dies….So you can get some great dimension. 

    1 ablogcalledwanda.com Tim Holtz Leaf Card

    Here's the stamp/die set packaging…

    1 ablogcalledwanda.com Tim Holtz Leaf Card


    These are the ink colors I chose to use:

    1 ablogcalledwanda.com Tim Holtz Leaf Card


    When I color with my distress inks, I put some of the ink on a clear block and use that as my palette. Super easy to clean and work with. Here you can see that I first put down a soft yellow layer on my pieces. 

    1 ablogcalledwanda.com Tim Holtz Leaf Card


    Next up I put down a bit of Marmalade distress ink…

    1 ablogcalledwanda.com Tim Holtz Leaf Card


    And some Barn Door distress ink…. Now it's starting to come together like a fall leaf! 

    1 ablogcalledwanda.com Tim Holtz Leaf Card


    My messy table! I cut out a pumpkin too, but ended up not using that…

    1 ablogcalledwanda.com Tim Holtz Leaf Card

    It's been really fun sharing this project with you today! It was a relaxing process to make this one, just layering and coloring and distressing. I like these "all day" cards! Have a wonderful week ahead! See you soon. XO 

  • Mighty Oak….

    Hellllooooooooo! It's Friday Eve, or as other people like to call it, Thursday! I'm already waiting for the weekend. My aunts and uncles are coming to my town and it's been many years since all of us were together at once and I am very anxious to see everyone. Just have to make it through one more work day. I can feel the light changing at night now – it's already dark here and it's 7:45. I love that. Autumn – bring it! 

    Today I'm sharing a card made with an awesome new die and stamp set from Papertrey Ink called "Mighty Oak." Lemme tell ya, it's all sorts of fabulousness. Really versatile tree and leaves set with gorgeous sentiments. It has been on my stamp table for a couple of weeks and it was making me crazy. HAD to make something! I decided on a fall tree with a retro color scheme of yellow, orange and olive green. Hope you likey. 


    1


    This sentiment is sooooo pretty! I stamped it with brown ink onto a strip of vellum, and then added a few gems to keep it retro chic. The tree trunk is actually a very dark brown – it looks black on my computer right now. The three colors of ink are from the Adirondacks Ink line. 

    1


    Here's a side view…. All the leaves pop out of the die, then you stamp them, and pop them back in place like magic! 

    1


    1


    Okay peeps, have a wonderful weekend and thank you for stopping by to see me today. I'm always happy to have you here at my little piece of the interwebs. XOXO

    1