Hi there creative and crafty friends! Top o’ the morning to you! It’s my turn today on The Greetery Blog! So of course I’m posting here too! Spring is coming! And it’s time for green all around us! Today I’m sharing a St. Patrick’s Card made with the gorgeous Nordic Hearts – turned into a shamrock. I love St. Patrick’s Day – it’s my cat’s birthday – ha! (His name is Lucky and he has gorgeous green eyes). Green is one of my favorite colors and this time of year, especially, it is so fresh and pretty. So make a wish on a Lucky clover!!
My finished card is an A2 white card base. Layered with white, green gingham and vellum – you know, my favorites! I started my card by die cutting three of the medium sized Nordic Hearts from olive, yellow, green cardstock. I made my stem by hand cutting the curve of another heart die cut. I generously splattered the pieces with gold paint. I die cut the Make A Wish die from gold cardstock. All stamps and dies are from The Greetery!
Here’s a side view of all the pieces. Aren’t you smitten with those hearts?! I definitely am!
I used the Calendar Basics stamp set to stamp March 17 onto a little banner from the Sentiment Suite Basics Die set. It fit perfectly there on that spot on the card. To assemble the card I layered green gingham paper, then vellum, then a white layer die cut with the Crimped Rectangles Dies. The white layer is popped up with foam tape. I put the hearts onto the white layer using foam tape and assembled them into the shape of a shamrock. I glued the Make A Wish over the top of the shamrock and then tucked the little banner underneath.
To finish off, I added a few little yellow heart embellishments. That’s it for my project for today. Fresh green for Spring! I hope you have a wonderful and creative day. And an awesome weekend! We are going to a vintage pop up today and I can’t wait!! It’s my pleasure to share with you, and I look forward to sharing with you again soon. In the meantime, happy crafting! XOXO
Hi friends! Happy Saturday! Happy 1st day of March! The year is “marching” on, isn’t it!? I love it when everything turns green and the flowers bloom! We’ve had some sunny days here and renewal is in the air. I love St. Patrick’s Day for lots of reasons…. Mostly because my beloved kitty cat was born on St. Patrick’s Day – and that’s why his name is Lucky! So shamrocks, and gold pots, and rainbows and leprechauns it is! Today I’m sharing two cross stitch projects that are for St. Patrick’s Day! I actually finished stitching them AND finished them too! Yayayayayay for me! Hee hee. I’ll share my two projects, and then the supplies will be listed out in the narrative and in the supply list! Let’s go!
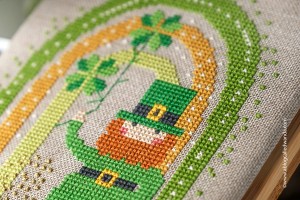
First up is this fun Leprechaun stitch – complete with a rainbow, some four leaf clovers, and his pot of gold! Isn’t he cute? This was a really fun stitch!
I bought the heart board and the ribbons at Hobby Lobby and I used my hot glue gun to make the bows and affix them to the board. I hot glued the charm to the center for a little bit of whimsy!
The pot of gold is dark gray thread, and then I used gold metallic thread for the coins! It’s so cute in person!!
Lots and lots of green threads! Just a little bit of back stitching for the stems of the four leaf clovers. The area of the stitching is approximately 5″x7″ so it isn’t a large stitch and it went pretty quickly! I really like this fabric – makes it look a bit vintage.
My second project for today is Lucky Charm! It features a huge four leaf clover, a horseshoe, and pretty text! I added the button to the center of the pattern to add a bit of texture. I used the free pattern, and the called for threads from DMC. I finished it on sticky board with batting to make it a little puffy. The ribbon will be used to hang it on the wall.
PATTERN: Free Lucky Charm Pattern from FQS
FABRIC: 14 count Aida Vintage Country Mocha
THREAD: DMC threads as called for
FINISHING BOARD, AND RIBBONS: My stash and Sticky Board
The little center areas of the horseshoe are gold metallic thread! There are so many pretty greens in this pattern. It looks so good on the 14 Aida – nice and crisp. The finished smaller area with the stitching is 7″ x 7″ and the larger green part is 9″ x 9″. I found the fabric at my local quilt shop and I used sticky board, tape and my hot glue gun to wrap and finish the piece. There is batting also – to make it puffy.
I used a green button from my stash to put into the center of the clover. I just felt like it needed a little something something…..
That’s it for my first projects for March! I don’t think I’ll get any more stitching done for St. Patrick’s Day – but I do definitely have some paper projects to share in the coming weeks! I hope you have a wonderful weekend! See you soon! XOXO
Top O' the morning to you my crafty friends! I hope that you find a pot o' gold at the end of your rainbow today! Best wishes for a fun and Happy St. Patrick's Day!
My St. Pat's cards for this year were inspired my lovely and talented friend Shannon White, who is one of my fellow Design Team gals at Taylored Expressions. She made THIS CARD for release week and I just loved it! Today I'm sharing my version of her cute card!
Here is my card:
The cute little shamrock die and the Lucky word die and the tiny leaves are all from Taylored Expressions! The ADORABLE little pocket is from WPlus9!! EEEP! I popped the pocket on some foam tape and then added my greenery, then glued the word partially on the pocket. SO fun!
Well, I made a bunch of cards….so I was die cutting teeny pieces for quite some time! Here are my die cuts all ready for assembly.
And you know my trick for perfectly matching pearls….get your Copics out! These are YG25! Color them right on your backing piece and then they are easy to just peel off when you're ready.
Tiny jean pockets! I used Tim Holtz Kraft Core cardstock and then sanded part of the die to make it look like denim.


