

Hi everyone! I'm soooooo happy to be here to share with you today! (actually happy is an understatement!!) Today is the final day of product introductions for the March 2017 Papertrey Ink release! It's my honor and pleasure to introduce to you the newest Make it Market Mini Kit – Bloom & Grow! Betsy has done it again with another one of her awesome kits. I have every single one of them and they are like little gems in my craft room – so special to me. I know a lot of you feel the same way too. Click over to Nichole's blog at some point today to catch up on ALL of the awesome news from the past week about the new products. Everything will be available for purchase tomorrow (March 15th) at 10pm EST TONIGHT – updated 3/15! on the Papertrey Ink website. I will be posting many more cards and projects after release date! Thank you to all of you who have been excited about this new design team adventure with me – I am so grateful for your support and cheer leading! I hope your week is off to a good start and I hope I make it better with some fun things here today.
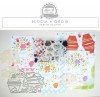
This newest Make It Market Mini Kit comes with beautiful patterned papers with a loose plaid and pretty watercolor brushstrokes. It also has a gorgeous floral stamp set with matching dies and fun stencils. The dies coordinate not only with the stamp set, but with the amazing floral bouquets that are pre-printed on the beautiful PTI linen cardstock. These floral bouquets have tabs at the bottom so you can insert them into the matching flower pots. And the sentiments fit perfectly onto the tabs! So great for Spring and Summer creating. I love this kit for bridal showers, Mother's Day cards, Tea parties and friendship cards. It was really quick and easy to make cards that look like they took a long time – sure to impress! Let's take a look…

For this card I made an A2 card base from Kraft cardstock. I layered a piece of the included blue and white patterned paper and added a strip of vellum across it. The flower pot and floral bouquet are pre-printed. I used the matching die cuts to easily cut them out. When you fold over the flower pot image, it has a slot for the bouquet to slide into. I then die cut some extra flowers and attached them with foam tape for dimension. A few pearls and a pretty twine bow – and your'e done!


After I die cut out the first flower pot, I had the idea to turn it into a place card! The flower pot stands up on it's own and it would be so beautiful at an Easter table or at a shower event! I used the PTI banners dies and hand printed the name on the banner. I stamped a couple of green leaves using the included stamp set.

Here is a side view of the place card. I used adhesive on the floral bouquet tab and attached it to the back of the flower pot!

This next card also uses the included patterned paper and the pre-printed bouquet and flower pot. This time I stamped the sentiment onto the pull out tab.

This is so cute and clever – how Betsy designed the images to work together! LOVE.

For this next card I used the stamp set and made pretty flower clusters for a clean and simple, one layer card. You could make this in any color combination and it would look great. These stamps work together very nicely in scale, and with all the little extra accents you have come to expect from PTI!

Okay, one final card! I used the stamps and matching dies for this one to create a half wreath around the sentiment. Since the sentiment is on the smaller side, I die cut two circles to frame it and make it more of a focal point on the card. The roses and leaves die cut like a dream… I added a few pearls again for accents.

Thank you so much for stopping by today. Please CLICK HERE to go to Nichole's Blog and see everything from the past week. We have all been working hard behind the scenes to make this release fun and fabulous for everyone. Have a wonderful day! XO


SUPPLIES FOR TODAY'S PROJECTS!
 |
 |
 |
 |
 |
 |
 |
 |
 |
 |
 |
 |
 |
 |
 |
 |
 |
 |


