Tag: floral card

  • Thinking of You – with love and purple florals! Fun with The Greetery!

    Hello friends! Wishing you a happy day today! It's my turn to share a project on The Greetery Blog today – so of course I'm going to share it here with you also! Yay! The new release festivities from Concord and 9th finished up this weekend, and it's time to start some Easter crafting here too! Spring is springing! We have had tons of rain in the past month and everything is so green and fresh and all the trees and flowers are blooming. I'm in the mood for pastels and florals! If you're a fan of The Greetery (which I know you are), then you might be very excited next week! Just sayin!

    My card today features one of my favorite Greetery stencil sets- Rose Tapestry! I decided this time to make it in purple! I do really like how it came out! My finished card is an A2 kraft card base, layered with purple and gingham and then the hoop with the pretty pattern inside. I used cream cardstock for the florals part and the sentiment. Makes the card a bit warmer.

    the greetery, the greetery rose tapestry stencil, the greetery hoops, cross stitch, the greetery notionable dies, the greetery sign off sentiments, stencils, gingham, friendship card, handmade card ideas, floral card, stamps and dies, wanda guess, a blog called wanda


    Here's a side view of all my layers and elements…. Lots of dimension on this card for sure. And lots of different textures and patterns too. Just the way I like it! Hee hee.


    the greetery, the greetery rose tapestry stencil, the greetery hoops, cross stitch, the greetery notionable dies, the greetery sign off sentiments, stencils, gingham, friendship card, handmade card ideas, floral card, stamps and dies, wanda guess, a blog called wanda


    I used both large and small blender brushes with those wonderful stencils, and inked with shades of spring greens and pretty purples. It is so fun to watch the design take shape with each stencil layer. I used the Hoopla Oval Inserts to die cut my stenciled panel to the perfect size to fit into the Hoop. I accented with silver and purple. I used the Notionable Dies to make the scissors, thread, thimble and needle. My stenciled panel and my sentiment are on cream cardstock for more of a vintage look instead of bright white cardstock.
     
    I stamped the sentiment from the Signed Off Sentiments set, and die cut it out with the matching die. I attached everything to my card base and finished off with a bit of twine and some purple pearls. This would be a great card for a crafty friend! Or a fellow cross stitcher!

    the greetery, the greetery rose tapestry stencil, the greetery hoops, cross stitch, the greetery notionable dies, the greetery sign off sentiments, stencils, gingham, friendship card, handmade card ideas, floral card, stamps and dies, wanda guess, a blog called wanda


    the greetery, the greetery rose tapestry stencil, the greetery hoops, cross stitch, the greetery notionable dies, the greetery sign off sentiments, stencils, gingham, friendship card, handmade card ideas, floral card, stamps and dies, wanda guess, a blog called wanda


    the greetery, the greetery rose tapestry stencil, the greetery hoops, cross stitch, the greetery notionable dies, the greetery sign off sentiments, stencils, gingham, friendship card, handmade card ideas, floral card, stamps and dies, wanda guess, a blog called wanda


    the greetery, the greetery rose tapestry stencil, the greetery hoops, cross stitch, the greetery notionable dies, the greetery sign off sentiments, stencils, gingham, friendship card, handmade card ideas, floral card, stamps and dies, wanda guess, a blog called wanda


    This card was really so fun to make! Lots going on and it all just works together beautifully because of how everything is designed. 


    the greetery, the greetery rose tapestry stencil, the greetery hoops, cross stitch, the greetery notionable dies, the greetery sign off sentiments, stencils, gingham, friendship card, handmade card ideas, floral card, stamps and dies, wanda guess, a blog called wanda

    Thanks for spending a little time with me today! Get out your supplies and make something today! Try it in a different color – or with a new twist! Enjoy the creative process and have a blessed day! I will see you soon with some more fun projects! XOXO

    THANK YOU FOR SHOPPING VIA MY AFFILIATE LINKS – IT HELPS SO MUCH!!

    If you enjoy my content – consider buying me a coffee! Thank you!

    Buy me a coffee! Thank You!


    CLICK HERE or on the graphic below to see the full supply list for today's card! (Affiliate Links Used)

    Buy me a coffee blog graphic


  • The Greetery – Pretty Flower Pots!

    Hi guys! It's me again! And I'm back with more yellow, and more flowers! I was on The Greetery Blog yesterday with a TGIF project and I wanted to share it here with you, too! Happy Crafturday/Saturday my friends!

    My card features some of the newer stamps and dies release from The Greetery this summer…. The Pretty Pot Dies and the Container Garden Stamps and Dies. The finished card is a white A2 card base, layered with yellow, vellum, and more white. This card is bright and sunny! The idea came to me when the Pretty Pot die came out…. I wondered – hey, does the Container Garden floral spray fit into the pot?? Well…guess what? It does! Nice!

    the greetery, the greetery stamps and dies, the greetery container garden, the greetery pretty pot, the greetery windowpane plaid, pretext sentiments, floral card, handmade cards, stamping, card layout ideas, the greetery design team, wanda guess, a blog called wanda


    Here's a top down photo to show all the layers…. You can see I used foam tape to mount my flowers/pots to the card and also to mount that top layer of white paper.

    the greetery, the greetery stamps and dies, the greetery container garden, the greetery pretty pot, the greetery windowpane plaid, pretext sentiments, floral card, handmade cards, stamping, card layout ideas, the greetery design team, wanda guess, a blog called wanda


    To make the pots, I die cut them from Kraft cardstock. I used shades of Distress Inks and splatters to make the pots look like aged terra cotta/clay pots that have been out in the garden for a while… The sentiment was heat embossed onto a banner with white embossing powder.

    the greetery, the greetery stamps and dies, the greetery container garden, the greetery pretty pot, the greetery windowpane plaid, pretext sentiments, floral card, handmade cards, stamping, card layout ideas, the greetery design team, wanda guess, a blog called wanda


    I used my MISTI to ink/stamp the Windowpane Plaid background stamp onto a white panel. I also used my MISTI to stamp the flowers. Everything lines up so perfectly – thanks to Betsy. I used Copic Markers to add a bit more shading, and then a white gel pen too.

    the greetery, the greetery stamps and dies, the greetery container garden, the greetery pretty pot, the greetery windowpane plaid, pretext sentiments, floral card, handmade cards, stamping, card layout ideas, the greetery design team, wanda guess, a blog called wanda


    I die cut the floral spray using the matching Container Garden Die. I tucked it inside the pot – I love how this looks!! I wish I had this pot of flowers in my garden!

    the greetery, the greetery stamps and dies, the greetery container garden, the greetery pretty pot, the greetery windowpane plaid, pretext sentiments, floral card, handmade cards, stamping, card layout ideas, the greetery design team, wanda guess, a blog called wanda


    the greetery, the greetery stamps and dies, the greetery container garden, the greetery pretty pot, the greetery windowpane plaid, pretext sentiments, floral card, handmade cards, stamping, card layout ideas, the greetery design team, wanda guess, a blog called wanda

    Okay friends! Last project for the weekend…. But guess what? I'll be back on Monday!! Next week we have this on tap: Doodlebug and Pigment Craft Co! Take care until we meet again! XO

    CLICK HERE or on the graphic below to see the supply list for today's card. (Affiliate Links Used)

    1

  • Pinkfresh Studio March 2021 New Release – Folk Garden Card!

    Hi everyone! It's time for another beautiful new release from Pinkfresh Studio! And, we're celebrating with a giant blog hop today! Yippeee! Happy Monday indeed! Hope you had an awesome weekend. This new release is just what you would think – GORGEOUS florals!!! I am still loving the stamp/die/stencil combo of products that make it so simple to get amazing results. Today's card of mine features the Folk Garden suite of products, in a fresh spring color palette. All the prizes, discounts, and links are at the bottom of my post – so be sure to read through to the end. 

    My finished card is an A2 white card base – then layers of soft blue, vellum, and more crisp white. I love building layers to frame pretty flowers….

    pinkfresh studio, pinkfresh studio folk garden, pinkfresh studio stamps and dies, florals, flowers, stencils, floral card, birthday card, pinkfresh studio blog hop, handmade, spring, bow dies, wanda guess, a blog called wanda


    The flowers are all ONE big stamp!! I stamped the stamp in black ink with my MISTI. Then I used Pinkfresh Inks in blues and mint greens and the matching stencils and stenciled the color onto the flowers. The die cut cuts ALL the flowers at once! Then you can leave them as the are on the stamp, or move them around like I did and create floral sprays anywhere on your card. I stamped and die cut the sentiment in matching blue inks.

    pinkfresh studio, pinkfresh studio folk garden, pinkfresh studio stamps and dies, florals, flowers, stencils, floral card, birthday card, pinkfresh studio blog hop, handmade, spring, bow dies, wanda guess, a blog called wanda


    1


    Here's a close up of the flowers. I ended up stamping, coloring and die cutting a second set of flowers. I trimmed the colored part of the buds and layered a second one on top for more dimension.

    pinkfresh studio, pinkfresh studio folk garden, pinkfresh studio stamps and dies, florals, flowers, stencils, floral card, birthday card, pinkfresh studio blog hop, handmade, spring, bow dies, wanda guess, a blog called wanda


    I die cut the pretty Artistic Bows Die from matching blue paper to affix to the floral spray.

    pinkfresh studio, pinkfresh studio folk garden, pinkfresh studio stamps and dies, florals, flowers, stencils, floral card, birthday card, pinkfresh studio blog hop, handmade, spring, bow dies, wanda guess, a blog called wanda


    pinkfresh studio, pinkfresh studio folk garden, pinkfresh studio stamps and dies, florals, flowers, stencils, floral card, birthday card, pinkfresh studio blog hop, handmade, spring, bow dies, wanda guess, a blog called wanda


    Some pretty white shimmery enamel dots help to finish off the card!

    pinkfresh studio, pinkfresh studio folk garden, pinkfresh studio stamps and dies, florals, flowers, stencils, floral card, birthday card, pinkfresh studio blog hop, handmade, spring, bow dies, wanda guess, a blog called wanda


    I stacked two sentiments for the 'wish big' part so it would have more depth to it.

    pinkfresh studio, pinkfresh studio folk garden, pinkfresh studio stamps and dies, florals, flowers, stencils, floral card, birthday card, pinkfresh studio blog hop, handmade, spring, bow dies, wanda guess, a blog called wanda


    This is a photo I took a few weeks ago near our house. It was the color inspiration for this card! Such a bright and happy Spring palette of green, blue and white. SO FRESH!! 

    California Blossoms!

    PRIZE INFORMATION:   Pinkfresh Studio GENEROUSLY will be giving away the full release on the Pinkfresh blog & YouTube channel!! They will also be giving away a total of TEN $25  gift cards along the hop. As with all our Pinkfresh blog hops – the winners will be picked from the comments on all the blogs! Pinkfresh will pull the winners & post them on April 5 , 2021 on their GIVEAWAY PAGE. You must check that page & claim your prize within 2 weeks. GOOD LUCK!! Thank you so very much for stopping by on my part of this awesome blog hop! Be sure to follow all the links on the Pinkfresh Studio Blog to see all the inspiration we have to share with you! If you're new here – welcome! Hope to see you again! XOXO


  • Concord & 9th October Release! I’m a Guest Designer!

    Holla! Hey! Hello! Happy Friday! I'm super excited to say that I am one of the guest designers for the month of October for Concord & 9th! I'll be sharing projects every Friday for the next four weeks, using new stamps and dies from the October New Release. YIPPEEEE! I've known for a while, and now I'm excited to share the news and show you some projects. CLICK HERE to visit the Concord & 9th Blog!

    I hope you had a good week – and are looking forward to a fun weekend too. My week was busy and full of activities and creating. Some of you have emailed or messaged me about this crazy power outage situation here in Northern California. UGH. So I live in Sacramento County. When you look on the big power outage map, my county is the only one that has power. We are not on PG&E grids for electricity. We have SMUD. So I've been good here. About five miles east – all my foothill friends have zero power. It's the strangest thing I can remember happening around here. Thank you for checking on me tho. Now, back to cards! 

    The first product bundle I'm showcasing is the Annuals Bundle. A beautiful stamp set, matching dies, and calendar pages. You can create your own beautiful calendars with it (there are monthly words), make cards, and use it in your bullet journals and scrapbooking. Super versatile! I chose to make a card with the gorgeous florals and the pretty word dies. I used a graphic color palette of black, white, grey and pops of bright pink. 

    Concord and 9th new release. Annuals Bundle. Guest designer. Wanda Guess. Copics, florals, CAS cards


    Concord & 9th new release October 2019


    My finished card is A2 sized with a white card base. I layered dark grey cardstock, and then vellum. The top layer is white cardstock that I stamped with the graphic image from the stamp set. Basically making my own patterned paper! I love doing that!

    Concord and 9th new release stamps and dies


    I stamped and die cut the floral image and colored it with my Copic markers. I die cut the words dies from pink and black cardstock. The friend word was stamped in Versamark ink and embossed with white embossing powder. I love this look of sharp contrast.

    1


    The center rectangle part of the card is mounted onto the card with foam tape. Then the floral is mounted on with foam tape also. I added a few sequins for just a bit of sparkle!

    Concord & 9th


    clean and simple card ideas

    Thank you so much for visiting today! If you're new to my blog and came over from the Concord & 9th Blog – welcome! Happy to meet you! Happy crafting! I'll see you on Sunday or Monday – not sure when I'll get posting! LOL. 

    CLICK HERE or on the graphic below to see they supply list for today's card. (Affiliate Links Used). CLICK HERE to shop the new release over on the Concord & 9th website!

    concord and 9th new release

  • Watercolor Birthday Roses!

    Hi creative and crafty friends! Monday already!? How are you? I woke up at 5am and have been in the studio all morning trying to organize and plan my week. I have a lot of projects in the works and trying to keep it all straight in my head. If you can believe it, Valentine's Day stamps are already starting to arrive here! Yikes! It's really remarkable how far ahead the planning is for crafting projects! Yesterday I had a "girl day" and took a crochet class with a dear friend. We had fun for sure! I'm getting better, but still have a lot to learn. There are sooooo many gorgeous yarns out there. I want it allll! A whole new thing for me to hoard!! LOL. This is definitely not your grandma's crocheting! It's more modern and fun and I am loving it. After that I hung out at the stamp store and had dinner with the crew from Judikins who are here visiting Sacramento! F-U-N! I have a super busy week this week. Most weeks I am home at least a couple of days but this week I am out and about every day and night! Must be the Fall season! It's all good, fun, work, play, all of that. I hope that you have a great week my friends! 

    Last month I was trying to keep up with the 30 Day coloring Challenge and had some half done projects saved. Today I'm sharing a card made with one of the panels I colored – a classy botanical style tree rose stamp from Impress Cards and Crafts. A beautiful image to color for sure! I used my Zig Clean Color Brush Markers and some small paint brushes. I made it into a clean and elegant birthday card in a square format!

    Impress Cards and Crafts Tree Rose stamp. Kuretake Zig markers


    My finished card is a 5×5 inch square. I made my card base from my favorite shade of pink cardstock! I layered cream cardstock onto the pink and then layered my watercolored panel using foam tape. The main image was stamped in black archival ink to stand up to the water. For the bottom cream layer I used rich brown ink and stamped the stamp twice – once in each corner – to add a bit of a background effect. I used my Kuretake Markers to color the roses and leaves and also used a bit of blue around the image. The sentiment was gold embossed onto a black banner for some drama!

    MFT Essential Sentiments. Gold Embossing


    Here is a close up of the coloring and the background. For the leaves I used three shades of green and let it all blend together. Tip: Use a tiny paint brush and get the paper wet before adding your marker color – the effect will be nice and soft. Then, after your project is dry, go back and add depth with the marker itself. These markers are so wonderful to work with. 

    Kuretake Zig brush markers


    Watercolor roses


     Maybe I went a little crazy with the shimmer spray??? LOL. I used Gold and Pearl Shimmer on this one! It's veryyyyy pretty but super hard to photograph! I like how it all came out! 

    Blog 1


    Blog 1

    Thanks so much for spending a little bit of your day with me! Have an amazing week! Lots of love from my studio to yours! XOXO

  • More Papertrey Ink July 2017 Release: Introducing Stemmed Statements!

    I'm back! Day three of Papertrey Ink Inspiration week for the July new release! Happy to see you again so soon! Today I'm featuring a sweet and pretty new floral stamp set called Stemmed Statements. This stamp set has tons of floral images just right for cards, and also has matching dies. I thought these images were perfect for watercoloring! Everything in the new July release is available now in the PTI Store. I hope you've found some things that you like this month. I kind of loved everything this month!!! Wait until tomorrow's post!! YEAH!!

    For today's card, I used the pretty geranium stamp image. My card base is A2 size and then I covered it with PTI polka dot paper from my stash. I die cut a panel from watercolor paper to stamp on and then kept the left over watercolor paper handy for an additional image. I started by stamping and heat embossing the geranium twice on the bottom of the panel. I left a space in the center for another geranium. The third one was stamped, embossed and then die cut out and added on later. I used Zig Clean Color Brush Markers for my watercoloring in vivid reds and soft greens….so pretty! 

    Papertrey Ink Stemmed Statements. Watercolor with Zig Brush Markers. Wanda Guess PTI design team


    These stamps are so delicate and lovely! Here is a close up of my watercoloring. I added a light aqua wash of color around the images and also splattered some aqua onto the entire panel. I attached the third geranium with foam squares. 

    Papertrey Ink Stemmed Statements. Watercolor with Zig Brush Markers. Wanda Guess PTI design team


    Papertrey Ink Stemmed Statements. Watercolor with Zig Brush Markers. Wanda Guess PTI design team


    The sentiments included with this set and sweet and delicate – simple joys….ahhhh…

    That's it for today's post! I hope to see you tomorrow! Hint for tomorrow's post: TROPICAL!! XOXO

  • PTI More March Release: Botanical Letters and Beautiful Berries Spring!

    Papertrey InkGood day to you! It's almost the official first day of Spring! And I have lots more Spring inspiration for you! Does it seem like I made a ton of PTI projects this month already? Well, that's because I did! And today I have even more! YAY! If you want to see my other posts, just scroll down in my blog after this post. Lots of good stuff for us to stamp and create with. What a joy! I have been having a lovely weekend – continuing to organize, and enjoying some sunshine around here. And I took a nice long nap yesterday too. Now it's time to get busy back in the studio. I have loads of ideas…in fact, an entire sheet of a legal pad! I have been brainstorming and planning. Organizing helps me clear my head and make way for creativity and I can feel it happening. Hope you are in a creative groove right now! 

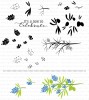
    Today there are two projects made with the brand new Papertrey Ink March stamp release. It's all about beautiful florals! And, one of my favorite color combinations: pink and green! I made one birthday card to show you, and a set of pretty custom note cards I made for one of my best girl friends. I'm featuring the new stamp sets called Beautiful Berries: Spring, and Botanical Letters. I hope you find something to inspire you today! Thank you for joining me along this journey all week! It's been really fun and exciting to share with you! 

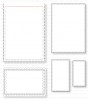
    First up is a clean and simple birthday greeting made with Beautiful Berries stamps and matching dies. I started with a card base die cut with one of my favorite PTI products – the Noted A2 Scalloped Die! This die makes a card! You place the top edge of the die on the card fold, and run it through your big shot, and end up with a gorgeous card. The inner layer stitched die is included with the set! Clean and elegant and quick to make! 

    PTI Beautiful Berries stamps and dies. Birthday card by Wanda Guess. March 2017 release week.


    This is so lovely! I adore the graphic nature of these florals and leaves!! This would be pretty stamped in any color. I used brown for the branches. At first I tried a dark green, but I ended up liking it better in brown. The dies are a perfect match. I stamped and die cut two pieces for the front of my card. When I attached them to the card I used foam tape. 

    PTI Beautiful Berries stamps and dies. Birthday card by Wanda Guess. March 2017 release week.


    I used one of the stamps that is the flower centers to add some green dots around the stems after I attached them. The sentiment is stamped in dark chocolate ink, off center towards the bottom of the card. 

    PTI Beautiful Berries stamps and dies. Birthday card by Wanda Guess. March 2017 release week.


    PTI Beautiful Berries stamps and dies. Birthday card by Wanda Guess. March 2017 release week.


    PTI Beautiful Berries stamps and dies. Birthday card by Wanda Guess. March 2017 release week.


    Next up today is the project I made with the new Botanical Letters stamps! EEEEEEEK! I love these so much! I knew right away I wanted to make a note card set for one of my best friends. She is a great pen pal and correspondent and always sends beautiful notes. I cut out cream linen cardstock and rounded the corners to make flat note cards. Then I used the Botanical Letters stamps to spell out her name at the top of each note. 

    PTI Botanical Letters stamps. March 2017 Release. Notecards by Wanda Guess


    When I packaged the notes and enveloped to give her as a present, I used the Flower Mandalas Dies for a pop of interest attached to some pretty PTI ribbon….. So feminine and pretty. Here you can see that I matched the envelopes to the green ink, and I made some letter seals for the backs of the envelopes! 

    PTI Botanical Letters stamps. March 2017 Release. Notecards by Wanda Guess


    These Flower Mandala dies are gorgeous! I die cut one from gingham and one from green paper and layered them. Then attached a pretty pink center with foam tape. 

    Papertrey Ink Flower Mandala Dies. March 2017 release


    PTI Botanical Letters stamps. March 2017 Release. Notecards by Wanda Guess


    Here is a close up of the letter seal. I die cut the right size circle using circle dies, then stamped the first letter of her last name in the center. Using the tiny floral stamps, I added green, pink and brown to the letter. On the back I put some double sided tape and left the backing on it so she can easily adhere them to the envelopes. 

    PTI Botanical Letters stamps. March 2017 Release. Notecards by Wanda Guess


    The Index Sheet for the stamp set is super helpful for placement of the tiny stamps. No need for a stamp positioner. It was very easy to get the flowers in the right place. Start with the leaves first! You can see in each letter, there are grooves for the leaves to fit into! Genius! Once you have the leaves stamps, the other stamps fit right in. And, if it's not perfect, it still looks great. I can't wait to stamp this in Christmas colors!!! 

    PTI Botanical Letters stamps. March 2017 Release. Notecards by Wanda Guess


    PTI Botanical Letters stamps. March 2017 Release. Notecards by Wanda Guess


    PTI Botanical Letters stamps. March 2017 Release. Notecards by Wanda Guess


    For the finished project, I made four note cards, and four letter seals. I wrapped it with green matching envelopes for a pretty presentation. 

    PTI Botanical Letters stamps. March 2017 Release. Notecards by Wanda Guess

    Thank you for stopping by today! It's so nice to have you here! Welcome new readers who have found me via Papertrey Ink! We are going to have a fun year of stamping together. Happy First Day of Spring tomorrow! XOXO 


    SUPPLIES FOR TODAY'S PROJECTS!

  • Hero Arts April Card Kit Blog Hop!

    Hi friends! I'm super excited to be sharing a card with you today as part of the Hero Arts "My Monthly Hero" Card Kit release for April. This kit is SO pretty! It was a joy to make a card with these supplies. Really cool Daniel Smith watercolors – maybe you haven't tried them yet? I first saw them at CHA and was hooked right away. This new kit is a great way to try some of the Daniel Smith Watercolors. The kit has a stamp set, matching dies, gems, watercolors and pre-folded cards. Sure to inspire you right out of the box! It's very nice to be included in the hop today. I hope you have a great time looking at everyone's creations! Thank you for visiting with me here! CLICK HERE to shop the kit in the Hero Arts Store!

    6a0120a7861a18970b01b7c7d7b3ca970b-800wi.jpg

    I was inspired right away by this beautiful big flower stamp! I stamped it and white embossed it twice onto watercolor paper. Then I used the included watercolors and painted them in gorgeous shades of purple (Quinacridone Violet and Quinacridone Fuchsia). I stamped and white embossed several of the leaves onto watercolor paper and then colored them in pretty greens (Serpentine Genuine, Phthalo Yellow Green and Cascade Green). I cannot even stress enough how pretty these colors are in person! 

    My Monthly Hero Kit from Hero Arts. Watercolor florals card by Wanda Guess. Daniel Smith Watercolors.


    Here is a close up of my blooms and leaves so you can see the colors all blended together. For the flower centers I used the Yellow Deep Hue watercolor paint. I stamped the sentiment in a deep rich Archival Jet Black ink. 

    6a0120a7861a18970b01b7c7d7b3ca970b-800wi.jpg


    6a0120a7861a18970b01b7c7d7b3ca970b-800wi.jpg


    I mounted my flowers and leaves onto the card using foam tape for a bit of dimension. I used a piece of black and white striped paper to add a graphic element to the background. 

    6a0120a7861a18970b01b7c7d7b3ca970b-800wi.jpg


    6a0120a7861a18970b01b7c7d7b3ca970b-800wi.jpg

    PRIZE! One lucky winner will be chosen from all the blog comments – and will win a free Hero Arts Kit! Make sure to leave comments on all the stops on the hop for more chances to win. 

    The Hero Arts kits sell out pretty regularly, so I would hop right on it if you think you want this one (and I kinda think you do!) I'm glad you stopped in today. Have a great time hopping! See you soon!

  • Blogging makes me happy….

    Hey crafty friends! I'm trying to hurry up and blog tonight before the power goes out again! SOOO weird, that we are having thunder and lightning storms here in Sacramento tonight. The power already went out once, and it's pouring rain right now! That isn't the norm around here… Kinda feels like the Midwest, not Northern California. LOTS of lightning! Poor Buddy went and hid in his kitty house in the studio and is in backwards, so all I can see is his furry rear end sticking out. Poor guy! 

    The title of this post says it all… Blogging makes me happy. Truth. You guys make me happy. Thanks for the nice comments on my last post and for the good vibes I can truly feel coming my way. You lifted my spirits with your wise words and kind thoughts. That's the exact reason I blog…kind people. I'm blessed to know you!

    In the spirit of keeping me happy this week and not getting down, I came home and made a card right after work again. One thing about my new (early) work schedule is that I am home by around 4:15 in the afternoons now. I wanted to use my new Papertrey Ink goodies that have been sitting on the counter…so I whipped up a clean and classy floral card. LOVE these new stamp sets!! (Brushed Blooms and Graceful Greetings).


    Papertrey Ink Brushed Blooms. Card by Wanda Guess


    I stamped all my images using Mama Elephant Inks. I chose some pretty, rich, black wood grain paper and then contrasted it with some pretty polka dots paper. I love black and light blue together. Delicious! I popped some bright yellow in there too, and matched the yellow twine at the end. 

    1


    So I was SUPER nervous when I stamped that big word stamp across my flowers! Whew. How many times have I ruined a card when I put the words on? Um, a lot! But this time it came out nice and crisp! I used black archival ink. 

    Papertrey Ink Graceful Greetings. Card by Wanda Guess


    My white panel with the stamping on it is raised up with foam tape for some depth. I added some pearls at the end – like I always do. I think this has a really nice vintage feel to it! 

    1


    Before I took my card photos I ran out and grabbed the FIRST hydrangea of the season! SO pretty!! It's so fresh and this color takes my breath away. 


    Papertrey Ink PTI Brushed Blooms. Card by Wanda Guess

    Thanks for stopping by! Probably when you read this it will be FRIDAY already! Woot Woot Woot! Amen to that! Hope you have a really nice weekend planned! Take care everyone! XOXO

    1