Hi there creative and crafty friends! Top o’ the morning to you! It’s my turn today on The Greetery Blog! So of course I’m posting here too! Spring is coming! And it’s time for green all around us! Today I’m sharing a St. Patrick’s Card made with the gorgeous Nordic Hearts – turned into a shamrock. I love St. Patrick’s Day – it’s my cat’s birthday – ha! (His name is Lucky and he has gorgeous green eyes). Green is one of my favorite colors and this time of year, especially, it is so fresh and pretty. So make a wish on a Lucky clover!!
My finished card is an A2 white card base. Layered with white, green gingham and vellum – you know, my favorites! I started my card by die cutting three of the medium sized Nordic Hearts from olive, yellow, green cardstock. I made my stem by hand cutting the curve of another heart die cut. I generously splattered the pieces with gold paint. I die cut the Make A Wish die from gold cardstock. All stamps and dies are from The Greetery!
Here’s a side view of all the pieces. Aren’t you smitten with those hearts?! I definitely am!
I used the Calendar Basics stamp set to stamp March 17 onto a little banner from the Sentiment Suite Basics Die set. It fit perfectly there on that spot on the card. To assemble the card I layered green gingham paper, then vellum, then a white layer die cut with the Crimped Rectangles Dies. The white layer is popped up with foam tape. I put the hearts onto the white layer using foam tape and assembled them into the shape of a shamrock. I glued the Make A Wish over the top of the shamrock and then tucked the little banner underneath.
To finish off, I added a few little yellow heart embellishments. That’s it for my project for today. Fresh green for Spring! I hope you have a wonderful and creative day. And an awesome weekend! We are going to a vintage pop up today and I can’t wait!! It’s my pleasure to share with you, and I look forward to sharing with you again soon. In the meantime, happy crafting! XOXO
Helloooooo! Let’s Pawty! Hee hee! I have one more card to share with my new supplies from the newest Pretty Pink Posh release! This week is a big Instagram Hop to celebrate the release and I’m in that hop today! CLICK HERE to see the Instagram Hop! I wanted to share my card here on my blog too. Hope you are having an amazing week and hope your March is going good so far!
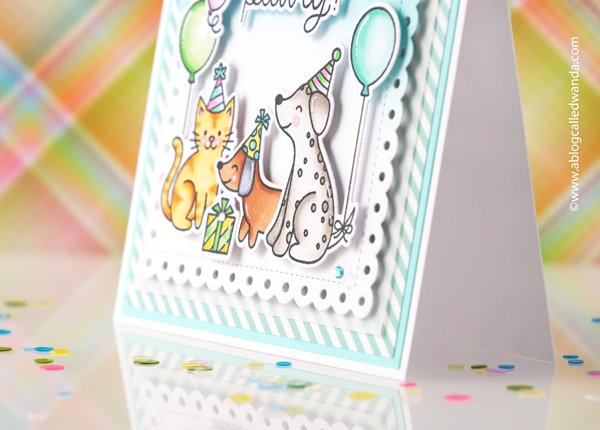
My card features the brand new and absolutely adorable Birthday Dogs and Cats stamps and dies! EEP! I also used the new Birthday Icons stamps to add some more details. My finished card is a white square, measuring 5″ x 5″. Sometimes I really love a square card, don’t you? I layered pretty blue cardstock, then some stripes, some vellum, and then an ink blended eyelet square panel.
Here’s a side view so you can see all the layers! Aren’t those critters the cutest things ever??!!
I used bright white cardstock and Salvaged Patina Distress Ink to blend the top of my eyelet square. I also splattered on some white paint – just because I love that look. The sentiment was stamped in black ink and die cut out with the matching die – so crisp!
I stamped and die cut the two doggos and the kitty and some balloons and a present, and then colored everything in with my Copic Markers. I added white gel pen accents to everything. I do like this clear and bright color palette or lime, pink and aqua.
I matched the stripes, the ink blending and the Copic coloring of the balloon which gives a really professional and cohesive look. My tip: Choose your papers first and then match your coloring and inks to the paper. In my opinion, that is an extra nice touch!
Hi friends! Happy Saturday! Happy 1st day of March! The year is “marching” on, isn’t it!? I love it when everything turns green and the flowers bloom! We’ve had some sunny days here and renewal is in the air. I love St. Patrick’s Day for lots of reasons…. Mostly because my beloved kitty cat was born on St. Patrick’s Day – and that’s why his name is Lucky! So shamrocks, and gold pots, and rainbows and leprechauns it is! Today I’m sharing two cross stitch projects that are for St. Patrick’s Day! I actually finished stitching them AND finished them too! Yayayayayay for me! Hee hee. I’ll share my two projects, and then the supplies will be listed out in the narrative and in the supply list! Let’s go!
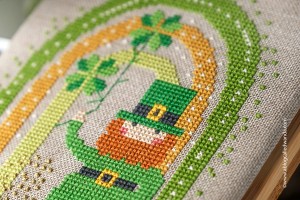
First up is this fun Leprechaun stitch – complete with a rainbow, some four leaf clovers, and his pot of gold! Isn’t he cute? This was a really fun stitch!
I bought the heart board and the ribbons at Hobby Lobby and I used my hot glue gun to make the bows and affix them to the board. I hot glued the charm to the center for a little bit of whimsy!
The pot of gold is dark gray thread, and then I used gold metallic thread for the coins! It’s so cute in person!!
Lots and lots of green threads! Just a little bit of back stitching for the stems of the four leaf clovers. The area of the stitching is approximately 5″x7″ so it isn’t a large stitch and it went pretty quickly! I really like this fabric – makes it look a bit vintage.
My second project for today is Lucky Charm! It features a huge four leaf clover, a horseshoe, and pretty text! I added the button to the center of the pattern to add a bit of texture. I used the free pattern, and the called for threads from DMC. I finished it on sticky board with batting to make it a little puffy. The ribbon will be used to hang it on the wall.
PATTERN: Free Lucky Charm Pattern from FQS
FABRIC: 14 count Aida Vintage Country Mocha
THREAD: DMC threads as called for
FINISHING BOARD, AND RIBBONS: My stash and Sticky Board
The little center areas of the horseshoe are gold metallic thread! There are so many pretty greens in this pattern. It looks so good on the 14 Aida – nice and crisp. The finished smaller area with the stitching is 7″ x 7″ and the larger green part is 9″ x 9″. I found the fabric at my local quilt shop and I used sticky board, tape and my hot glue gun to wrap and finish the piece. There is batting also – to make it puffy.
I used a green button from my stash to put into the center of the clover. I just felt like it needed a little something something…..
That’s it for my first projects for March! I don’t think I’ll get any more stitching done for St. Patrick’s Day – but I do definitely have some paper projects to share in the coming weeks! I hope you have a wonderful weekend! See you soon! XOXO
Hellooooooo friends! It’s a super fun and exciting day today! Pretty Pink Posh is celebrating their eleventh anniversary and birthday this month! WOOHOOO! I’m so happy for Paulina and her wonderful company for all these successful years in the crafting industry. How lucky are we that she keeps making us these amazing stamps and dies to play with?! Congratulations!! To celebrate their anniversary, of course there’s an awesome party-themed new release! Everything you could want for birthdays and other celebrations. There is a huge multi day blog hop to showcase all the new products – and also some prizes too. All the prize information is at the bottom of this post, along with the hop list for today. I’m so happy to be included in the festivities.
I have two projects to share with you today, featuring new products and getting you in the mood to party, or pawty! (you’ll see what I mean)! Everything is available now to shop to your heart’s content!
I started by die cutting and assembling the Birthday Treat Box and lining the back with matching gingham paper. I splattered on some white paint. I die cut a white Eyelet Circle and put that on the front of the treat box.
I die cut out the adorable pup using shades of brown cardstock. I used a white gel pen to add small highlights to the pieces. I gave the pup a super cute party hat and a present to hold. I added a few gems for just a little bit of sparkle. I attached the dog to the front of the treat box using foam tape. I stamped the sentiment using the new Birthday Dogs and Cats stamp set and die cut it with the matching dies. Let’s Pawty!!
I put some candy into a cello bag and tied it with matching twine and put it into the treat box – it’s so festive and fun. Sure to make any party goer smile.
My second project is a perfectly pink and cream party pennant card! I am really into pink right now! I’m loving pink everything! LOL. This card features the brand new Party Flags Dies and the new Stars Stencil and some other favorites from PPP! My finished card is a cream A2 card base, layered with another piece of cream cardstock, stenciled with stars, then those festive flags!
I started by stenciling soft yellow stars onto a cream background. I wanted the whole look of this card to be soft. I splattered on some gold paint and set that aside to dry. I die cut out my party flags using pastel cardstocks, and die cut the cupcake out also.
The cupcake icon is part of the flags set! Adorbs. I used the new Scallop Flag Tags to die cut a little gold scalloped edge for my flags – I love how that came out! I used Woodgrain cardstock for the flag sticks….
I have always loved this sentiment…. Let’s PARTY! It’s the prettiest font, and looks so good in gold!
Okay, friends, that’s it for my projects for today! Thanks for joining with me in the fun blog hop to celebrate PPP!! Be sure to note the instructions on the website for a discount on your purchase and a free gift!!
PRIZE INFO! There are FOUR $30 gift certificates up for grabs (one winner each day)! Winners will be picked randomly from your comments along the blog hop. Comments must be left by 11:59 PM PST on 3/4. Winners will be announced on the PPP blog. GOOD LUCK!!
Hey friends! How are you? Hope you had a lovely Valentine’s Day weekend! It was fun that VD was on a Friday and it just so happened to coincide with my husband’s day off! We went out for a really nice romantic dinner – and we never do that! It was so delightful! And we went out for a nice coffee afterwards. It’s fun to still be made to feel special after 32 Valentine’s Days together! Romance is still alive! It’s been super cold and rainy here but our front yard is coming alive with tons of daffodils already. Spring will come soon I think! Hope you are doing great!
Today I’m up on The Greetery Blog with a pretty in pink birthday card! I’m sharing my card here today as well. A clean and simple design with pretty spring colors…. Just a few supplies and some cool gold ink… My finished card is a horizontal A2 card base in light pink cardstock.
My card features the All Aglow stencils and dies…. The sentiment is from the Make a Wish stamp set. I used the stencils and lots of ink pads to create the multi colored candles. I die cut out the stenciled panel and then trimmed the candles to fit my horizontal card… I used foam tape strips to mount the candles to the card. I used gold ink to stamp the starbursts behind the candles. The sentiment was stamped in crisp black ink along the bottom.
A little bit of Stickles on the candle wicks! Pretty and shiny!
That’s it for today! It’s time to start Easter and Spring crafting now! I can’t wait! XOXO
Hi friends! Happy Friday! I hope you had an awesome week! Do you have fun plans for the weekend? Thank you for all the comments on my Greetery release post! You are all so kind and I appreciate you leaving a note of encouragement. Hope you got some Greetery goodies and that you’re looking forward to creating! Are you working on Valentines yet?? I am definitely in Valentine mode!!
Today’s card is another L O V E card! It can be a Valentine, or an anniversary card, or a just because card! Pretty, cheerful, fresh colors, gingham (of course) and wonderful new supplies from Concord & 9th! Yeah!
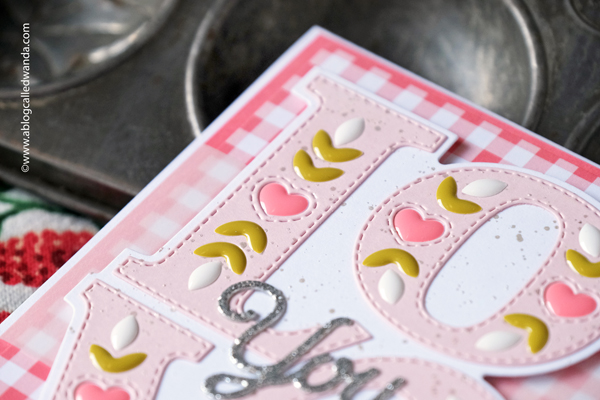
My finished card is a white A2 card base. Layered with watermelon cardstock, gingham, a bit of vellum, and then those big bold letters! My card features the brand new Love Letters Dies and matching enamel shapes, along with the Sweet Sayings Die set…. The concept for these dies/enamel shapes is so cool! You die cut out the letters from one color, and then the background from another color (so many options) and then the matching enamel shapes fit into the dies perfectly! Love this!
Here’s a close up of the letters and enamel shapes! SOOOOOOOO fabulous. Those crazy peeps at Concord and 9th are always thinking up something cool! I die cut the LOVE from Pink Lemonade cardstock and layered the letters onto fresh white. I splattered on silvery shimmery ink splatters, then added on all the hearts and leaves.
I used the Sweet Sayings dies and silver glitter cardstock to die cut out the ‘you’ to add in the center. You know, glitter paper is always a good idea!
That’s it for today! Be well, and keep on creating! I will see you soon my dears! XOXO
It was my pleasure to introduce the brand new Bibliophile Collection to you this week! And, I hope you love it as much as I do!! Happy Crafting!! If you scroll back to my last blog post you can see all my projects from the new release, and the accompanying supply lists. If you have any questions – reach out!! Thanks for all the love and kind comments! Happy Creating! Can’t wait to see what YOU make!
Hi crafty friends! Hope you’re enjoying a beautiful Winter week! We are doing good here – having a bit of a cold snap, like everyone else – and staying warm and cozy in the craft room. It’s been a busy month already and another year is in full swing. Our daffodils starting getting their fresh green stalks so that’s the first sign that a change will soon be here. Looking forward to longer days, and love in the air for Valentine’s Day too!
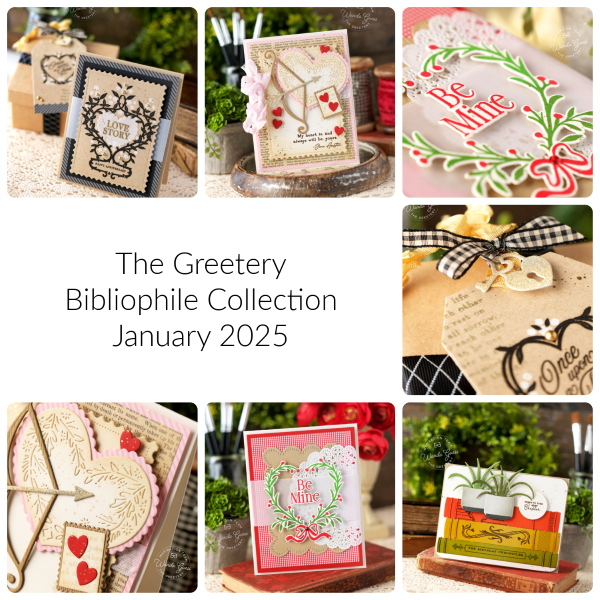
Today is VERY exciting because it’s the reveal/showcase day for the first Greetery release of the year! WOOHOO! The new release is called the Bibliophile Collection! It has stamps, dies, and stencils for the book lover, the romantic, and the vintage lover too! Think hearts, and more book items, and even a cupid’s arrow! I adore this new collection and I know you will too! The design team will be sharing all of our projects today, and showing you all the new products. Just one day of features – then the new release will go live TOMORROW at 10am EST! (So you don’t have to wait too long -yay for that!)
I have four projects to share today – can’t wait to show you! All the prize information, details, and design team links are at the bottom of my post. Lots of pictures for you today, friends!
My first project for today is a pretty, vintage inspired Valentine card made with lots of things from the new release! This card features the brand new Nordic Hearts Dies, the brand new Cupids Arrow Dies and the brand new Love Stories Stamp Set. You’ll notice I also used a lot of other Greetery favorites! I love a Valentine color palette of red, pink and cream – with a touch of gold too! My finished card is an A2 cream card base, layered with pink stripes and text paper, and then a cream top layer. I die cut the beautiful new Nordic Heart die from cream and pink. I inked Distress Inks on all the cream parts and generously splattered gold paint too.
I made a pretty postage stamp using the text from the new Love Stories stamp set and some hearts…. The bow and arrow was made using woodgrain cardstock and gold glitter paper. The sentiment was stamped in dark brown ink…so pretty!
My next project is a matching tag and card combo! With all of these beautiful supplies, I thought it might be nice to make a more masculine project. And I’m going to save this one for my hubs for our anniversary! A dark and classy color palette of kraft, white, black and gold. Love it! These projects feature the brand new Bookish Frames – Romance, the brand new Lock and Key Dies, the brand new Love Stories stamps…and more!! The tag of course was made using the versatile Tag Team dies…. The tag and the card are a perfect match.
My finished card is an A2 kraft card base, layered with black stripes, black cardstock and then the kraft top layer. I made the card using the stamps and stencil combo – perfection!! I stamped the black heart vines and then stenciled the white floral parts with white pigment ink. I splashed gold paint on the top and added pretty gold pearls.
I added a vellum strip around the top layers for more visual interest. The heart with the sentiment ‘love story’ is heat embossed in gold onto a vellum heart.
The tag was die cut using kraft cardstock. I stamped the heart, flowers and sentiment in the center of the tag. I added some stamped text around the main sentiment – very vintage!
The new Lock and Key Dies make the perfect tiny accents for the top of my tag!
My next project is another Valentine Card – but this time it’s bright and vivid! Red and white! So classic. This card features the brand new Folk Heart stamps and dies… My finished card is an A2 white card base, layered with red and gingham and then kraft. A doily is always appropriate on a Valentine card – don’t you think?! I stamped the pretty heart shape and the bow and die cut them out with the matching dies. I added the perfect sentiment in red in the center. This card would be a good one to mass produce and it’s fairly flat for mailing also.
And, last, but certainly not least, a card for the book lovers! This card features the brand new Shelved Product Suite! You guys are going to love this!! I made a birthday card since I know so many book lovers! I used a warm and boho chic color palette, reminiscent of a bookshop. And I even added some plants. I adore the cute sentiments in this new suite. “Here’s to your next chapter” is so clever for a birthday card. My finished card is a cream horizontal A2 card base. I die cut out the books for my stack and then used the stamp set to add accents onto each book. I also gently inked the edges of the books. I made two little plants using previously released Greetery dies. I love this look!! I’m very excited to see what everyone else makes with this product suite – the possibilities are endless.
CLICK HERE FOR THE SUPPLY LIST FOR TODAY’S PROJECTS!
That’s it for today – and for the reveals of this awesome new release! I’m in the mood for love! And Books! Thanks for stopping by to share with me today! It’s my pleasure to introduce the new release. Enjoy and happy crafting! XOXO
Giveaway Information: The Greetery is giving away TWO $50 gift certificates, the comment deadline is Thursday, 1/23 at 6:00am EST (comments from team blogs entered into giveaway). Winners announced on The Greetery blog on Thursday, 1/23 at 9am EST (an hour before the new products go live) GOOD LUCK!!
Helloooooo! Or should I say BOOOOOOO! I have a little something just for BOO today!! This is another project I made with the brand new PPP Valentine Release for 2025! Paulina made the cutest stamp set – with Ghosties! Valentine Ghosties! Really a fun idea! And so clever. I love them just as much as the original Ghost Friends for Halloween!! My card for today is part of the big Instagram Hop for the new release. So if you’re on Instagram, be sure to find my post and leave a comment for a chance to win a prize!
My finished card is a clean and simple design with traditional colors of red and white for Valentine’s Day. I love the sentiment! It’s a white A2 card base, layered with gingham and red, and then a pretty white scalloped panel. I stamped and die cut the ghosties and colored them with Copic Markers and assembled the flying cuties onto the card with foam squares… The sentiments in this stamp set are perfect too! A few little red enamel hearts finish off the look.
What do you think of Valentine ghosties? I love it when the holidays are fun and silly – it’s good for us to be silly! So I am a YES to ghosties with love letters! Hee hee. I’m wishing you a very happy day today and I’ll see you soon! Remember to go over to Instagram to do the hop today. XOXO
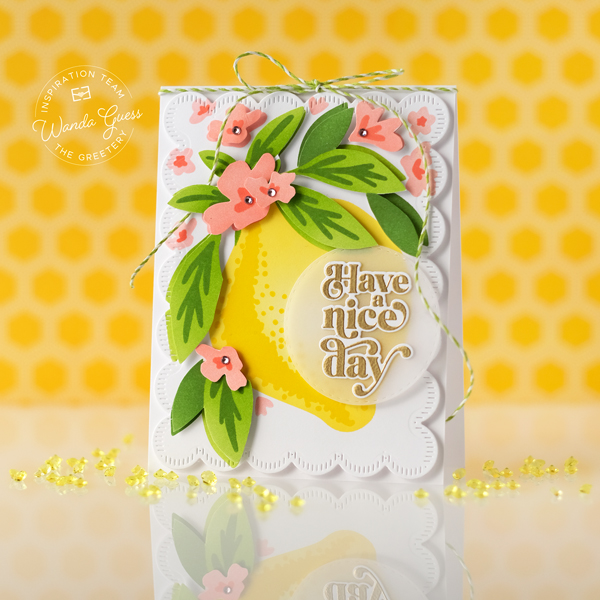
Hi friends! This week was my turn to have a project up on the Greetery Blog! Hope you’re doing great and having a great week! The first full week of the New Year!! In the new year, it’s time to turn to themes other than holidays, and to have fresh eyes on our projects. So I thought – what is the freshest thing? Lemons!! In that tone, I chose to share a card today featuring the lovely Large Lemon stencils and dies. The perfect colorful start to non-holiday crafting!!
My finished card is a white A2 card base. I layered a white layer die cut with the A2 Scallops Dies – so pretty! I stenciled two lemons and leaves, using the Large Lemon stencil/die set. One lemon is on the scallop panel, and the other set I cut out the leaves and flowers to create a dimensional look. I stenciled using shades of yellow, green and pink ink pads, and my blender brushes.
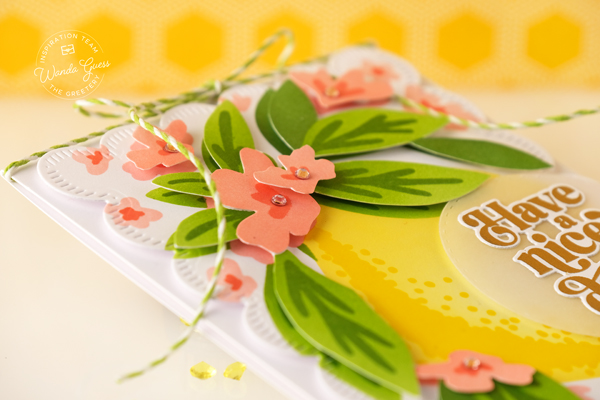
For the sentiment, I used the One Fine Day stamps and dies and heat embossed the sentiment with gold embossing powder. I die cut out the sentiment and attached it to a vellum circle. I attached the extra leaves and flowers onto the card using small foam circles to make them pop. As a finishing touch I added some light pink gems. I also tied pretty twine around the top of the card. I really love these colors….so bright and happy.
That’s it for my project for today! I hope you have a fantastic and creative day! Wishing you a very happy, healthy and creative new year! It’s my pleasure to share The Greetery with you, and I look forward to sharing with you again soon – and through 2025! Be on the lookout for a new release soon! In the meantime, happy crafting! XO Wanda


