Category: Other Crafts

  • Crafted by C9 Beautiful Christmas Crafting Kits!

    Well helloooooo there! Have I got a fun post for you today! I have been working on this post for WEEKS! And I finally get to share everything with you! I am so excited! I was lucky enough to receive a wonderful, amazing, cool PR box from my friends at Concord & 9th that contained their brand new Crafting Kits. Concord & 9th started a new subsidiary company called Crafted by C9 and wowza. It’s awesome! The concept is this – fully curated and contained crafting kits. You buy a kit, and that’s it! You need nothing else to create a project. The kits have everything – even down to the glue and the tape! Right now all the kits are Christmas themed, but if I know them, there will be more good things coming as the new year arrives. It was a joy to open everything up and see what they made for us! I think you’re going to love it. Everything is already available for shopping and shipping!

    For these kits, I imagine a few things…. Beginning crafters who are maybe a bit shy about buying a ton of supplies…. Busy busy crafters who just have a little time to make some holiday magic…. Groups of friends, family, kids getting together to make projects and enjoy time together…. Presents for your favorite crafter! I put together ALL of the kits and I can say that they were SO easy to make. The directions are in both video and print format – all you need to do is click on the enclosed QR code and it takes you straight to the instructions. The videos are beautiful and so well thought out. Literally anyone can have fun making a project!

    There are trees, and reindeer, and little holiday houses….and garlands. Lovely home decor with a handmade, homespun feeling. All the kits use signature Concord & 9th color palettes. Seriously. Awesome! Today I am going to share TONS of photos of my projects. I hope to inspire you to get some kits and share with your friends and loved ones!

    Crafted by C9 is here! They were kind enough to give my blog readers a discount code too! Let’s get started, shall we!?

    CLICK HERE TO SHOP CRAFTED BY C9 KITS!

    WANDA10 — DISCOUNT CODE

    So one day while I was at work, a HUGE box arrived at my house! I mean huge! It was a true pleasure to open every single individually wrapped box of goodies. Merry Craftsmas indeed! I feel so spoiled and I know that’s how you will feel when your kits arrive! Thank you Crafted by C9!

    a blog called wanda, christmas crafting, concord and 9th, concord and 9th christmas, crafted by c9 kits, crafted by c9 new release, crafting kits, diy christmas, garland, handmade christmas crafting, ideas for crafting together, paper houses for christmas, reindeer, trees, wanda guess
    a blog called wanda, christmas crafting, concord and 9th, concord and 9th christmas, crafted by c9 kits, crafted by c9 new release, crafting kits, diy christmas, garland, handmade christmas crafting, ideas for crafting together, paper houses for christmas, reindeer, trees, wanda guess

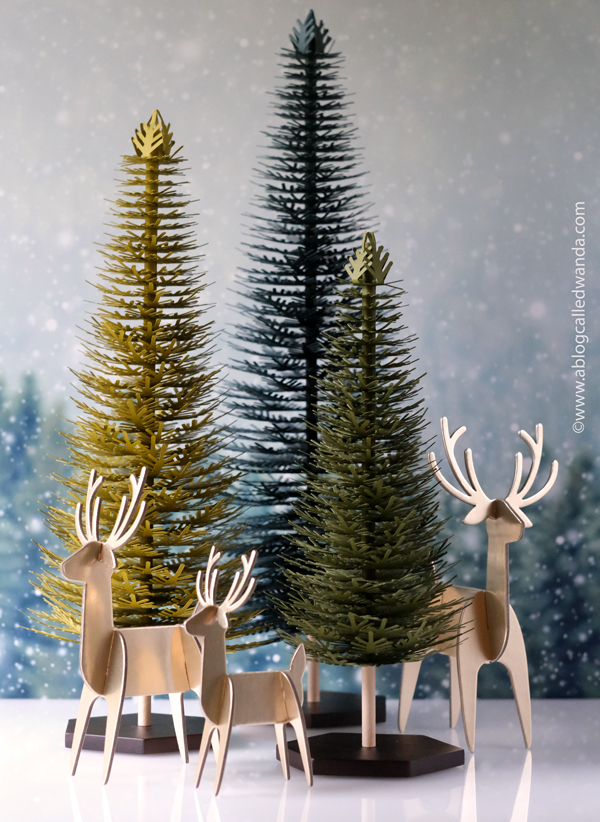
    The first thing I put together was this beautiful tree! There are three trees, each a different size and color. Put them together and you have a mini forest for your home decor! Here are the contents of the kit – even the glue! The stand is such nice quality and beautiful wood.

    a blog called wanda, christmas crafting, concord and 9th, concord and 9th christmas, crafted by c9 kits, crafted by c9 new release, crafting kits, diy christmas, garland, handmade christmas crafting, ideas for crafting together, paper houses for christmas, reindeer, trees, wanda guess

    Here are some step out photos of the process of building the tree. All three trees go together in exactly the same way. You build them from the bottom up by layering all the perfectly cut pieces. Could not be easier! My tree just grew and grew!

    a blog called wanda, christmas crafting, concord and 9th, concord and 9th christmas, crafted by c9 kits, crafted by c9 new release, crafting kits, diy christmas, garland, handmade christmas crafting, ideas for crafting together, paper houses for christmas, reindeer, trees, wanda guess

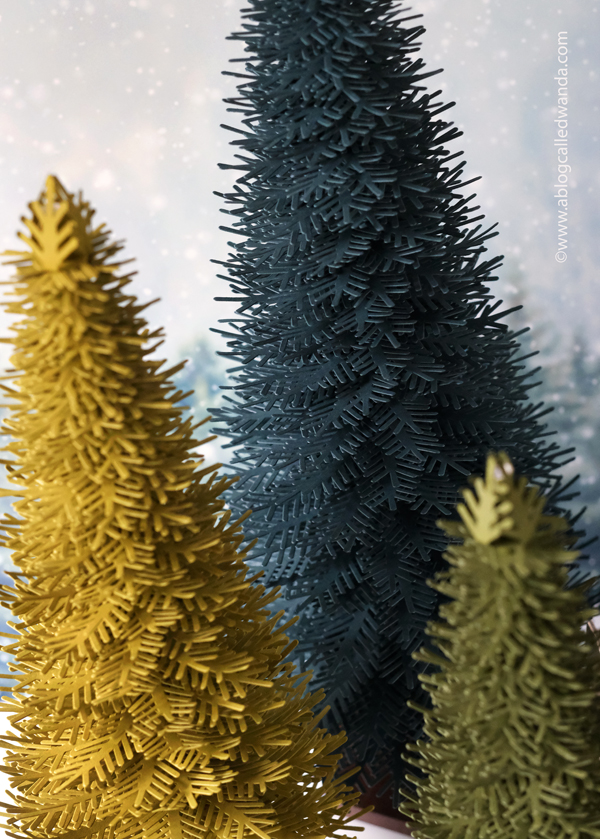
    Here are all three of the trees together, so you can see the sizes and the colors. They are VERY pretty and sturdy!

    a blog called wanda, christmas crafting, concord and 9th, concord and 9th christmas, crafted by c9 kits, crafted by c9 new release, crafting kits, diy christmas, garland, handmade christmas crafting, ideas for crafting together, paper houses for christmas, reindeer, trees, wanda guess

    CLICK HERE TO SHOP CRAFTED BY C9 KITS!

    a blog called wanda, christmas crafting, concord and 9th, concord and 9th christmas, crafted by c9 kits, crafted by c9 new release, crafting kits, diy christmas, garland, handmade christmas crafting, ideas for crafting together, paper houses for christmas, reindeer, trees, wanda guess

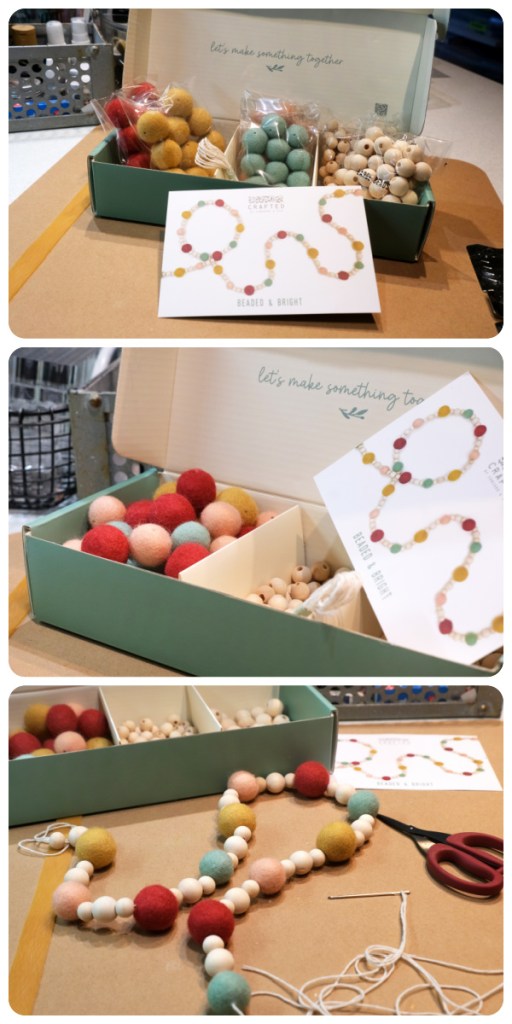
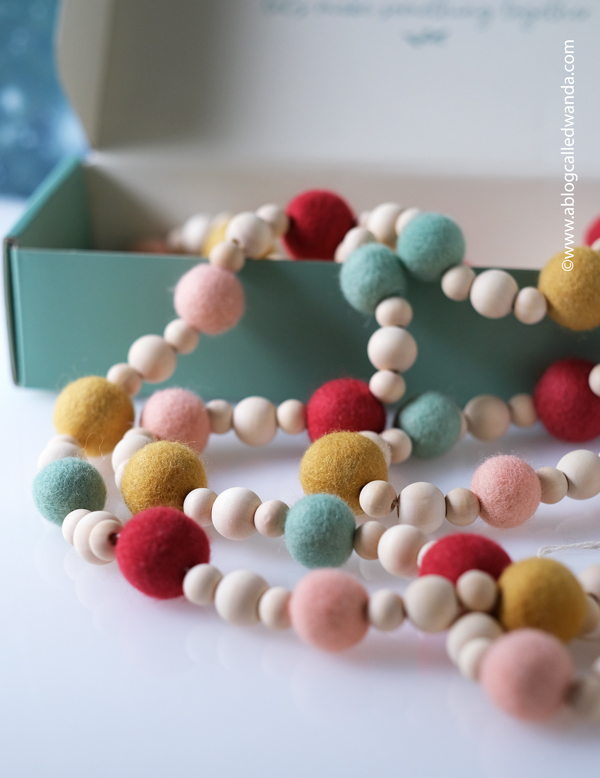
    Next up I put together this wonderful garland! I do so love a felt ball! LOL. This is maybe my favorite one? (Or maybe the houses – hard to say)! Again, see how perfectly packaged it is?? Easy directions for a piece of home decor that will last forever. The needle and thread are in the box – nothing is forgotten…

    a blog called wanda, christmas crafting, concord and 9th, concord and 9th christmas, crafted by c9 kits, crafted by c9 new release, crafting kits, diy christmas, garland, handmade christmas crafting, ideas for crafting together, paper houses for christmas, reindeer, trees, wanda guess

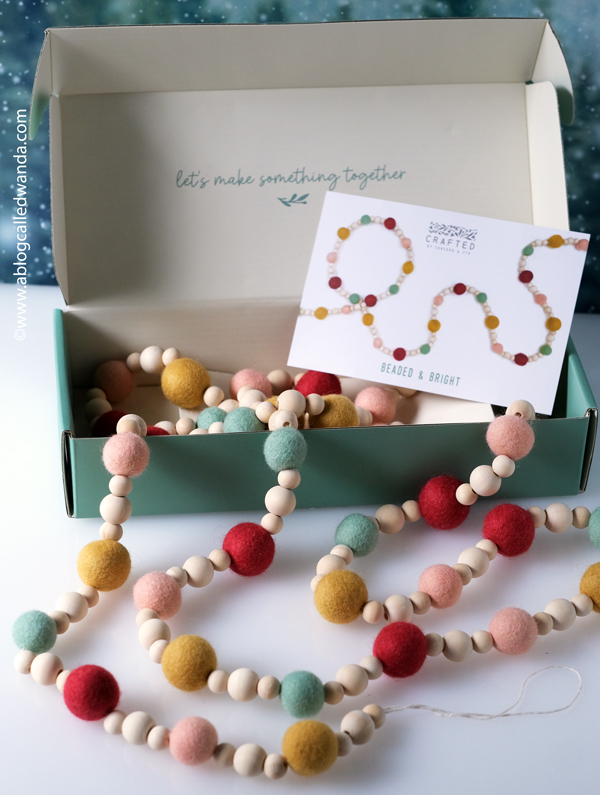
    Here are some photos of my finished garland. I am kinda obsessed with this color palette, aren’t you? I think this could also be very pretty in a baby’s room or for a birthday. This one does not have to be only for Christmas!

    a blog called wanda, christmas crafting, concord and 9th, concord and 9th christmas, crafted by c9 kits, crafted by c9 new release, crafting kits, diy christmas, garland, handmade christmas crafting, ideas for crafting together, paper houses for christmas, reindeer, trees, wanda guess

    CLICK HERE TO SHOP CRAFTED BY C9 KITS!

    a blog called wanda, christmas crafting, concord and 9th, concord and 9th christmas, crafted by c9 kits, crafted by c9 new release, crafting kits, diy christmas, garland, handmade christmas crafting, ideas for crafting together, paper houses for christmas, reindeer, trees, wanda guess

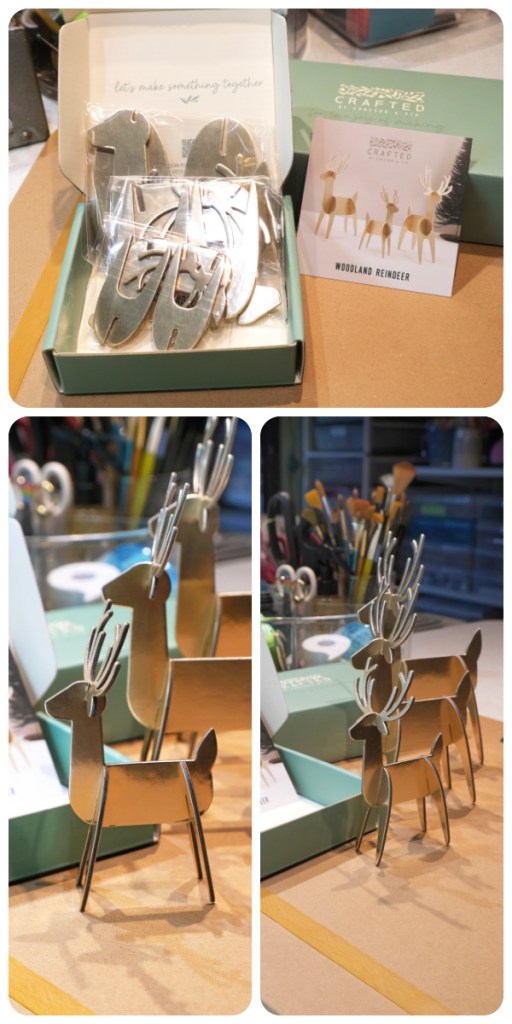
    Next up, I put together this festive metallic reindeer! This kit is probably the simplest/easiest kit to put together. You assemble the reindeer by attaching the legs. That’s it! The kit comes with three festive reindeer in the prettiest shade of gold/platinum. They are sturdy and thick cardstock too. Lovely!

    a blog called wanda, christmas crafting, concord and 9th, concord and 9th christmas, crafted by c9 kits, crafted by c9 new release, crafting kits, diy christmas, garland, handmade christmas crafting, ideas for crafting together, paper houses for christmas, reindeer, trees, wanda guess

    CLICK HERE TO SHOP CRAFTED BY C9 KITS!

    a blog called wanda, christmas crafting, concord and 9th, concord and 9th christmas, crafted by c9 kits, crafted by c9 new release, crafting kits, diy christmas, garland, handmade christmas crafting, ideas for crafting together, paper houses for christmas, reindeer, trees, wanda guess

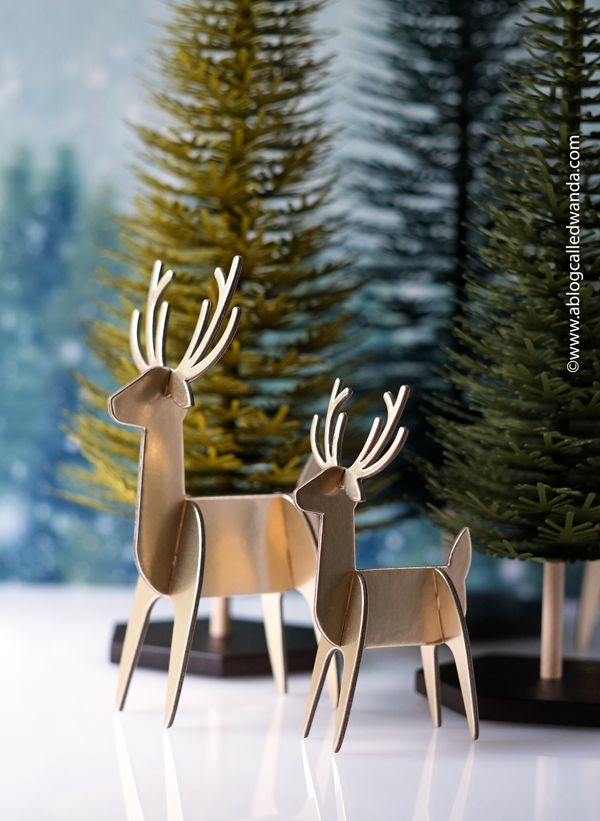
    The trees and the reindeer are a perfect match! Voila – you’ve created a scene! Beautiful for a holiday table – just add some candles! I love this entire look!

    a blog called wanda, christmas crafting, concord and 9th, concord and 9th christmas, crafted by c9 kits, crafted by c9 new release, crafting kits, diy christmas, garland, handmade christmas crafting, ideas for crafting together, paper houses for christmas, reindeer, trees, wanda guess

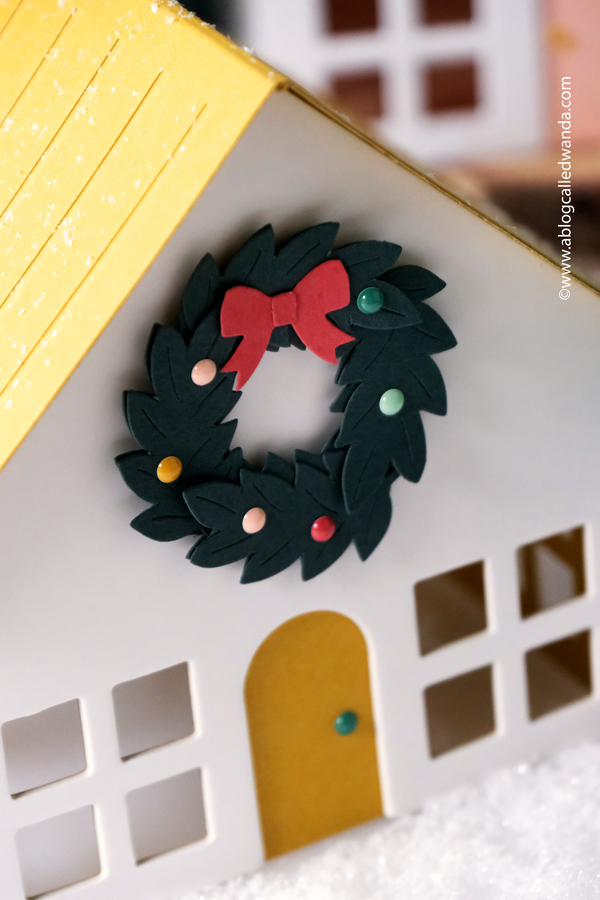
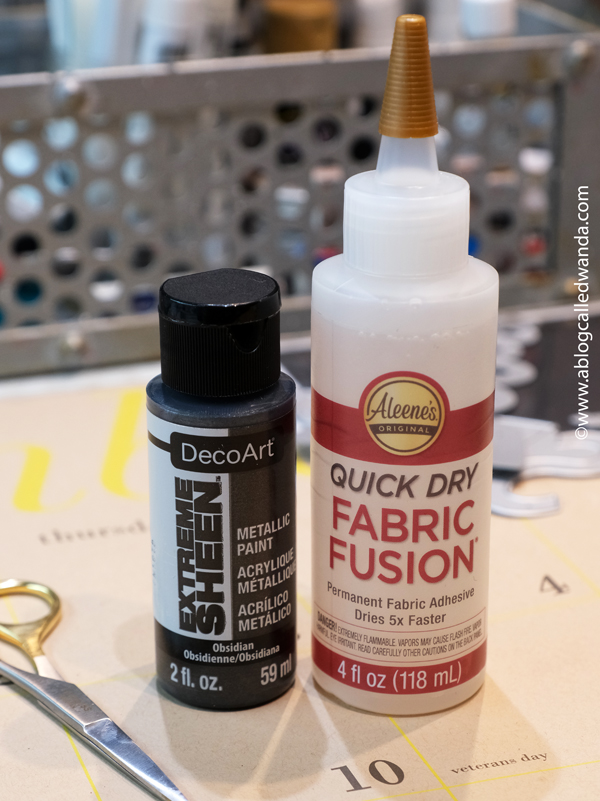
    And….the finale! The amazing little holiday houses! This kit comes with FIVE houses! (It was late at night and I apologize I didn’t take a photo of the kit before I made them!)… The houses are white on the outside and each one is a different color on the inside. Each house is a different size and shape, and each one has a different embellishment. All the embellishments, the glue, the tape and even the enamel dots are in the box. READY to go! Here are four of the five houses and the large tree! EEP. So pretty together! I’ll tell you in a minute why only four of the houses are in the photo. Aren’t they just the sweetest thing ever!? I love this!! The quality is outstanding. These are THICK and sturdy.

    a blog called wanda, christmas crafting, concord and 9th, concord and 9th christmas, crafted by c9 kits, crafted by c9 new release, crafting kits, diy christmas, garland, handmade christmas crafting, ideas for crafting together, paper houses for christmas, reindeer, trees, wanda guess

    CLICK HERE TO SHOP CRAFTED BY C9 KITS!

    a blog called wanda, christmas crafting, concord and 9th, concord and 9th christmas, crafted by c9 kits, crafted by c9 new release, crafting kits, diy christmas, garland, handmade christmas crafting, ideas for crafting together, paper houses for christmas, reindeer, trees, wanda guess

    Here’s a close up of one of the embellishments – everything comes already cut out for you! Look at those tiny bows!

    a blog called wanda, christmas crafting, concord and 9th, concord and 9th christmas, crafted by c9 kits, crafted by c9 new release, crafting kits, diy christmas, garland, handmade christmas crafting, ideas for crafting together, paper houses for christmas, reindeer, trees, wanda guess

    I sprinkled on some fake snow to make it look nice and wintery!

    a blog called wanda, christmas crafting, concord and 9th, concord and 9th christmas, crafted by c9 kits, crafted by c9 new release, crafting kits, diy christmas, garland, handmade christmas crafting, ideas for crafting together, paper houses for christmas, reindeer, trees, wanda guess

    And this is house number five! I thought it might be fun to make it inside out! So instead of a white house, it’s a pretty red house! What do you think? I think it’s kinda cute! I should have put the door on the inside – but I still love it! And that tiny light garland? Get outta here!!

    a blog called wanda, christmas crafting, concord and 9th, concord and 9th christmas, crafted by c9 kits, crafted by c9 new release, crafting kits, diy christmas, garland, handmade christmas crafting, ideas for crafting together, paper houses for christmas, reindeer, trees, wanda guess

    These next few photos are just close ups of all the different elements!

    a blog called wanda, christmas crafting, concord and 9th, concord and 9th christmas, crafted by c9 kits, crafted by c9 new release, crafting kits, diy christmas, garland, handmade christmas crafting, ideas for crafting together, paper houses for christmas, reindeer, trees, wanda guess

    CLICK HERE TO SHOP CRAFTED BY C9 KITS!

    a blog called wanda, christmas crafting, concord and 9th, concord and 9th christmas, crafted by c9 kits, crafted by c9 new release, crafting kits, diy christmas, garland, handmade christmas crafting, ideas for crafting together, paper houses for christmas, reindeer, trees, wanda guess
    a blog called wanda, christmas crafting, concord and 9th, concord and 9th christmas, crafted by c9 kits, crafted by c9 new release, crafting kits, diy christmas, garland, handmade christmas crafting, ideas for crafting together, paper houses for christmas, reindeer, trees, wanda guess

    I thought it might be pretty to put some tealights inside! Love this look! Warm and cozy!

    a blog called wanda, christmas crafting, concord and 9th, concord and 9th christmas, crafted by c9 kits, crafted by c9 new release, crafting kits, diy christmas, garland, handmade christmas crafting, ideas for crafting together, paper houses for christmas, reindeer, trees, wanda guess
    a blog called wanda, christmas crafting, concord and 9th, concord and 9th christmas, crafted by c9 kits, crafted by c9 new release, crafting kits, diy christmas, garland, handmade christmas crafting, ideas for crafting together, paper houses for christmas, reindeer, trees, wanda guess

    Truly, it is my pleasure to introduce the Crafted by C9 crafting kits to you! What a treat! I hope you are inspired to make some things and have some quiet time in the midst of holiday madness! I am very blessed by the crew at Concord & 9th. Some of the best people in crafting. I’m grateful and honored to share their new endeavor with you today. Let me know in the comments what is your favorite kit!!

    CLICK HERE for the comment box – I always love hearing from you!

    DISCOUNT CODE – 10% OFF – WANDA10

    CLICK HERE TO SHOP CRAFTED BY C9 KITS!

  • Fun Halloween Felt Pennants and a Birthday Witch!

    Hello friends! Happy Halloween Week! I love this week! AND, it’s also my birthday week! So I especially love this week! LOL. Saturday night we went to a fun and festive Halloween Festival and I dressed up (photos at the end of my post),  and we had the best time. Sunday we carved pumpkins all day. The house is all decorated and the front yard is REALLY decorated! (My husband goes crazy with the decorations and it’s the talk of the neighborhood!)  We are Halloween ready. We have a lot of fun – setting up a table in our driveway and playing spooky music, the fog machine going…passing out candy. And especially chit chatting with the neighbors and seeing the cute costumes.

    On Sunday I am turning the big SIXTY! Gosh, it’s been bothering me for months. That seems like so many years. I’m not ready to be this age. In my brain I’m still about 25! No other birthday has really bothered me, but this one is. I can’t stop thinking about it and obsessing about it. (Nothing I can really do though, right?) My husband has been spoiling me already and I feel loved, and blessed by so many people. I do know that I am lucky to have had so many years. In the comments, leave me your one best piece of advice for graceful aging! Wish me luck!

    I have a reallllllllly fun project to share today. Maybe one of my favorite things I’ve ever made!! It came together exactly how I pictured in my head and I love how the color palette turned out. I made some Halloween Felt Pennants/Banners for decorations for our home! They were easy and fun to make – a cheerful project with minimum supplies…a quiet afternoon in the craft room…. The dies are from Ellen Hutson! Did you know that you can still buy EH stamps and dies on Amazon?? Well, you can! CLICK HERE!

    I used the dies from Ellen Hutson (sadly I think the Halloween ones are sold out right now, but the pennant with different sayings is available) and my favorite felt (the only felt I use) in Halloween colors. The other supplies are either from Amazon or Hobby Lobby and I’ll talk more about that below. Let’s take a look at my finished pennants! EEK! Lots of photos ahead, because I was having too much fun actually. Aren’t they the cutest thing??

    ellen hutson, pennants, halloween pennants, felt pennants, cute halloween, party decor, taylored expressions felt, felt crafting, wanda guess, a blog called wanda


    I made two pennants but I could have made tons more – I just ran out of time!! The dies + that felt = delicious! The felt cuts like butter with those dies. Couldn’t be nicer. I used orange and black of course, but then popped in some pink and peach. This is my new favorite Halloween combo.

    52


    51


    The banners were kind of “floppy” with just the felt so I die cut a matching piece of cardstock and glued it to the back to make them look nice and finished and to stand out straight. 

    ellen hutson, pennants, halloween pennants, felt pennants, cute halloween, party decor, taylored expressions felt, felt crafting, wanda guess, a blog called wanda


    Like literally who knew that I would love pink and orange together??? I used ribbons from my stash and mirrored stars as a nice small accent. I tried not to go overboard as you know I like to do….


    ellen hutson, pennants, halloween pennants, felt pennants, cute halloween, party decor, taylored expressions felt, felt crafting, wanda guess, a blog called wanda


    CLICK HERE FOR THE SUPPLY LIST FOR TODAY’S PROJECT!


    Here are my pretty felt colors – they are also listed in my supply links! MMMMMMM. Yummy. This felt is 100% wool and it crafts like a dream. And it comes in many many beautiful colors!!

    55


    I used this fabric glue to glue all my pieces together – gave me a nice hold without lumps and bumps and it did dry quickly! I bought the dowels and the little wood balls at Hobby Lobby and used this metallic paint to paint the wood balls that are on top of the dowels. 


    57

    I used my hot glue gun to attach the dowels to the back of the pennants and to attach the wood balls on the top. I also used hot glue for the stars…

    55


    Some pretty ribbons from my stash….

    55


    CLICK HERE FOR THE SUPPLY LIST FOR TODAY’S PROJECT!


    ellen hutson, pennants, halloween pennants, felt pennants, cute halloween, party decor, taylored expressions felt, felt crafting, wanda guess, a blog called wanda


    ellen hutson, pennants, halloween pennants, felt pennants, cute halloween, party decor, taylored expressions felt, felt crafting, wanda guess, a blog called wanda


    CLICK HERE FOR THE SUPPLY LIST FOR TODAY’S PROJECT!

    ellen hutson, pennants, halloween pennants, felt pennants, cute halloween, party decor, taylored expressions felt, felt crafting, wanda guess, a blog called wanda


    ellen hutson, pennants, halloween pennants, felt pennants, cute halloween, party decor, taylored expressions felt, felt crafting, wanda guess, a blog called wanda


    And now for Wanda the Witch – the birthday witch! Here is my costume for the Festival! I had fun doing bright green sparkly eye shadow (hard to see because of my glasses) and a nice spider on my neck! (a temporary tattoo)….and that hat! Mark bought that for me this year!! My spider earrings and my face stickers are from the Spirit Halloween store.


    64


    And here I am at one of the antique stores on the street with the Halloween Festival. You can see I’m getting attacked by a giant spider! AAAAAAHHHHHHH!

    64

    That’s it for today! Hope you have a really fun and cheerful Halloween. Don’t forget to be a kid and be silly once in a while! Eat candy and have some laughter. It’s good for the soul. Stay crafty and I’ll see you soon – after I’m SIXTY!!! Now that is the real spook! Hahahaha. XOXOXO Wanda


    CLICK HERE FOR THE SUPPLY LIST FOR TODAY’S PROJECT!

    60

  • 4th of July Patriotic Pinwheel Wreath Project!

    Happy Monday! Happy July! It's going to be a good week! There's a fun holiday involved! Yeah! I am very into Americana themed items – crafts, home decor, clothes, cards, stitching…. Well, you get the idea! Our home is very decorated for the 4th of July with lots of flags and good things. I am wishing you a good week and a fun holiday with family and friends! I recently made it a goal to read more….Summer is a great time for lazy afternoons reading!! I have been an avid reader since I was very small and lately life just got busy and I stopped reading and I miss it!! Anyone else have a giant stack of books waiting on the nightstand?? I recently updated my Amazon Summer 2024 reading list if you want to check it out!! 

    My project for today is a home decor piece made from paper!! And card making supplies! 

    My project is a Paper Pinwheel Wreath! Made from patriotic papers and 4th of July theme. It's made from lots and lots of pinwheels hot glued onto a wreath form. It was a very fun project and it came together quickly and easily. This would be a really good group project because it's the same thing made over and over again and it's easy to finish in an afternoon. Here is my wreath and where it's hanging in our home – on the cabinets between the kitchen and our nook. All my supplies are at the bottom of my post or CLICK HERE!

    pretty pink posh, pretty pink posh pinwheels, 3d pinwheels, wreath, paper wreath, pinwheel wreath, 4th of july, americana, home decor, usa decorations, wanda guess, a blog called wanda


    I photo'd it on this white door so you could see the size and scale against a plain background…

    pretty pink posh, pretty pink posh pinwheels, 3d pinwheels, wreath, paper wreath, pinwheel wreath, 4th of july, americana, home decor, usa decorations, wanda guess, a blog called wanda


    pretty pink posh, pretty pink posh pinwheels, 3d pinwheels, wreath, paper wreath, pinwheel wreath, 4th of july, americana, home decor, usa decorations, wanda guess, a blog called wanda


    In my stash, I had these buttons from Michaels so I added a few of them!

    pretty pink posh, pretty pink posh pinwheels, 3d pinwheels, wreath, paper wreath, pinwheel wreath, 4th of july, americana, home decor, usa decorations, wanda guess, a blog called wanda


    I used the AMAZING 3D Pinwheel Dies to make this project. I made about 30 large and small pinwheels but it only ended up taking about 14 pinwheels to finish my wreath. I actually thought it would take a lot more!! I die cut all my pinwheels first – sooooo easy. 

    pretty pink posh, pretty pink posh pinwheels, 3d pinwheels, wreath, paper wreath, pinwheel wreath, 4th of july, americana, home decor, usa decorations, wanda guess, a blog called wanda


    Here they are before assembly – small and large ones!

    pretty pink posh, pretty pink posh pinwheels, 3d pinwheels, wreath, paper wreath, pinwheel wreath, 4th of july, americana, home decor, usa decorations, wanda guess, a blog called wanda


    I folded them over and used colorful brads to finish/close them up! This could not be more fun or simple!

    pretty pink posh, pretty pink posh pinwheels, 3d pinwheels, wreath, paper wreath, pinwheel wreath, 4th of july, americana, home decor, usa decorations, wanda guess, a blog called wanda


    On my desk…. I used a wreath form (in the supplies) and acrylic paint. I painted the wreath form blue (I forgot to take a photo of that part!) and then I used hot glue to attach all the pinwheels to the wreath form. (I only burned myself once! Ha) I glued them right under the part with the brad. 

    pretty pink posh, pretty pink posh pinwheels, 3d pinwheels, wreath, paper wreath, pinwheel wreath, 4th of july, americana, home decor, usa decorations, wanda guess, a blog called wanda


    You, again, could make this project with any theme! I am definitely going to make a Halloween one. I have so many cute Halloween papers! As I continue to try to use my stash!!

    pretty pink posh, pretty pink posh pinwheels, 3d pinwheels, wreath, paper wreath, pinwheel wreath, 4th of july, americana, home decor, usa decorations, wanda guess, a blog called wanda


    After the entire wreath was assembled I generously splattered on rich gold paint for a little bit of shimmer….

    pretty pink posh, pretty pink posh pinwheels, 3d pinwheels, wreath, paper wreath, pinwheel wreath, 4th of july, americana, home decor, usa decorations, wanda guess, a blog called wanda


    pretty pink posh, pretty pink posh pinwheels, 3d pinwheels, wreath, paper wreath, pinwheel wreath, 4th of july, americana, home decor, usa decorations, wanda guess, a blog called wanda


    pretty pink posh, pretty pink posh pinwheels, 3d pinwheels, wreath, paper wreath, pinwheel wreath, 4th of july, americana, home decor, usa decorations, wanda guess, a blog called wanda


    My trusty sidekick Lucky was right there on my desk when I finished my project…. So I snapped a quick photo of him inside my wreath! How fun is he??!! 

    pretty pink posh, pretty pink posh pinwheels, 3d pinwheels, wreath, paper wreath, pinwheel wreath, 4th of july, americana, home decor, usa decorations, wanda guess, a blog called wanda

    That's it for today! Happy July! Happy 4th! I'll be back on Thursday with a cool card with a VERY Americana theme! I can't wait to show you! I hope you'll try to make a paper wreath!

    CLICK HERE to see another project I made last year with the same patriotic pinwheels idea!

  • Fabric Garlands! A quick and easy home decor project!

    Hellooooooo sweet friends! I have a fun craft project today – and it doesn't have any paper involved! Yes, you heard me right! It's a fabric project! So super fun, quick, easy, and awesome. I have had the supplies to make this (these) for a couple of years. Oh my. Well, I went to a craft retreat a couple months back and I finally made my fabric strip garlands! You know how you have things in your craft room for a long time and keep thinking "I need to make that"? Well, I did! Hee hee. And now I want to make more! Let's get started before I keep yammering on more. 

    I initially made this red, white and blue fabric strip garland to hang in our kitchen for the 4th of July! This garland is also the perfect size to go across the fireplace mantle or our entertainment center!  I bought two packs of fat quarters (blue pack and red pack) at Hobby Lobby, and I also got the rope at Hobby Lobby. That's all you need to get this result….

    fabric garland, fabric strip garland, moda jelly roll, fabric ideas, home decor garland, make your own fabric garland, diy, gingham, 4th of july, halloween, shabby chic, wanda guess, a blog called wanda


    I hung the finished garland over our kitchen curtains! It looks so cute! It adds the right amount of homey feeling!


    fabric garland, fabric strip garland, moda jelly roll, fabric ideas, home decor garland, make your own fabric garland, diy, gingham, 4th of july, halloween, shabby chic, wanda guess, a blog called wanda


    Supplies! That's it! I roughly cut the fat quarters into two inch strips. At first I used my ruler, but then I ended up just eye balling the strips and it went very fast cutting them all up. Again – EASY!! Each strip is about 20 inches long to start.

    fabric garland, fabric strip garland, moda jelly roll, fabric ideas, home decor garland, make your own fabric garland, diy, gingham, 4th of july, halloween, shabby chic, wanda guess, a blog called wanda


    I laid the rope out on my desk (I cut it about 8 feet long to have lots of room and then trimmed it later). I just started knotting the fabric strips over the rope making sure to keep the colors and patterns varied. I love this combination of gingham, strips, chambray…. It's very pretty!!

    fabric garland, fabric strip garland, moda jelly roll, fabric ideas, home decor garland, make your own fabric garland, diy, gingham, 4th of july, halloween, shabby chic, wanda guess, a blog called wanda


    You just fluff it up and straighten it out when you hang it! I think start to finish this took me about two hours to make!!

    fabric garland, fabric strip garland, moda jelly roll, fabric ideas, home decor garland, make your own fabric garland, diy, gingham, 4th of july, halloween, shabby chic, wanda guess, a blog called wanda


    Here are two other garlands I made using the same fun technique. For these next two I used Moda Fabric Jelly Rolls for the fabric. And I think this will be my preferred method for any other ones I made. Moda makes the most gorgeous fabrics! And, the Jelly Rolls come with the fabric already in strips (with a pretty zig zag edge too)! For the Jelly Rolls, I unrolled all of the strips and then cut them in the middle, so each big strip became two small strips. Really the perfect amount for a garland. 

    This one is all season, shabby chic! In all my favorite colors!! I added in some crochet trim and some velvet ribbon too. This one I think will hang in my craft room! I LOVE it. 

    fabric garland, fabric strip garland, moda jelly roll, fabric ideas, home decor garland, make your own fabric garland, diy, gingham, 4th of july, halloween, shabby chic, wanda guess, a blog called wanda


    Here's a close up of the knots. Wrap the strip around the rope, and pull the ends through (kind of like you would tie a string on the top of a tag). 

    fabric garland, fabric strip garland, moda jelly roll, fabric ideas, home decor garland, make your own fabric garland, diy, gingham, 4th of july, halloween, shabby chic, wanda guess, a blog called wanda


    fabric garland, fabric strip garland, moda jelly roll, fabric ideas, home decor garland, make your own fabric garland, diy, gingham, 4th of july, halloween, shabby chic, wanda guess, a blog called wanda


    And the last one I made is retro Halloween! Kitty cats and candy corns and polka dots. LOVE! This one was made with another Moda Jelly Roll fabric pack. The colors are lovely!

    fabric garland, fabric strip garland, moda jelly roll, fabric ideas, home decor garland, make your own fabric garland, diy, gingham, 4th of july, halloween, shabby chic, wanda guess, a blog called wanda


    CLICK HERE TO SHOP THE PRETTY FABRIC PACKS!!

    fabric garland, fabric strip garland, moda jelly roll, fabric ideas, home decor garland, make your own fabric garland, diy, gingham, 4th of july, halloween, shabby chic, wanda guess, a blog called wanda

    Okee dokee! That's it for today! I hope I've inspired you to try a new crafting project! This was literally so easy. I think it would be really cute to make one for a baby's room or for a special color themed party. Also, I already have the fabric for a holiday one. Can't stop, won't stop. LOLZ. Have a blessed and beautiful day my friends. See you soon! XOXO


  • Introducing Poshta Design Autumn 2022 Felt Projects New Release – Day 3! Falling Leaves and Pie Please!

    Hello again my felt loving friends! It’s Day 3 of the new release for Poshta Design!! I was invited by Lizzie to help introduce the Poshta Design Autumn 2022 New Release! As you know, Poshta Design makes the most beautiful felt kits! The new release is full of felt projects, dies, felt, embellishments and more for everything Autumn and Halloween. I made a LOT of projects and I’ve been sharing them this week! Yay! Today is the last day of product and project reveals. The new release will be available for purchase on Friday 8-26 at Noon EST! Head on over to the Poshta Design Website for more information and details! Giveaway information and product information is at the bottom of my post.

    Today I am featuring the new Falling Leaves Die Set and the new By The Slice Die Set!! And, also featuring all that yummy felt in perfect Fall colors!! I used the By The Slice Die Set to make a little banner of pie slices! OMG this is soooooo fun! I’m definitely going to hang this up in my kitchen. I assembled the pie slices using the dies and then sewed them onto a strip of gingham ribbon. I can’t even stand it. Like seriously. 

    fall felt projects, felt crafting, felt plushies, felt pie garland, thanksgiving, felt leaves, felties, poshta design, handmade thanksgiving, felt pie slices, thanksgiving table ideas, fall, autumn, crafting, scrapbooking, wanda guess, a blog called wanda


    The way the dies are created, the long strip of top crust is longer than the pie, and as you stitch it up, matching the holes, it creates a ripple effect. Genius! I made a cherry pie slice with lattice work…. And I added some chunky glitter on top to look like sugar sprinkles! 

    fall felt projects, felt crafting, felt plushies, felt pie garland, thanksgiving, felt leaves, felties, poshta design, handmade thanksgiving, felt pie slices, thanksgiving table ideas, fall, autumn, crafting, scrapbooking, wanda guess, a blog called wanda


    LOVE. 

    fall felt projects, felt crafting, felt plushies, felt pie garland, thanksgiving, felt leaves, felties, poshta design, handmade thanksgiving, felt pie slices, thanksgiving table ideas, fall, autumn, crafting, scrapbooking, wanda guess, a blog called wanda


    Why am I hungry all of a sudden??  🙂

    fall felt projects, felt crafting, felt plushies, felt pie garland, thanksgiving, felt leaves, felties, poshta design, handmade thanksgiving, felt pie slices, thanksgiving table ideas, fall, autumn, crafting, scrapbooking, wanda guess, a blog called wanda


    Next up is my set of Falling Leaves…. I added a tiny bit of stuffing inside each one to make them just slightly puffy!! I added sequins and seed beads for sparkle and cuteness. And there is the sweetest little acorn too!

    fall felt projects, felt crafting, felt plushies, felt pie garland, thanksgiving, felt leaves, felties, poshta design, handmade thanksgiving, felt pie slices, thanksgiving table ideas, fall, autumn, crafting, scrapbooking, wanda guess, a blog called wanda


    A pretty oak leaf….just the right size!

    fall felt projects, felt crafting, felt plushies, felt pie garland, thanksgiving, felt leaves, felties, poshta design, handmade thanksgiving, felt pie slices, thanksgiving table ideas, fall, autumn, crafting, scrapbooking, wanda guess, a blog called wanda


    fall felt projects, felt crafting, felt plushies, felt pie garland, thanksgiving, felt leaves, felties, poshta design, handmade thanksgiving, felt pie slices, thanksgiving table ideas, fall, autumn, crafting, scrapbooking, wanda guess, a blog called wanda


    This photo makes me happy! I’m looking forward to making some more projects, and using them to decorate my home and give as gifts too! 

    fall felt projects, felt crafting, felt plushies, felt pie garland, thanksgiving, felt leaves, felties, poshta design, handmade thanksgiving, felt pie slices, thanksgiving table ideas, fall, autumn, crafting, scrapbooking, wanda guess, a blog called wanda

    Here are the descriptions of the products straight from Lizzie: 

    Falling Leaves Die
    The gentle beauty of changing leaves is one of the most glorious features of the Autumn season. Bring that beauty indoors with the Falling Leaves Die. This die includes four different leaf shapes and a two-piece acorn that you can use to create brightly colored home decor that won’t fade at the end of the season. These leaves are perfectly suited for garlands, wreaths, and anything else you can bring to life. Retails for $38
     
    By The Slice Banner Die
    Who doesn’t love pie? Apple, cherry, pumpkin, chocolate mousse? How about a sampler platter? With the By The Slice Banner Die you don’t have to pick just one. This die includes elements like a teardrop-shaped steam vent and lattice strips to make creating a whole smorgasboard of flavors as easy as…well…pie! The By The Slice Die pairs beautifully with a mini pom pom maker to create delightful “whipped cream” dollops. Retails for $25
     
    In addition to all of the dies we’ve featured this week, there will be three different (gorgeous) color sets of felt, sequins and beads embellishments, threads and more!
     
    GIVEAWAY INFORMATION: Poshta Design will be doing a giveaway on each introductory blog post for a $50 gift certificate to the website (for a total of 3 gift certificates). Posta Design will be choosing the winners from the blog comments on each introductory post and the winners will be announced at 9am on Friday 8/26 before the release goes live. Good Luck!

    It has been my pleasure to share all these fun felt designs with you! I hope you’re inspired to try some new crafts and join me in celebrating Autumn!! I’ll be back on the blog soon with something new!! XO

  • Introducing Poshta Design Autumn 2022 Felt Projects New Release – Day 2! Halloween!

    Hello everyone! Today is day two of the introductions for the Poshta Design new release! I was invited by Lizzie to help introduce the Poshta Design Autumn 2022 New Release!  As you know, Poshta Design makes the most beautiful felt kits! The new release is full of felt projects, dies, felt, embellishments and more for everything Autumn and Halloween. The new release will be available for purchase on Friday 8-26 at Noon EST! Head on over to the Poshta Design Website for more information and details! Giveaway information and product information is at the bottom of my post.

    Today’s projects are all about Halloween fun and festivities!! I have a cute jack-o-lantern, the adorable bat, and a spooky witch hat – all made from gorgeous felt!! I love Halloween and the whimsy of (especially vintage) Halloween icons… I was smiling the entire time I was making these felt creations to share with you!! Let’s look….

    First up is that smiling sweet jack-o-lantern! To make this, I used the same pumpkin die set that was from yesterday’s post – then I used the add-on die to make the jack face!! I layered black felt under the orange to make it pop. I used fresh green for the leaves and stem. I always like to add a little detail to my projects so I tied on a bit of twine and added a bauble. 

    felt ideas, felt projects, felt crafting, felt plush, felt halloween, halloween projects, halloween crafts, diy halloween, halloween party, felties, Poshta design, felt jack o lantern, felt witch hat, felt bat, wanda guess, a blog called wanda


    And here is my little witch hat creation! If you buy this die set, you will receive access to the video on how to assemble it (hint – it’s easy!)… I added sequins and beads to decorate the hat and chose orange as my accent color. I think I might attach it to a headband and wear it for Halloween! EEK! You could use these as party decorations or little favors….so many ideas!

    felt ideas, felt projects, felt crafting, felt plush, felt halloween, halloween projects, halloween crafts, diy halloween, halloween party, felties, Poshta design, felt jack o lantern, felt witch hat, felt bat, wanda guess, a blog called wanda


    And lastly, that FUUUUUNNNNN bat! Oh, gosh, isn’t he too much??!! With his little fangs and his widow’s peak?! Ha! The wings have pipe cleaners inside so they can mold and move!! See the small channel at the top of the wings? The pipe cleaner fits inside there while you’re sewing it together. I chose purple felt for him and it came out so cute. This die set also comes with a video for how to assemble.

    felt ideas, felt projects, felt crafting, felt plush, felt halloween, halloween projects, halloween crafts, diy halloween, halloween party, felties, Poshta design, felt jack o lantern, felt witch hat, felt bat, wanda guess, a blog called wanda


    And here is my trio of Halloween cuties!

    felt ideas, felt projects, felt crafting, felt plush, felt halloween, halloween projects, halloween crafts, diy halloween, halloween party, felties, Poshta design, felt jack o lantern, felt witch hat, felt bat, wanda guess, a blog called wanda


    felt ideas, felt projects, felt crafting, felt plush, felt halloween, halloween projects, halloween crafts, diy halloween, halloween party, felties, Poshta design, felt jack o lantern, felt witch hat, felt bat, wanda guess, a blog called wanda


    I used dark gray enamel dots for his eyes!! Hee hee. You stitch the smile and the fangs onto the front panel before putting the bat together. The holes for the smile, etc are in the die…. I used all six strands of embroidery floss for all my projects today. 

    felt ideas, felt projects, felt crafting, felt plush, felt halloween, halloween projects, halloween crafts, diy halloween, halloween party, felties, Poshta design, felt jack o lantern, felt witch hat, felt bat, wanda guess, a blog called wanda


    felt ideas, felt projects, felt crafting, felt plush, felt halloween, halloween projects, halloween crafts, diy halloween, halloween party, felties, Poshta design, felt jack o lantern, felt witch hat, felt bat, wanda guess, a blog called wanda


    This photo shows both ways to use the beautiful pumpkin die set!! Different colors and themes…love it!!


    felt ideas, felt projects, felt crafting, felt plush, felt halloween, halloween projects, halloween crafts, diy halloween, halloween party, felties, Poshta design, felt jack o lantern, felt witch hat, felt bat, wanda guess, a blog called wanda

    Here are the descriptions of the products straight from Lizzie: 

    Harvest Pumpkin: Jack-O-Lantern Details Die This jaunty Jack-O-Lantern Details Die coordinates with the Harvest Pumpkin die to transform your pumpkins from simple squash into cheerful harbingers of Halloween. The shaped base plate makes placement a snap, enabling you to create a whole legion of smiling pumpkins in no time at all. Please note: This die coordinates with the Harvest Pumpkin Die. This die does not cut the pumpkin shape, just the jack-o-lantern details. Retails for $24
     
    Friendly Flier Die
    If you prefer cute over creepy in your Halloween decor, this adorable little bat is ready to swing by to help you spruce up your space! His happy smile is sure to brighten your day and chase the ghoulies away. Make ornaments, wreaths, garlands and more to give your Fright Night decorations a softer, sweeter flair. 
    The Friendly Flier Die includes exclusive access to an assembly video (the access code will be included in the package). Retails for $20
     
    Witch’s Hat Die
    Nothing in a witch’s wardrobe is as iconic as the traditional conical hat. Our witch is a bit more fashion-forward though. She has included a hat band for adding a contrasting pop of color and an optional star detail for those days when a sorceress just wants to feel pretty. The Witch’s Hat Die includes exclusive access to an assembly video (the access code will be included in the package). Retails for $25

    GIVEAWAY INFORMATION: Poshta Design will be doing a giveaway on each introductory blog post for a $50 gift certificate to the website (for a total of 3 gift certificates). Posta Design will be choosing the winners from the blog comments on each introductory post and the winners will be announced at 9am on Friday 8/26 before the release goes live. Good Luck!

    CLICK HERE TO VISIT THE POSHTA DESIGN WEBSITE!

    Thank you for stopping by today! BOO! These Halloween projects are SO FUN! Tomorrow I will have two more projects to show you! And one of them is delicious! See you then! XO

  • Introducing Poshta Design Autumn 2022 Felt Projects New Release – Day 1! Harvest Pumpkin!

    Helllllooooooooo! It’s starting to feel like Autumn around here! I’m SO excited! I have something super fun and fabulous to share with you this week! I was invited by Lizzie to help introduce the Poshta Design Autumn 2022 New Release! I have been keeping this under wraps for a while and I’m really happy to be able to share this with you. As you know, Poshta Design makes the most beautiful felt kits! The new release is full of felt projects, dies, felt, embellishments and more for everything Autumn and Halloween. I made a LOT of projects and I’ll be sharing them over the next three days! Yay! The new release will be available for purchase on Friday 8-26 at Noon EST! Head on over to the Poshta Design Website for more information and details! Giveaway information and product information is at the bottom of my post.

    Today we are introducing the Harvest Pumpkin Die Set and the Harvest Pumpkin: Autumn Floral Details Die Set. These two die sets work together to make the most wonderful pumpkin for Thanksgiving or Fall decorating! I must say that it was really fun to create this pretty pumpkin. The dies are excellent quality and the felt cut like a dream…. 

    Felt Projects, Felt Plush projects, fun with felt, felt designs, Poshta Design, Fall Felt project, felt pumpkin, harvest, flowers, felt ideas for fall, autumn crafts, wanda guess, a blog called wanda


    As you can see, the pumpkin assembles in sections so it really looks like a pumpkin!! I used rusty orange felt for a harvest feeling. I added a small amount of batting inside just to make it a little puffy. I used all six stands of matching embroidery floss to put everything together. The flowers were made to look like sunflowers here, but you could really use any color!! I added seed beads to some of the pieces to add a bit of sparkle and dimension. I feel like these would be perfect place setting gifts for the Thanksgiving table!! Or string a few together for a banner, or placed in your tiered tray. 

    Felt Projects, Felt Plush projects, fun with felt, felt designs, Poshta Design, Fall Felt project, felt pumpkin, harvest, flowers, felt ideas for fall, autumn crafts, wanda guess, a blog called wanda


    And here is a photo of just some of the yummy felt colors that will be part of the new release!!

    Felt Projects, Felt Plush projects, fun with felt, felt designs, Poshta Design, Fall Felt project, felt pumpkin, harvest, flowers, felt ideas for fall, autumn crafts, wanda guess, a blog called wanda

    Here are the descriptions of the products straight from Lizzie: 

    Harvest Pumpkin
    Each Autumn we search fields and farmer’s market displays for the perfect pumpkin. Well, the search is over! This generously sized pumpkin gives you plenty of space to accent with leaves, flowers, monograms, or even patterned fabrics. This die also coordinates with the Harvest Pumpkin: Autumn Floral Details and Harvest Pumpkin: Jack-O-Lantern Details Dies for added seasonal versatility. Retails for $58.

    Harvest Pumpkin: Autumn Floral Details Die
    The Autumn Floral Details coordinates with the Harvest Pumpkin Die to add a seasonal flower arrangement to your charming felt pumpkins. Use the prearranged design for a spectacular bouquet or use the individual flowers for more subtle styling and endless embellishment options. This die coordinates with the Harvest Pumpkin Die. This die does not cut the pumpkin shape, just the floral details. Retails for $28

    GIVEAWAY INFORMATION: Poshta Design will be doing a giveaway on each introductory blog post for a $50 gift certificate to the website (for a total of 3 gift certificates). Posta Design will be choosing the winners from the blog comments on each introductory post and the winners will be announced at 9am on Friday 8/26 before the release goes live. Good Luck!

    CLICK HERE TO VISIT THE POSHTA DESIGN WEBSITE!

    Thank you so much for stopping by to visit today! Just wait until you see what else I have to show you the next two days! Yippeeeee! See you tomorrow! XO

  • French Flower Pot with Resin and Chalk Paints!

    Hi everybody! Hope your week is going great! I've been crafting night and day the past 2-3 days! I have so many projects and cards to make and share! Stay tuned! Today's project is something completely new and different for me! I made a resin/paint/wax project a couple weeks ago! My first one (except for the one I made in a class to learn how)! SO EXCITING! I have been a stamper and card maker for 28 years!!! Yikes! So I loooove making paper things of course. But I have been an overall crafty person since I was very small. I remember one time when I was around eight years old I made my own magazine. I still totally recall sitting on the floor gluing and pasting and writing articles. I used to do loom beading as a little girl too! And pretty much anything else. When I got to high school I discovered photography and that became my first artistic soulmate. I used to make cards from my self printed black and white photographs. Man how I miss being in a darkroom! Anyhoo I am doing the time machine rewind with you! All this is meant to say that it's time for me to explore again, and try some new things. Get the creativity flowing in new ways… Well, I have discovered resin and molds and chalk paints and transfers – oh my!! I'm having a lot of fun, and maybe I'll inspire you to try something new too!

    Today's project started out as the necessity for a nice gift for my friend Liz. I bought this GORGEOUS orchid at the nursery to give her as that gift. But, me being me, I wanted to make her something… The idea came to me to 'make' her a pot for the orchid. The pot that the orchid came with was a plain white ceramic pot. I changed it into a faux stone French Fleur-de-lis pot! Let's look – lots of pictures ahead.

    iron orchid designs, iron orchid molds, iron orchid designs ideas, orchid pot, iron orchid fleur de lis mold, resin casting, resin in iron orchid molds, annie sloan chalk paints, decorate a flower pot, gift ideas, annie sloan black wax, clear wax, annie sloan paris gray, ideas for resin, wanda guess, a blog called wanda

    This was literally the most perfect orchid I have ever seen! Pristine and beautiful! 


    1


    And here is the white pot that it came with….

    iron orchid designs, iron orchid molds, iron orchid designs ideas, orchid pot, iron orchid fleur de lis mold, resin casting, resin in iron orchid molds, annie sloan chalk paints, decorate a flower pot, gift ideas, annie sloan black wax, clear wax, annie sloan paris gray, ideas for resin, wanda guess, a blog called wanda
    iron orchid designs, iron orchid molds, iron orchid designs ideas, orchid pot, iron orchid fleur de lis mold, resin casting, resin in iron orchid molds, annie sloan chalk paints, decorate a flower pot, gift ideas, annie sloan black wax, clear wax, annie sloan paris gray, ideas for resin, wanda guess, a blog called wanda


    So now the fun part!!!! Look at all these fun supplies!!!

    iron orchid designs, iron orchid molds, iron orchid designs ideas, orchid pot, iron orchid fleur de lis mold, resin casting, resin in iron orchid molds, annie sloan chalk paints, decorate a flower pot, gift ideas, annie sloan black wax, clear wax, annie sloan paris gray, ideas for resin, wanda guess, a blog called wanda


    I decided to use that big chunky Fleur-de-lis mold!!!! It was the perfect size and scale for the pot.

    iron orchid designs, iron orchid molds, iron orchid designs ideas, orchid pot, iron orchid fleur de lis mold, resin casting, resin in iron orchid molds, annie sloan chalk paints, decorate a flower pot, gift ideas, annie sloan black wax, clear wax, annie sloan paris gray, ideas for resin, wanda guess, a blog called wanda


    The resin is a two part mixture. You mix equal parts of two different liquids and still it well… It pours into the mold totally clear, and then over a period of about ten minutes it turns white! It's realllllll fun to watch this happen. It takes around 10 minutes is all.

    iron orchid designs, iron orchid molds, iron orchid designs ideas, orchid pot, iron orchid fleur de lis mold, resin casting, resin in iron orchid molds, annie sloan chalk paints, decorate a flower pot, gift ideas, annie sloan black wax, clear wax, annie sloan paris gray, ideas for resin, wanda guess, a blog called wanda


    Here it is ready to pop out of the mold! At this point, it is still malleable so you can curve it or make it form to something else. But you only have a little bit of time before it hardens. 

    iron orchid designs, iron orchid molds, iron orchid designs ideas, orchid pot, iron orchid fleur de lis mold, resin casting, resin in iron orchid molds, annie sloan chalk paints, decorate a flower pot, gift ideas, annie sloan black wax, clear wax, annie sloan paris gray, ideas for resin, wanda guess, a blog called wanda


    I used Lock Tite Glue to affix the Fleur-de-lis to the pot. It has a gentle curve to it so I taped it while the glue dried. This is how it looked before any paint, etc. 

    iron orchid designs, iron orchid molds, iron orchid designs ideas, orchid pot, iron orchid fleur de lis mold, resin casting, resin in iron orchid molds, annie sloan chalk paints, decorate a flower pot, gift ideas, annie sloan black wax, clear wax, annie sloan paris gray, ideas for resin, wanda guess, a blog called wanda

    I used Annie Sloan Chalk Paint to paint the pot. I used three coats and let it dry in between each coat. I was surprised how nicely the paint 'took' to the ceramic.


    iron orchid designs, iron orchid molds, iron orchid designs ideas, orchid pot, iron orchid fleur de lis mold, resin casting, resin in iron orchid molds, annie sloan chalk paints, decorate a flower pot, gift ideas, annie sloan black wax, clear wax, annie sloan paris gray, ideas for resin, wanda guess, a blog called wanda


    iron orchid designs, iron orchid molds, iron orchid designs ideas, orchid pot, iron orchid fleur de lis mold, resin casting, resin in iron orchid molds, annie sloan chalk paints, decorate a flower pot, gift ideas, annie sloan black wax, clear wax, annie sloan paris gray, ideas for resin, wanda guess, a blog called wanda


    Here are the supplies and colors I used to make this project…

    iron orchid designs, iron orchid molds, iron orchid designs ideas, orchid pot, iron orchid fleur de lis mold, resin casting, resin in iron orchid molds, annie sloan chalk paints, decorate a flower pot, gift ideas, annie sloan black wax, clear wax, annie sloan paris gray, ideas for resin, wanda guess, a blog called wanda


    I painted the pot with gray and green paints and then splattered on white and black spatters to make it look like stone. Then I put on two coats of clear wax over the paint.

    iron orchid designs, iron orchid molds, iron orchid designs ideas, orchid pot, iron orchid fleur de lis mold, resin casting, resin in iron orchid molds, annie sloan chalk paints, decorate a flower pot, gift ideas, annie sloan black wax, clear wax, annie sloan paris gray, ideas for resin, wanda guess, a blog called wanda


    iron orchid designs, iron orchid molds, iron orchid designs ideas, orchid pot, iron orchid fleur de lis mold, resin casting, resin in iron orchid molds, annie sloan chalk paints, decorate a flower pot, gift ideas, annie sloan black wax, clear wax, annie sloan paris gray, ideas for resin, wanda guess, a blog called wanda


    The final step after everything is completely dry, is to put on black wax!! I rubbed it with a stipple brush and a q-tip into the crevices and joints…. Looks so cool!!

    iron orchid designs, iron orchid molds, iron orchid designs ideas, orchid pot, iron orchid fleur de lis mold, resin casting, resin in iron orchid molds, annie sloan chalk paints, decorate a flower pot, gift ideas, annie sloan black wax, clear wax, annie sloan paris gray, ideas for resin, wanda guess, a blog called wanda


    iron orchid designs, iron orchid molds, iron orchid designs ideas, orchid pot, iron orchid fleur de lis mold, resin casting, resin in iron orchid molds, annie sloan chalk paints, decorate a flower pot, gift ideas, annie sloan black wax, clear wax, annie sloan paris gray, ideas for resin, wanda guess, a blog called wanda


    It's amazing what a difference the finishing touches make… This is the pot with only paint on it….

    iron orchid designs, iron orchid molds, iron orchid designs ideas, orchid pot, iron orchid fleur de lis mold, resin casting, resin in iron orchid molds, annie sloan chalk paints, decorate a flower pot, gift ideas, annie sloan black wax, clear wax, annie sloan paris gray, ideas for resin, wanda guess, a blog called wanda


    And this is the pot after splatters, clear wax and black wax, and just a touch of gold too!!

    iron orchid designs, iron orchid molds, iron orchid designs ideas, orchid pot, iron orchid fleur de lis mold, resin casting, resin in iron orchid molds, annie sloan chalk paints, decorate a flower pot, gift ideas, annie sloan black wax, clear wax, annie sloan paris gray, ideas for resin, wanda guess, a blog called wanda


    iron orchid designs, iron orchid molds, iron orchid designs ideas, orchid pot, iron orchid fleur de lis mold, resin casting, resin in iron orchid molds, annie sloan chalk paints, decorate a flower pot, gift ideas, annie sloan black wax, clear wax, annie sloan paris gray, ideas for resin, wanda guess, a blog called wanda

    That's it for me today, friends! Hope you enjoyed something a little different from me! It was such a cool project to make and I'm very happy with how it came out. Now I want to make all the molds and paint all the things. I just need more time!! What have you discovered lately? Do you have a new crafty hobby you're loving? I want to hear – leave me a comment! I'll be back soon with some paper projects. Until then, take care and keep on creating! XOXO


  • Good Friday 2022 – Cross Project!

    Hi everyone! Happy GOOD Friday! Easter weekend is here, can you believe it? The year is whizzing on by so fast! It will be Summer in a minute. I love Easter and I'm excited for all the activities and moments this weekend will bring. I have one final Easter project to share with you before the holiday comes and goes. I made this pretty cross to put in our bedroom. I used my favorite color and some pretty flower transfers. It was a quick and easy project and I love how it came out! 

    I started with a wooden cross from the craft store. I painted it (three coats) with Fusion Mineral Paint in the color Azure. The transfers are the Brocante pack from Iron Orchid Designs. I also used my favorite gold paint for the splatters. Just a few supplies and about two hours. I love projects like this!! 

    iron orchid designs, iron orchid transfers, fusion mineral paint, cross, diy cross for easter, easter crafting, iron orchid flowers, iron orchid brocante, crafting


    These transfers are SO incredibly pretty!!! 

    iron orchid designs, iron orchid transfers, fusion mineral paint, cross, diy cross for easter, easter crafting, iron orchid flowers, iron orchid brocante, crafting


    I wrapped the transfer all the way around to the back of the cross, so it looks pretty from every angle.

    iron orchid designs, iron orchid transfers, fusion mineral paint, cross, diy cross for easter, easter crafting, iron orchid flowers, iron orchid brocante, crafting


    I layered flowers, and butterflies, and some text too. In this pic you can see my gold splatters shimmering in the light.

    iron orchid designs, iron orchid transfers, fusion mineral paint, cross, diy cross for easter, easter crafting, iron orchid flowers, iron orchid brocante, crafting


    iron orchid designs, iron orchid transfers, fusion mineral paint, cross, diy cross for easter, easter crafting, iron orchid flowers, iron orchid brocante, crafting


    This paint goes on like a dream! I like using a sponge/foam brush instead of bristles – just my preference.

    iron orchid designs, iron orchid transfers, fusion mineral paint, cross, diy cross for easter, easter crafting, iron orchid flowers, iron orchid brocante, crafting


    iron orchid designs, iron orchid transfers, fusion mineral paint, cross, diy cross for easter, easter crafting, iron orchid flowers, iron orchid brocante, crafting


    iron orchid designs, iron orchid transfers, fusion mineral paint, cross, diy cross for easter, easter crafting, iron orchid flowers, iron orchid brocante, crafting

    That's it for today's project! I am sending out lots of love your way and best wishes for a beautiful Easter weekend! He is Risen!! XOXO


  • Fun Bobble Hat Yarn Gnomes!!

    Hi there crafty friends!! It’s been raining here in Sacramento and I’ve been nesting and crafting. Oh, and decorating and eating Christmas treats too! LOL. My husband has gone Clark Griswold on me and full on decorated the front of our house and our yard…and the garage! You can probably see our house from space right now! The neighborhood kids love it and it’s bringing cheer to our little street and that’s all good. I haven’t really been stamping a lot lately. But I’ve been stitching and cooking and making yarn stuffs. Kind of trying to check off some crafty things from my long list. When it’s raining I love being in the craft room with Lucky in his bed, just working away. 

    I have a fun project to share with you today! These little bobble hat gnomes have been popping up a lot in my Instagram feed so of course I wanted to make some. This would be a fun group project or a family/kids project. Few supplies are needed and they were easy and joyful. I’m going to use mine to tie onto gift packages or boxes. They would also make cute ornaments or something to tie on the top of a bottle of wine for Christmas. I saw one person made them into a garland!!

    yarn, yarn gnome, gnomes, make it yourself, diy, christmas gnomes, kids crafts, bobble hats, handmade crafts for families, pom pom maker, pom pom projects, a blog called wanda


    These are my sweet little gnomies!!! I made one with a white ‘beard’ and one with a grey ‘beard!’ You could make these any color for any occasion. Aren’t they sweet??

    yarn, yarn gnome, gnomes, make it yourself, diy, christmas gnomes, kids crafts, bobble hats, handmade crafts for families, pom pom maker, pom pom projects, a blog called wanda


    Here’s the blue one in my hand so you can see how big they are….


    yarn, yarn gnome, gnomes, make it yourself, diy, christmas gnomes, kids crafts, bobble hats, handmade crafts for families, pom pom maker, pom pom projects, a blog called wanda


    Here are my supplies and my supervisor. Everything came from Hobby Lobby or Michaels. The rims for the hats are cut from a toilet paper tube!!

    4


    You start by making the bobble hat first. Cut a strip from the toilet paper tube. Next, cut several strips of yarn and wrap them around the tube until it’s all the way filled up. Maybe 35 strips?? 

    4


    4


    Here’s the tube all filled with yarn strips. To make the hat, simply pull all the strings through the middle and out the other side.

    4


    Tie the strings together with another piece of yarn – tightly. Then put in some batting or a couple of cotton balls to fill in the hat form. VOILA! A sweet little hat!! Trim the top of the strings into a tiny hat pom pom. Adorbs. To make the ‘beard’ for your gnome, make a pom pom from white or gray yarn. I used the yellow size pom pom maker. 

    4


    I painted his nose with a bit of craft paint. The wood bead is 10mm size. The last step is to use your hot glue gun to glue the hat onto the pom pom and then glue the nose on!! I decided to also add a jingle bell to the top of the hat for a bit of bling!!

    4


    Sweet gnomies!!

    yarn, yarn gnome, gnomes, make it yourself, diy, christmas gnomes, kids crafts, bobble hats, handmade crafts for families, pom pom maker, pom pom projects, a blog called wanda


    yarn, yarn gnome, gnomes, make it yourself, diy, christmas gnomes, kids crafts, bobble hats, handmade crafts for families, pom pom maker, pom pom projects, a blog called wanda

    That’s it for today’s project! I hope you liked something a bit different than a card, or paper!! Cheers to Christmas crafting! Leave me a comment and tell me what you’re working on right now! Hope you are having a blessed and happy week. XOXO