BOO TO YOU! Hello my friends! I am SO EXCITED to share some projects I made with the new Pretty Pink Posh Halloween 2025 release! You know I love this release every year, and I can’t wait to see what Paulina comes up with for us to craft! This year was as good as ever! Everything is cute and spooky (but not too spooky) and FUN. I made two projects so far, and I hope to make lots more. I hope you are doing well this week, as we are getting ready to transition into Autumn. We’ve had amazing weather here in Northern California, and I can feel the light changing which makes me super happy. My new job is going great and I’ve almost been there five months! I do miss crafting every day, but this job is a blessing for sure! So, I’ll craft and blog when I can, and enjoy sharing with you. XO
First up is this adorable treat box, well, because we know how much I love a treat box! Especially for Halloween! I used the brand new Cat Holder Dies and some old PPP favorites too. Traditional colors or black and orange, with a pop of lime green! Oh, and a sparkly spider web just because. I made a festive flag to tuck into my treat box, which I think makes the whole thing more fun. Googly eyes on a spider? Check! Candy? Check! A cross eyed kitty cat? Check!
Next up today is a cool Halloween card! This card features the brand new Fringe Pumpkin Dies and the brand new Trick or Treat Shadow Dies…. And those ghosties that I adore! My finished card is an A2 white card base, layered with stripes and then an eyelet rectangle. The pumpkin is the star of the show, and I incorporated some gold sparkly bits… Who said candy?!
Hi there sweet and crafty friends! It’s Wanda here, and today I’m on The Greetery Blog! And sharing here too of course! hope everything is going great in your corner of the world. We are enjoying the hot lazy days of late Summer here in Northern California. Ready for Autumn (always!). To share with you today, I made a fun gardening gloves card in shades of warm yellows and browns. This is peak gardening season so I thought this card was appropriate! This time of year I think of sunflowers and that was my inspiration…. You grow, girl!
My finished card is a white A2 card base, layered with brown gingham and more white cardstock. I used the Garden Gear Gloves stencils and dies to create the pretty gardening gloves. I used pale yellow cardstock for the gloves. I used stenciling colors to mimic sunflowers and greenery. The accents are made from kraft cardstock. These are so much fun to stencil – the color possibilities are endless!
I stamped the sentiment from the Way to Grow stamp set in brown ink onto a Pretext Banner Die. The background white layer was die cut from the Patchwork Background Die. I wrapped some twine around my layers before gluing them down. I also added a few yellow enamel hearts.
That’s it for my project for today. Wishing you a wonderful late Summer…. I hope you have a lovely and creative day. It’s always my pleasure to share with you, and I look forward to sharing with you again soon. I have LOTS to share in the next few weeks! Since I’m back to working full time, I’m sometimes behind in blogging, but you can always see all my cards in real time over on Instagram!! Keep on crafting!! XO Wanda
Helloooooo my friends! Happy weekend! Don’t be crabby, be crab-ulous! Hee hee. I’m here today to share a silly, cute, fun card with a coastal theme! As soon as I saw the Summer release from Waffle Flower I RAN to my computer to order some things! I love anything with an ocean vibe and these new items are perfection! This card was so much fun to make – I was smiling the entire time. And, for some reason, the Gilligan’s Island theme song was in my head. LOLZ! So in lieu of a trip to the ocean, this card will have to suffice!
My card features all new items from Waffle Flower – Anchor, Crabs, Coastal Postage… and more. My finished card is an A2 white card base with a horizontal axis. I layered teal gingham and then a white panel to feature my elements. I gently inked the top of the white panel in yellow ink to look like a bright Summer sky.
Here’s a side view to see all my layers and design elements…. I started by die cutting out those CUTE crabs! They were very easy to put together. The die set comes with a small one and a large one. Next I die cut the anchor from matte silver cardstock. I stenciled just the lighthouse postage stamp from the new set, and die cut it out with the matching die.
Isn’t that the sweetest little lighthouse postage??
That’s it for today’s card! Don’t worry, be crabby! So many puns, so little time. Wishing you a happy and great weekend!! Thanks for stopping by to visit my blog. Take care, everyone! XOXO
Hi friends! Hope you’re having an awesome week so far! Today is a GIANT Instagram Hop to celebrate the new release from Pinkfresh Studio… And I am lucky enough to be included in the fun hop festivities! CLICK HERE to see the hop, and leave a comment to win some prizes! The new release is, well, FRESH! Fresh, and pretty, and Summery…. Love it all!
My card for the new release and Hop features the brand new Coastal Paradise product suite of stamps, dies, and stencils. It all coordinates so beautifully, like only Pinkfresh can do…. I chose a color palette from my memories of time in Key West, Florida – those bright yellows, pinks, and aqua… This is Summer on a card for sure!
My finished card is a white A2 card base, layered in aqua summer stripes, and then a white stitched layer. I started by stamping all the pieces in rich black ink onto white cardstock. I used my Pinkfresh Studio ink cubes and small blending brushes to stencil all the colors onto the houses, trees, and umbrellas…. Then I die cut out everything with the perfectly matching dies. I stenciled the sunburst at the top of my panel right behind where I was going to put the houses.
This sentiment is absolutely PERFECT! I love the saying, the font, the size…everything! I stamped and die cut the sentiment out with the matching die…
Doesn’t this just remind you of sunny Florida?! I added white gel pen accents and tiny bits of Stickles to the elements for just another bit of detail.
Thanks for stopping by today! Sending you sunshine! I will see you soon! Until I do, happy crafting! XOXO
Hi there sweet and crafty friends! It’s Wanda here! Today is my turn on The Greetery Blog! (And of course here too!) Hope you’re having a wonderful Summer and enjoyed a fun 4th of July holiday! We had such a nice long holiday weekend. Lots of time at home, great church, fireworks, hamburgers… It was all good. And, now the year is half over!!
To share with you today, I made a sweet Summer tea party card! I used a fresh color palette that inspired me from an Instagram post with some cool graphic art. I am always inspired by color palettes! These happy teacups are perfect for a “just because” card. I love the blues together with that pop of orange and stripes for good measure.
My finished card is a cream A2 card base, layered with blue and white stripes, then a cream layer to feature the teacups. I used the Sips Tea Dies set to die cut three teacups. I gently inked the edges of the cups with darker blue ink. I also splattered on some white paint. I used the Lemon Blossom Die set to die cut two oranges and two leaf clusters. I inked and splattered those too. On the cream panel I used just a small portion of the Flourished Phrases Merry Stencil to add a little flourish to that top left corner. I used the small flowers from the Sweetest Corners Stamp Set to add flowers to two of the cups. Be sure to look at your stamp and supplies in new ways!!
The sentiment was stamped in black ink onto cream cardstock. I used the Sign Off Sentiments stamps and matching dies for the sentiment. I stacked the teacups and affixed them to the card with foam tape. Then I tucked in those little sweet oranges under the stack. (My favorite tea is the Good Earth Sweet and Spicy tea which has orange on the package!) What is your favorite tea? A few tiny orange hearts complete my card.
That’s it for my project for today. Wishing you a delightful rest of your Summer. I hope you have a lovely and creative day. It’s always my pleasure to share with you, and I look forward to sharing with you again soon. In the meantime, stay cool and keep on crafting!! XO Wanda
Hi there creative and crafty friends! It’s June and it’s Summer! In fact, TODAY is the first official day of Summer! It’s my turn today on The Greetery Blog too! What is the best thing about Summer? It might be ice cream! For today I made a fun and sweet ice cream cone card in pink and white, with some cute little strawberries too! This card might inspire me to go sit outside and enjoy the beautiful weather, and a cone! Strawberry of course!
My finished card is a white A2 card base, layered with stripes, vellum and a pretty scallop. My card features the What’s the Scoop Stamp Set and the Honeycomb Ice Cream dies. They work perfectly together. I started by die cutting out all my pieces to make the cone and the strawberries. I used a color palette of brown and pink, which I have always liked!! Seems kind of vintage too… I put the strawberries together and also the ice cream cone. I used Distress Inks to gently shade each of the pieces.
I stamped the sentiment in brown and pink to match my cone. I used the Curio Confections Dies to make the circles for the sentiment. I added little heart embellishments and some chunky glitter. You could make this card in any color combination and I think it’s perfect for a birthday card!
That’s it for my project for today. Wishing you good times and lots of ice cream too. I hope you have a wonderful and creative day. It’s my pleasure to share with you, and I look forward to sharing with you again soon. In the meantime, happy crafting! Happy Summer!
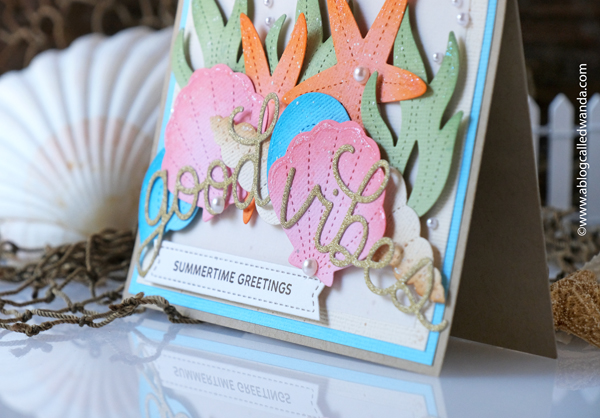
Hey Hi Hello! I’m back today with another card I made with the awesome Summer 2025 new release from our friends at Pretty Pink Posh! This is such a good release – one of my favs of all time! All the things we love for Summer! Today I made a seashell card to send you lots of good vibes as we head into the heart of the season. Oh, how I yearn for a trip to the beach! Hope you’re having a great week. This card today is also part of a bit multi-day Instagram Hop, so if you have Instagram, be sure to head over and enjoy the hop and enter to win some prizes! XO
Today’s card is an A2 horizontal kraft card base. I layered soft blue, cream, and vellum to serve as the background for my bounty of seashells… This card features the brand new Stitched Seashells and the brand new Stitched Coral Dies. They are marvelous! The perfect scale, all the right shapes, stitched details. What’s not to love? I busted out all kinds of pastel colors to make my shells and coral. I used Distress Inks in matching colors to gently ink around the edges of all the pieces. I added paint splatters and a bit of glitter also… Finally, lots of pretty pearls from the sea… The sentiments are also new – good vibes, and summertime greetings! Love.
Hi there my dear crafty friends! Hope you’re having an awesome week! This week is FLYING by! Today the hubs and I celebrated 32 years together!! He sent me a giant bouquet of roses at the office today, and it was soooo nice! We’re going to go out for a nice dinner this weekend to celebrate some more! Yay us! It’s quite an accomplishment to stay together this long, and I’m totally proud of us! It’s been a good week, really busy at work, and some fun creative things too. Oh, and our first set of 100 degree days…
Today is release day for the awesome new Summer 2025 release from Pretty Pink Posh! It’s one of my favorite stamp/die releases EVER. Yeah, it’s that good. The seashells dies are going to stay in my collection forever! (I’ll be sharing a card next week using them)! The release is sure to satisfy your summer crafting cravings….
My clean and simple card today features the brand new Beach Fun stamps and dies and the brand new Waves Dies… I love the simple lines, and I added tons of color using my Copic Markers. My finished card is a white A2 card base layered with Summer stripes paper and then my beach images. I ink blended the waves and the sand using Distress inks… I added some white gel pen accents and just a few gems to finish my warm sunny scene….
Happy Summer my friends! Happy crafting with the new release!!
It was my pleasure to introduce the brand new Star Spangled Summer Collection to you this week! And, I hope you love it as much as I do!! Happy Crafting!! If you scroll back to my last blog post you can see all my projects from the new release! If you have any questions – reach out!! Thanks for all the love and kind comments! Happy Creating! Can’t wait to see what YOU make! Happy Summer!
Hi crafty and creative Greetery loving friends! I hope this week is treating you good so far!! Happy almost Summer! I hope you had a great Memorial Day weekend. The temps are heating up here and (can you believe it) it’s almost June! And that means it’s time for Summer crafting! Yeah!
I’ve been at my new job a couple of months now and it’s so good to not be new anymore. I think I actually had one day where it felt like I knew what I was doing! Haha. So grateful for the opportunities that await me! I read this quote recently and it is so true: “Walk in like God opened that door for you, because He did. Stop second guessing yourself. No more insecurity or doubt. You’re not here by accident. You’re on assignment. You don’t need every answer. You just need obedience, courage, and the reminder that God has been equipping you for this moment your whole life. Everything can change with one act of faithfulness. All it takes is one person, one meeting, one conversation, or one opportunity to shift everything in your life. You’re not walking alone – God is with you.”
Today is VERY VERY exciting because it’s the reveal and showcase day for the new Summer 2025 Greetery release! OHHHHH YEAAAAAHHHHH! The new release is called the Star Spangled Summer Collection! There are stamps, and dies and stencils with a celebration and patriotic theme. Festive, Fun, classy, creative AND pretty! The new items are definitely filled with stars and patriotic themes, but most of the new goodies can be used for birthdays and graduations too. Really versatile!! The design team (and some awesome guests) will be sharing ALL of our projects today, and showing you all the new products. Just one day of features – then the new release will go live TOMORROW at 10am EST! So get ready to shop tomorrow!
I have three projects (and one little extra) to share today – can’t wait to show you! All the prize information, details, and design team links are at the bottom of my post. Party in the USA!
My first card for today features the AWESOME brand new Wave the Flag Dies along with the new Land of Liberty stamp set! I made a vintage inspired card by using cream, navy and deep red colors along with pops of rich gold! My finished card is a horizontal A2 cream card base. I started by die cutting the flag pieces in red and navy. I used embossing ink to smudge along the outer edges of the blue portions and then used gold embossing powder to give that gold effect on the edges. I stamped that gorgeous sentiment in gold embossing onto a vellum circle. I used Distress Ink to ink around the edges of my card and to splatter onto the card (for that old antique look!)…. I used stars and numbers die cut from gold glitter cardstock to complete my uber patriotic card, perfect for the 4th of July!!
My next card features the brand new Star Stream Suite of products – there are stamps, dies, stencils, foiling, and embossing folder! Whew! It’s VERY cool. I used the stencils and dies to create this super colorful and cheerful card. I intend my card for a graduation card! Reach for the stars! My finished card is an A2 cream card base, layered with the die cut panel that I stenciled. I used vellum again for my sentiment, and bright gold stars all around. I stenciled in red, navy and gold….and accented again with gold splatters and gold stars. (I’m pretty sure I had a pair of pants like this back in the 70’s! hahahah) I can imagine this in a whole bunch of colors! The sentiment is from the brand new Star Stream stamp set! Isn’t this unique and fabulous??
My third card today features the brand new Grand Finale dies along with the brand new Land of Liberty Stamp set (you’re gonna want this stamp set for sure!)… I used traditional colors of red, white and blue…. Then added pops of silver and glitter glue too. It’s bright! My finished care is a white A2 card base layered with red cardstock. Then I put down silver glitter cardstock – to show through the die cut fireworks. I die cut out the panel and also the fireworks and pinwheels. I used blue ink to stencil on the fireworks. Added my sentiment in blue and added a few gems and pearls. This die that cuts the large scene is so super detailed. Overall, it’s a party on a card!
I made one final project since I was in the 4th of July mood! I used the new Land of Liberty stamp set and made a little fun badge for the holiday. I used the Award Winning Dies set to make my badge…. I love how this came out!
That’s it for today – and for the reveals of this awesome new Star Spangled Summer release! Ready for ALL the patriotic celebrations! Thanks for stopping by to share with me today! It’s my pleasure to introduce the new release. Enjoy and happy crafting! XOXO
Giveaway Information: The Greetery is giving away TWO $50 gift certificates, the comment deadline is 5/30 at 7:00am EST (comments from team blogs entered into giveaway). Winners announced on The Greetery blog on Friday, 5/30 at 9:00am EST (an hour before the new products go live) GOOD LUCK!!


